 Microsoft Azure
 Cloud Financial Management (FinOps)
 How to Operationalize FinOps
Want to run Elasticsearch on Kubernetes? This guide will show you how.
Kubernetes is an open-source system developed for automating deployment, scaling, and management of containerized applications. It can handle outages and demand peaks by allowing its users to run multiple replicas of a single application while providing built-in scaling, health checks, and auto-healing mechanisms.
Briefly, Kubernetes works by having a description file that specifies how a container must work, the memory and CPU constraint of each container, how many replicas it should keep online, and what policy it should take to increase or decrease the number of instances. K8s also provides a mechanism (AKA deployment controller) to deploy new versions of the application while maintaining availability.
If you need a quick primer on Kubernetes and how it works with stateful applications, jump to our Kubernetes primer.
- Elasticsearch on Kubernetes: Proposed Architecture
- Elasticsearch Deployment
- Quick Kubernetes Primer: Running Stateful Applications on Kubernetes
- Bottom Line – Stateful Applications Can Work Well With Kubernetes
Elasticsearch on Kubernetes: Proposed Architecture
Distributed by design, Elasticsearch provides different ways to store data through replication while offering reliability and scalability.
Elasticsearch has different moving parts that must be deployed to work reliably. The following diagram shows our proposed architecture for deploying Elasticsearch on Kubernetes.
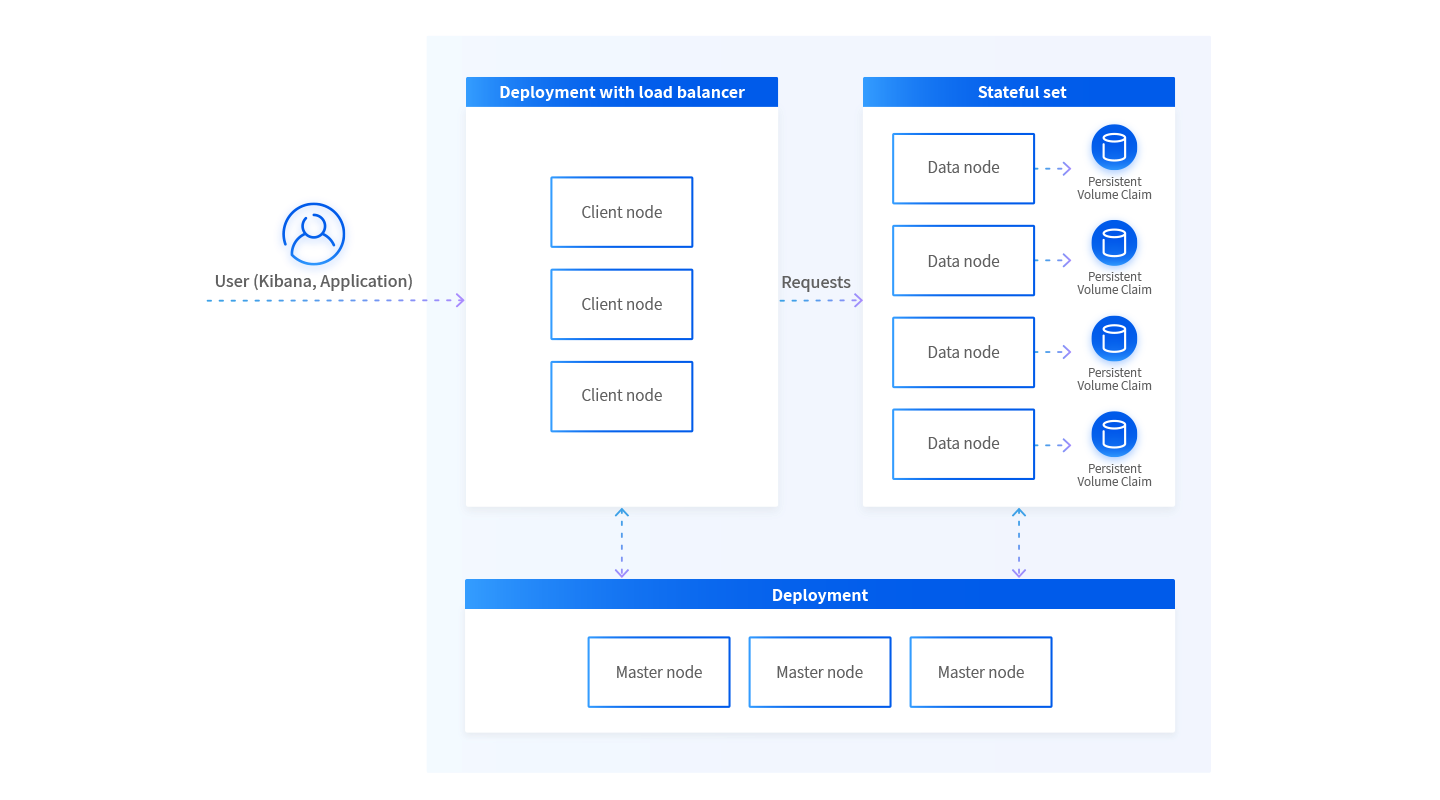
The proposed architecture features three main components which can be combined. But due to the ease of deployment with Kubernetes components, it is recommended to separate each into different computing units.
- Client nodes are deployed as single deployments with Horizontal Autoscaler (if available). These nodes act as a reverse proxy to the entire cluster and may need to increase or decrease the number of nodes dynamic by request. Client nodes query master nodes to discover how data is distributed between each data node. Queries go to multiple data nodes and are consolidated in the requested client.
- Master nodes are also published as deployments but can have a fixed number of instances: ideally three for high availability. Kubernetes will make sure there are always three instances running on different machines. A Kubernetes headless service will be deployed for autodiscovery. Master nodes hold meta-information about data nodes, such as location, sharding, and data replication.
- Data nodes are where things get interesting. Deployed as StatefulSets, each instance has a Persistent Volume claim. If an instance goes down, Kubernetes ensures the recovered instance will be attached to the correct claim. Data nodes split the indices into shards and also replicate information between nodes, so that in cases of node data loss or node outage this doesn’t provoke a cluster data loss.
In addition, there is extensive documentation on Elasticsearch topology and how to deploy an optimal Elasticsearch cluster for your needs. What’s important is to understand what type of nodes must be stateful deployed.
Deploying Elasticsearch on Kubernetes: Step By Step
This section details how to easily deploy Elasticsearch on Kubernetes and check everything you’ve learned so far.
Prerequisites
Hardware requirements
The examples should work on any updated Kubernetes instance. The initial setup started with three nodes with, at least, 4 GB of RAM. Please follow your cloud provider’s instructions on how to enable Kubectl to your cluster (Google Cloud, Microsoft Azure, Amazon AWS, Digital Ocean,).
Kubernetes Dashboard
To better understand the next steps, you can use the K8s Dashboard, which displays the information provided by the command line and turns it into an easy-to-understand graphical web interface. Follow these steps:
- Run the command to install the dashboard:
- Proxy the connection
kubectl apply -f https://raw.githubusercontent.com/kubernetes/dashboard/v2.0.0-beta8/aio/deploy/recommended.yamAccess the address: - Access the address:
https://localhost:8001/api/v1/namespaces/kubernetes-dashboard/services/https:kubernetes-dashboard:/proxy/ on your browser. Use the token of the _Kubeconfig_ file provided by the cloud provider.
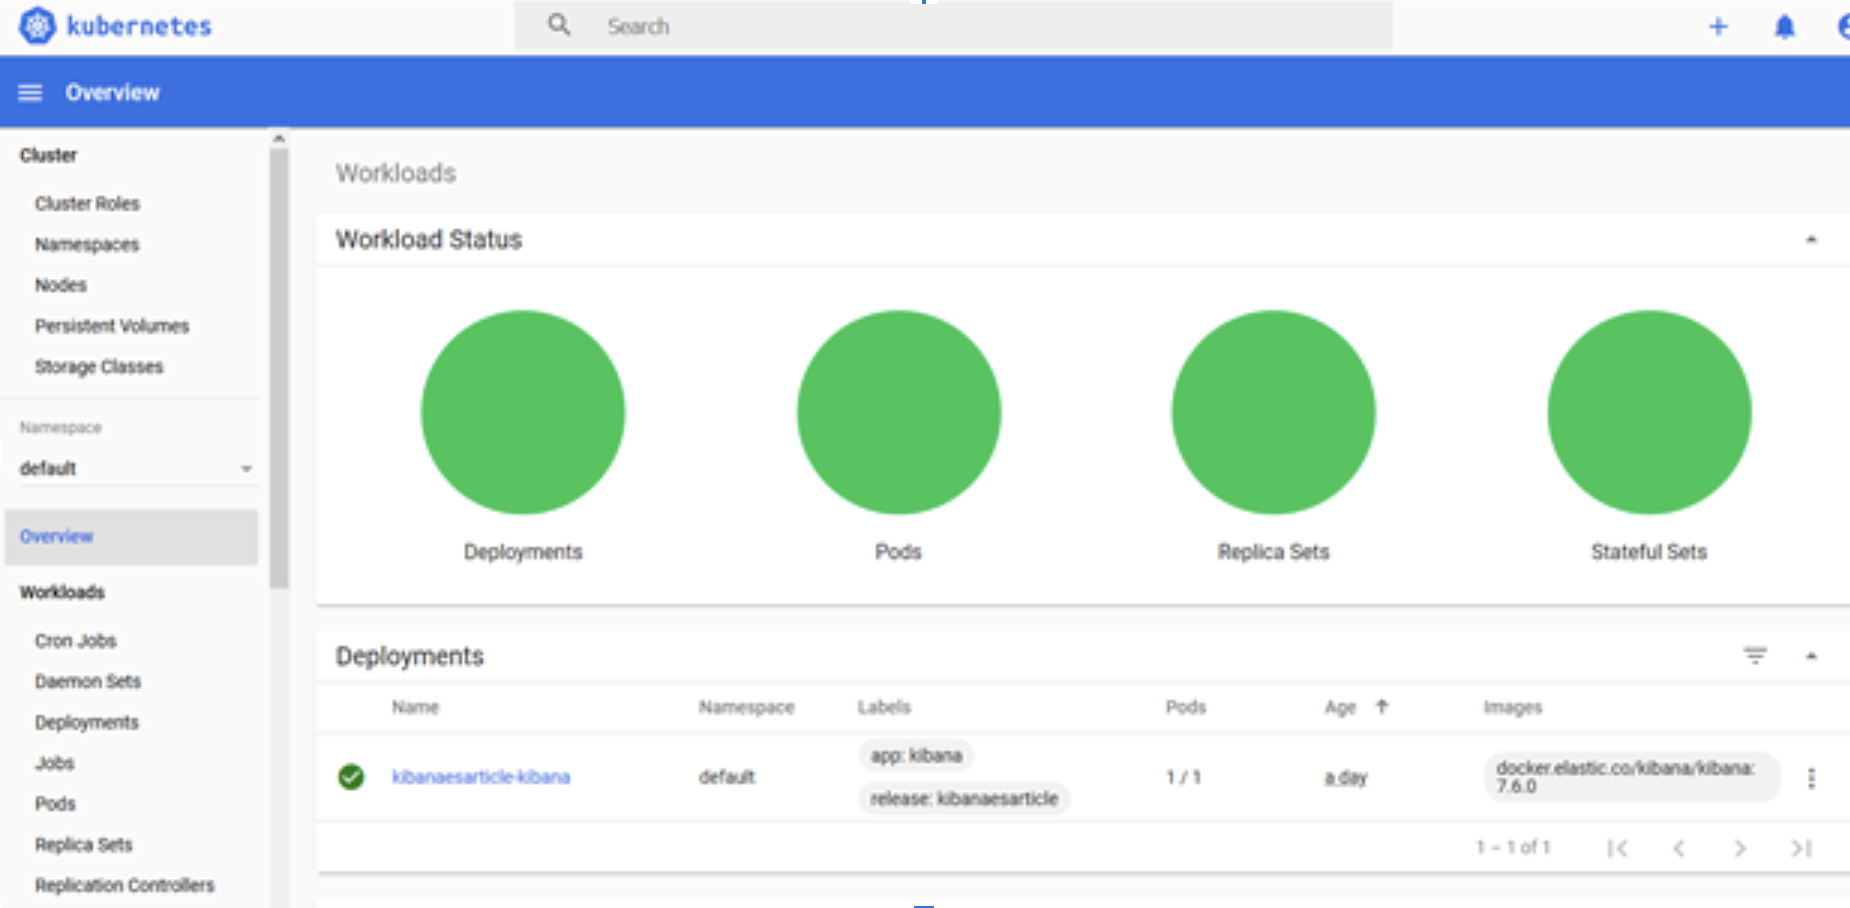
The Kubernetes dashboard is displayed:
Helm for ElasticSearch: Deploying Elasticsearch with Kubernetes Helm
Kubernetes Helm is an open source package manager for Kubernetes. One of the easiest ways to deploy Elasticsearch is using the official Elasticsearch Helm chart.
To deploy Elasticsearch with Kubernetes Helm, follow these steps:
- Install Helm on your local machine and in Kubernetes cluster (see documentation)
2. After installed, add Elastic Helm repository:
helm repo add elastic https://helm.elastic.co
3. Install Elastic by using the command:
helm install ${es_cluster_name} elastic/elasticsearch
For example:
helm install esarticle elastic/elasticsearch
4. Follow the deployment steps by checking pod deployment:
kubectl get pods --namespace=default -l app=elasticsearch-master -w
The output is displayed, which should be similar to the following:
NAME                    READY   STATUS   RESTARTS    AGE
elasticsearch-master-0  1/1     Running  0           2d
elasticsearch-master-1  1/1     Running  0           2d
elasticsearch-master-2  1/1     Running  0           2d
By default, the ES Helm Package creates three master nodes that act as client, master, and data nodes. Each replica will thus have its persistent volume claim:
kubectl get pv
NAME                                        CAPACITY    ACCESS MODES    RECLAM POLICY   STATUS  CLAIM                                               STORAGECLASS        REASON  AGE
pvc-2b7f3e47-c2a0-4654-baed-94ad32b507c2    30g         RWD             Delete          Bound   default/elasticsearch-master-elasticsearch-master-0 gp2                         2d
pvc-9078604-elfe-4097-897b-ba8bf84af863     30g         RWD             Delete          Bound   default/elasticsearch-master-elasticsearch-master-2 gp2                         2d
pvc-b857fdie-b387-4b54-b144-00ed66045047    30g         RWD             Delete          Bound   default/elasticsearch-master-elasticsearch-master-1 gp2                         2d
Helm also created a service with a load balancer, so it is possible to connect to the ElasticSearch service using the load balancer:
kubectl get service
NAME                            TYPE        CLUSTER-IP      EXTERNAL-IP   PORT(S)             AGE
elasticsearch-master            ClusterIP   10.245.80.223   <none>        9200/TCP,9300/TCP   2d
elasticsearch-master-headless   ClusterIP   None            <none>        9200/TCP,9300/TCP   2d
The Elasticsearch Helm chart provides many different configurations to personalize your deployment, as outlined in the manual.
Deploy Kibana with Helm
Kibana is a graphical user interface for Elasticsearch designed to query data and create (near real-time) dashboards. There is also a Helm chart, so you can easily install it.
Since you’ve already added the Elastic Helm repository into your local machine, type the following command:
helm install kibanaesarticle elastic/kibana
Note: You will probably need a new node on your Kubernetes cluster. Each ES master instance has received most of the previous Kubernetes node resources, and K8s cannot deploy Kibana. You can check if that’s the case by using the Kubernetes dashboard.
Once everything is deployed, you can check the service by creating a reverse proxy:
kubectl port-forward svc/kibanaesarticle-kibana 5601:5601
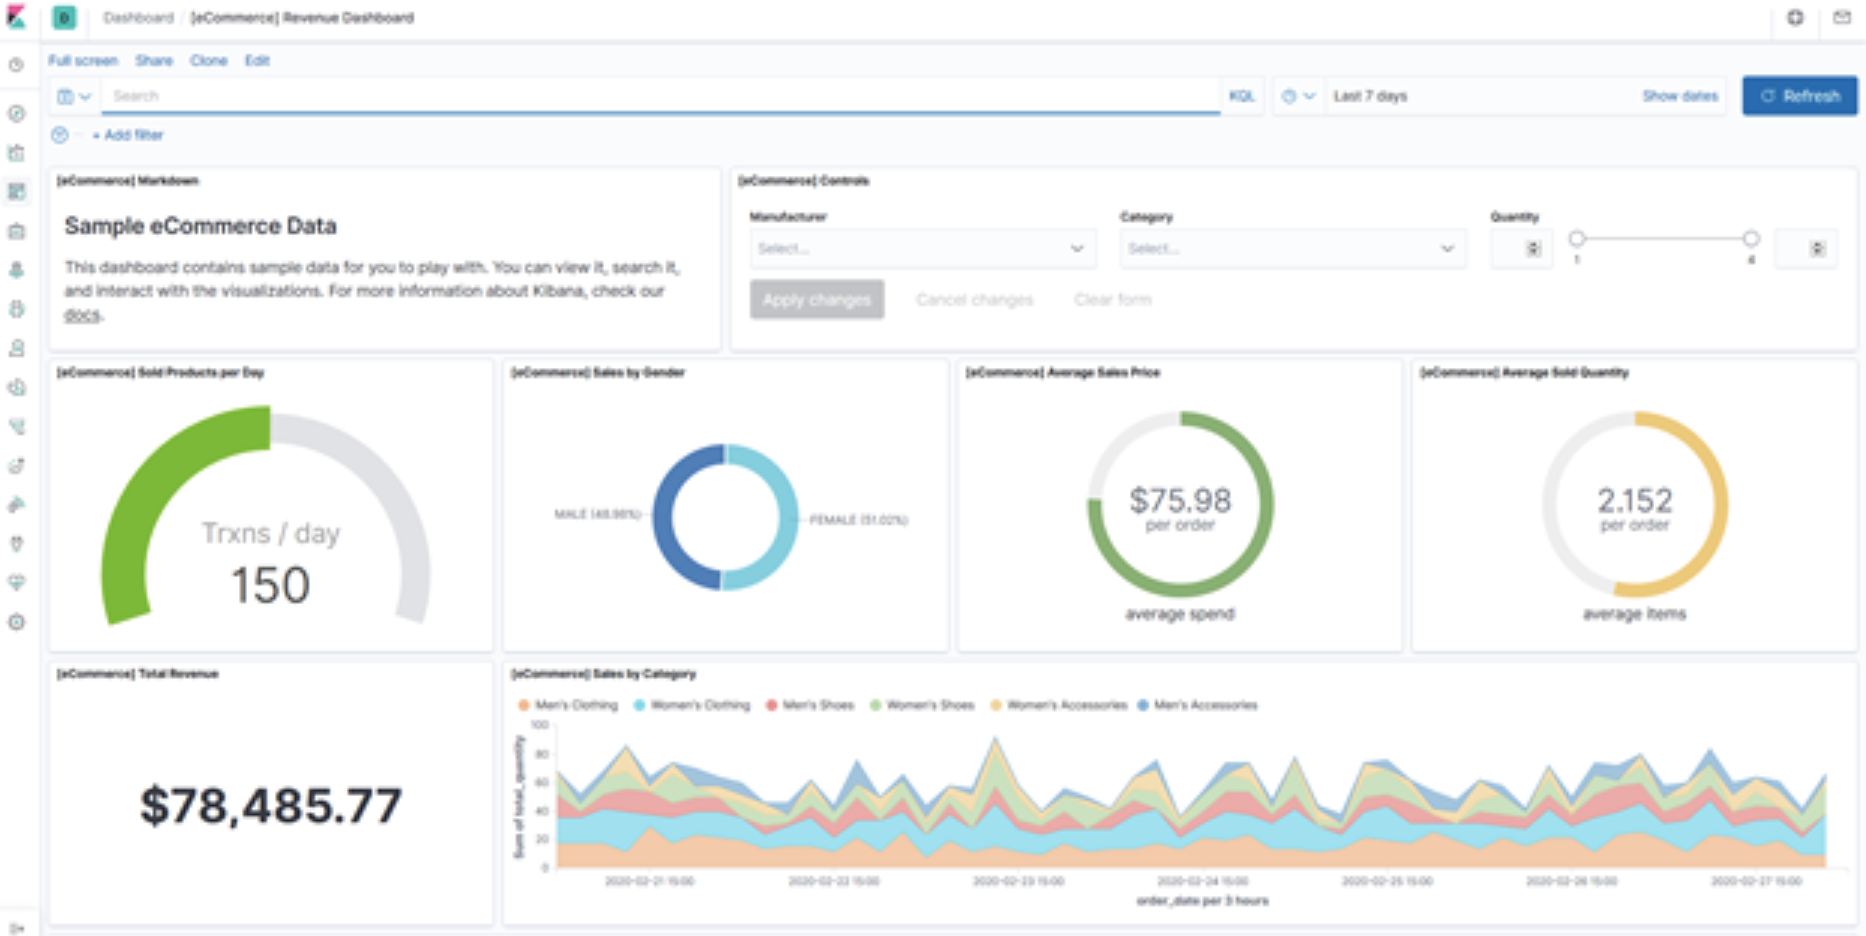
Then, access your web browser: https://localhost:5601. Kibana will connect to your Elasticsearch using the service name created by the previous Helm chart. If the ES is empty, Kibana will provide some sample data to import and present a dashboard sample.
You can change the service name by filling out the variables provided by the chart.
Quick Kubernetes Primer: Running Stateful Applications on Kubernetes
To understand our Elasticsearch on Kubernetes architecture a bit better, here is a quick primer on how Kubernetes works, and in particular, how it serves stateful applications. Several of the Elasticsearch components are stateful.
Stateful services hold data that may not be lost. A few examples are databases, user directories, messaging, and authentication services. These services cannot simply spin up new instances and work in a balanced way using a load balancer. First, each instance needs persistent storage that won’t be lost if the service shuts down. And second, each service has a policy on how to work in a distributed manner.
Kubernetes’ paradigm for handling persistent data is divided into three structures.
Persistent Volumes
The Persistent Volume is set up by the cluster administrator to make it available for users just as nodes are available for computing. These volumes are managed by plugins like NFS, iSCSI, or cloud-provider solutions (such as Google, AWS, or Azure). A Persistent Volume claim is a user asking for persistent storage, much like asking for CPU resources for a container image. Claims don’t need to understand the underlying storage structure and are as generic as they can be.
Related content: Read our guide to kubernetes cpu limit.
Storage Classes
Storage Classes are used for dynamic Persistent Volumes. If there is no Persistent Volume attending a claim, K8s will try to provision the storage claim based on Storage Classes—structures defined and named by the administrator that specify the constraints and resources used by each storage unit.
StatefulSet
StatefulSet is the API designed to manage stateful applications. Similar to deployment for stateless applications, StatefulSet manages pods but holds an identity of each pod to attach to the correct Persistent Volume claim in case of an outage.
The stateful application itself has constraints that overtake the resources available on Kubernetes when it comes to distributed computing: They need to be engineered to handle multiple instances and fallbacks.
Architectural Considerations for Stateful Applications on Kubernetes
Master/slave architecture is the most common and also the easiest architecture to deploy in a distributed environment. The architecture dictates that only one instance receives read and write requests, while the worker only keep the data updated. In some specific cases, worker instances are also allowed to serve read requests. If there is an outage with the master instance, one of the workers will automatically assume the role of master.
Related content: Read our guide to kubernetes limits vs requests.
In addition to the master/slave architecture, there are many others that provide more than one writeable node. However, the development of a high-performance stateful cluster must be carefully handled by an expert due to the increased complexity and the risk of having poorer performance than a single instance if badly configured.
Even with one-instance services, caution should be exercised. While it may be easy to upgrade/downgrade a service, one must take special care with stateful applications. Usually, once these applications are upgraded, the data stored on a Persistent Volume is changed. That change renders the original data unusable with an older version. This means if you need to roll back a version upgrade, the application may not be running as expected. The solution for this problem does not rely on K8s; it relies on how the application is designed to handle rollbacks.
Our Elasticsearch on Kubernetes architecture relied on another well-known pattern known as sharding.
Bottom Line – Stateful Applications Can Work Well With Kubernetes
Stateful applications such as Elasticsearch on Kubernetes are applications that require a reliable unit of persistent storage: Data losses are not an option. Besides that, these applications are much more difficult to distribute and scale. New instances must be carefully synchronized with existing ones. The shutting down of instances also needs to be carefully orchestrated with other instances of the same service to avoid data loss.
Issues also arise when upgrading or downgrading stateful applications. Version upgrades often lead to data structure changes, so a rollback plan should be tested and in place prior to production.
Kubernetes is the most popular container orchestrator available. It provides effective solutions for increasing application reliability by creating fallbacks and continuously monitoring running applications, among other things. Frequently, stateful applications have not been taken into consideration for orchestrators. Generally, these products have an entire team dedicated to operating and maintaining its inner parts. With Persistent Volumes, however, Kubernetes shows that it is possible to achieve the level of customization stateful applications require without losing the many advantages an orchestration system offers.