 Microsoft Azure
 Cloud Financial Management (FinOps)
 How to Operationalize FinOps
What is a Kubernetes Pod?
In the Kubernetes architecture, a pod is a set of containers that serve a common purpose. As the smallest deployable unit of computing that you can create and manage in Kubernetes, a pod can run on a single physical machine, called a node which is managed as part of a Kubernetes cluster.
Containers running in pods use container runtimes like Docker, rkt and runC. Pods contain at least one container, but when there is more than one, they all share the pod’s resources and act as a single entity.
These shared resources include storage volumes, a unique IP address assigned to the pod, and a set of network ports. Within the pod, containers communicate with one another using localhost. A pod is, therefore, a self-contained “logical host”.
When a pod is no longer needed, when there are insufficient resources on the node, or when the node fails, the pod is evicted. Depending on your scaling configuration, Kubernetes may automatically re-schedule the pod on another node.
In this article, you will learn:
- Kubernetes Pod Lifecycle
- How Do Controllers Help to Manage Pods?
- 6 Ways to Create a Pod
- Automating Kubernetes Infrastructure with Spot
Kubernetes Pod Lifecycle
Pods have a predetermined life cycle. The three main phases of a pod’s life cycle are:
- Pending—starts when at least one primary container initiates properly.
- Running—commences when all containers are running properly.
- Succeeded / Failed—Succeeded means the pod completed its task, and Failed means it was interrupted prematurely.
An additional value of the container phase is Unknown—this means that the pod state is not known to the controller, usually because of a communication error.
While in the Running phase, an agent running on each node called the kubelet tracks container states and ensures all are running smoothly. In case of a fault, the kubelet can sometimes restart the container. Kubernetes can detect common faults and seamlessly restore a pod’s health.
Applications use the Kubernetes API to communicate with pods. The API can be used to specify pods, and to query the status of running pods. You can add custom readiness data for a pod if needed by your application, and this data can be accessed via the API.
Pod Lifetime
Application containers and pods are ephemeral entities. Once created, they receive a unique identity (UID) and remain within their scheduled node until deletion or termination—based on their restart policy.
Pods scheduled to a dead or failed node are deleted (after a timeout period), since they cannot survive without the node’s resources or maintenance. They cannot self-heal or be rescheduled to another node—this would entail a change in their UID. Instead, the controller re-launches the pod with a new UID to an eligible node.
The lifetime of storage volumes and other pod-related entities, such as persistent volumes (PV), is often coupled to a pod, if their existence depends on that of a specific pod. The moment a pod is deleted, all its related entities are also deleted—and when a new pod is created, new identical entities are created in their place.
How Do Controllers Help to Manage Pods?
Controllers manage the replication, rollout, and health of a cluster’s pods. Upon detection of a failed node, the controller will seek the unresponsive pods and replace them to other nodes.
The main types of controllers you will work with in Kubernetes are Job controllers, Deployments, DaemonSet, and StatefulSet (there are additional controllers, like ReplicaSet, that work behind the scenes).
The Jobs controller runs a task until it is completed. It controls ephemeral batch-type jobs. Deployment controllers are typically used for stateless, persistent applications. StatefulSet controllers are used for databases and other stateful persistent applications. DaemonSets are used to run a pod on all nodes matching specific criteria.
Related content: read our guide to Kubernetes persistent volume
In a typical Kubernetes environment, controllers create most pods automatically, using the information in the pod template. They can then manage the pod’s lifecycle, ensuring that it functions in line with the pod template’s deployment requirements.
The controller replicates pods when required—either to relieve an overworked environment or to maintain the number of pods specified in the deployment. When required, it replaces failed pods, or evicts them from cluster nodes when they have completed their task.
The controller also acts as a traffic coordinator. Where pods contain several containers, they must share dependencies and hardware resources. A controller schedules these and coordinates execution and termination ofor containers. As an example, a pod may contain an ‘init’ container that sets up the environment before the application container begins to run the application—all this is coordinated by the controller.
Related content: read our guide to Kubernetes autoscaling
6 Ways to Create a Pod
There are several ways to create a pod in Kubernetes – here are the most common. The code examples in this section were shared in the Kubernetes documentation.
1. Creating a Pod Manually
You can use the Kubernetes Pod object to create a pod manually. This will create a pod without lifecycle management – if it crashes, it won’t be restarted.
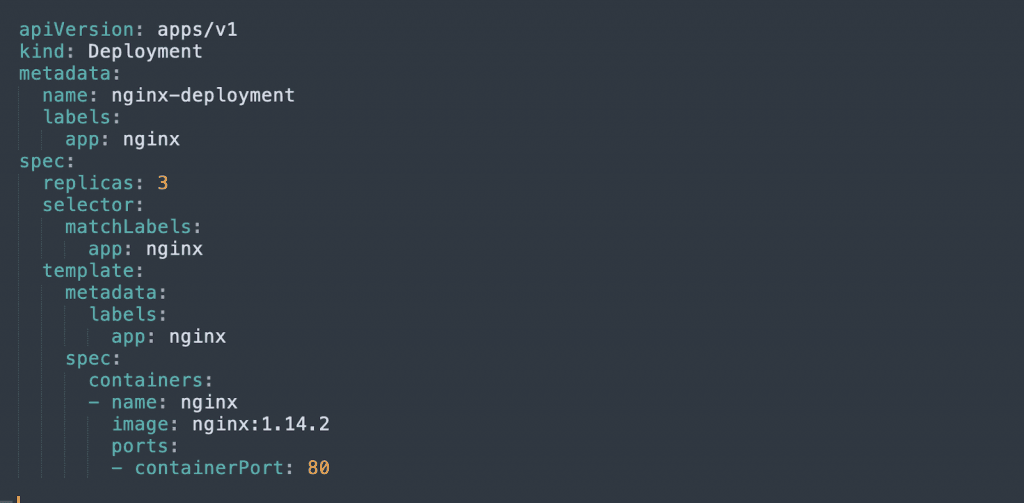
2. Deployment
A Deployment manages ReplicaSets, which are groups of identical pods. The Deployment object automatically creates pods, manages pod scalability, and can perform gradual updates of pods with minimal downtime.
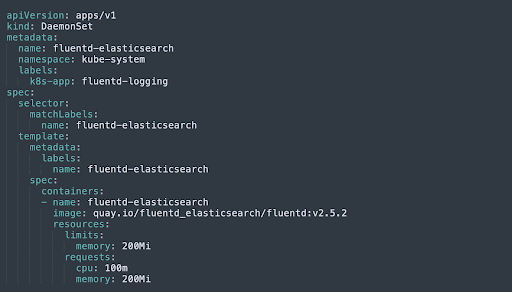
3. DaemonSet
A DaemonSet adds a pod to a selected set of nodes in the cluster, alongside existing pods. For example, this allows you to add a logging component to all your nodes.
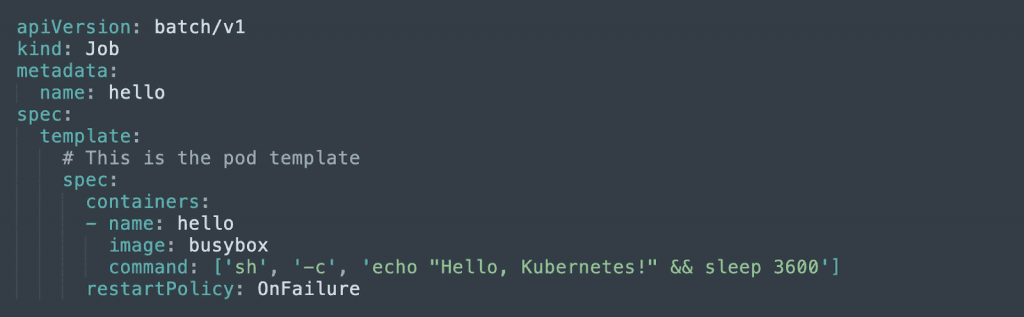
4. Job
A Job is used to automatically create pods, which are expected to run for a limited time, complete a specified number of tasks, and then terminate. The Job object monitors that pods generate the required number of completions, and can restart failed pods until the job is complete.
5. CronJob
A CronJob lets you define a schedule, and run Jobs, defined using Cron format, based on the schedule.
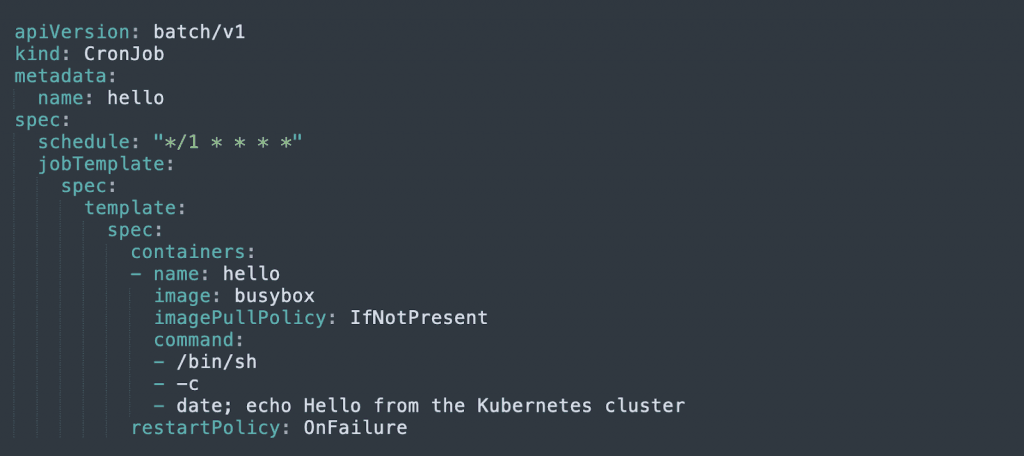
Learn more in our detailed guide to kubernetes job scheduler.
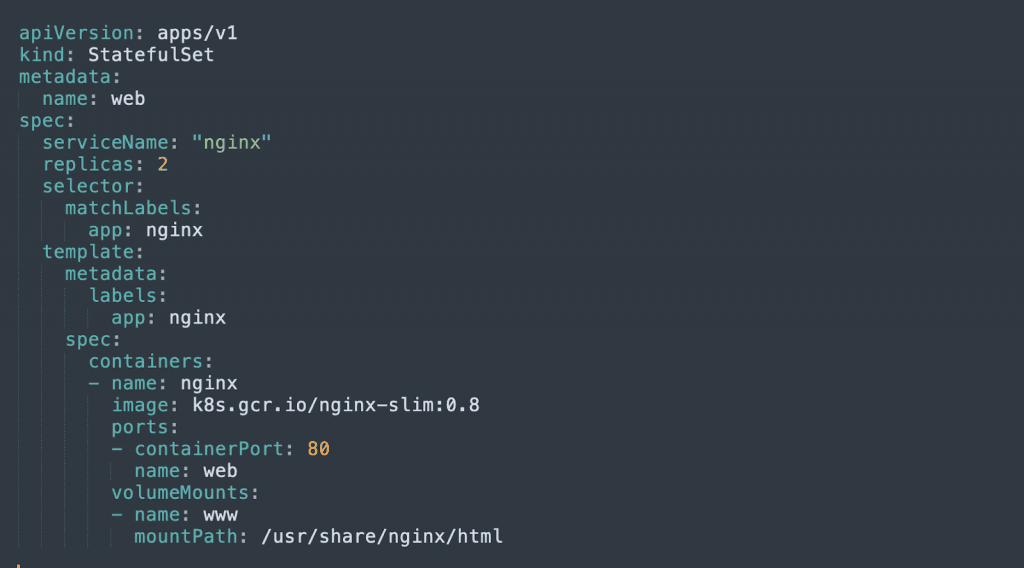
6. StatefulSet
A StatefulSet lets you deploy pods with a “sticky identity”, meaning each pod has a unique identifier that is maintained when it is rescheduled on another node. It also guarantees the order in which pods are created. StatefulSets can also have persistent storage volumes that survive the restart of any of the pods.
Automating Kubernetes Infrastructure with Spot
While Kubernetes handles pod orchestration, ensuring that the pods always have highly available and affordable nodes which are fully utilized on a continuous basis, is not a simple task.
Addressing this challenge, Spot Ocean from Spot frees DevOps teams from the tedious management of their cluster’s worker nodes while helping reduce cost by up to 90%.
Spot Ocean’s automated optimization delivers the following benefits:
- Container-driven autoscaling for the fastest matching of pods with appropriate nodes
- Easy management of workloads with different resource requirements in a single cluster
- Intelligent bin-packing for highly utilized nodes and greater cost-efficiency
- Cost allocation by namespaces, resources, annotation and labels
- Optimal blend of pricing models, including spot, reserved and on-demand compute instances
- Automated infrastructure headroom ensuring high availability
- Automated right-sizing based on actual pod resource consumption
Learn more about Spot Ocean today!