 Microsoft Azure
 Cloud Financial Management (FinOps)
 How to Operationalize FinOps
What is Kubernetes Daemonset?
DaemonSet is a Kubernetes feature that lets you run a Kubernetes pod on all cluster nodes that meet certain criteria. Every time a new node is added to a cluster, the pod is added to it, and when a node is removed from the cluster, the pod is removed. When a DaemonSet is deleted, Kubernetes removes all the pods created by it.
In a Kubernetes architecture, DaemonSets are used for deploying background services across clusters, providing support services for every node—such as system operations services, collecting logs, monitoring frameworks like Prometheus, and storage volumes.
Learn more in our detailed guide to kubernetes deployment strategy.
Typically, one DaemonSet deploys one type of daemon pod on all nodes. But in more complex configuration, you can have several daemonsets controlling one type of daemon, using labels to define deployment rules for each node.
This is part of our series of articles about Kubernetes Autoscaling.
Related content: Read our guide to cluster autoscaler.
In this article, you will learn:
How Do DaemonSets Work?
A DaemonSet is an independent object that has its own controller. The DaemonSet has a desired state—which pod needs to run on all eligible nodes (if no constraints are applied), or a limited set of nodes (if a selector is used). The DamonSet controller uses a reconciliation loop to check the current state of nodes, and if they are not currently running the required pod, it will run them.
The DaemonSet controller reconciliation process reviews both existing nodes and newly created nodes. By default, the Kubernetes scheduler ignores the pods created by the DamonSet, and lets them exist on the node until the node itself is shut down.
Another option is to limit the nodes the daemon will run on, using a node selector. The nodeSelector field in the DaemonSet YAML file lets you tell the DaemonSet controller which nodes are eligible for deploying the daemon.
How to Perform Common DaemonSet Operations
How to Create a DaemonSet
You can use YAML files to configure a DaemonSet. See example YAML file.
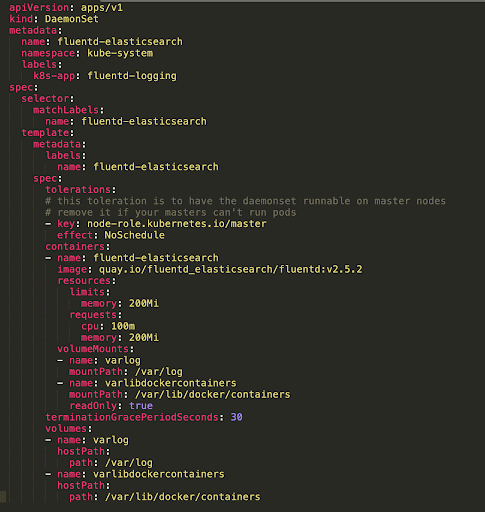
Here are several important parts of DaemonSet configuration:
| Element | Required? | Description |
| apiVersion | Yes | Version used by the API server |
| Kind | Yes | Should be DaemonSet |
| Metadata | Yes | Name for the DaemonSet, the namespace in which it should run, and labels that can help you find and organize the DaemonSet |
| spec.template | Yes | This is a pod template, which defines the pod you intend to run on all eligible cluster nodes |
| spec.selector | Yes | A pod selector managed by the DaemonSet. Must be one of the tags specified in the pod template. The example above shows that the selector is daemonset-container-a, which is also defined in the pod template. This cannot be changed after the DaemonSet is created. |
| spec.template.spec.nodeSelector | No | Makes it possible to run only some of the nodes matching the selector |
| spec.template.spec.affinity | No | Makes it possible to run a selection of nodes that match the required affinity |
| containers | No | Specifies the container image that should run on the DaemonSet pods |
DaemonSet pods respect taints and tolerations like regular pods, and also have several tolerations added automatically; for example, DaemonSet pods are not be scheduled on nodes that are not-ready or unreachable.
When you are done with the configuration, create a Daemonset using the following command (where my-daemonset.yaml is your configuration file):
kubectl apply -f my-daemonset.yaml
How are Daemon Pods Scheduled?
There are two ways to schedule pods that should run on every eligible node, as part of a DaemonSet:
- Using the DaemonSet controller—the default option.
- Using the default scheduler, by enabling the ScheduleDaemonSetPods option, and setting NodeAffinity in DaemonSet pod configuration, instead of using spec.nodeName.
The first option is problematic, because it can lead to inconsistent pod behavior, and can confuse cluster administrators because:
- DaemonSet pods do not have a state of Pending.
- The default scheduler handles pod preemption, and even when preemption is enabled, scheduling decisions made by the DaemonSet controller will not consider preemption and pod priority.
Therefore, it is recommended to create DaemonSets using the second option—the default scheduler. This option ensures that:
- The default scheduler binds DaemonSet pods to their intended hosts.
- Original node affinity is taken into account when scheduling pods to run on hosts
- No changes to spec.template by the DaemonSet controller.
- The default scheduler will not schedule DaemonSet pods to any nodes marked as unschedulable, which is the desired behavior.
How Do You Scale a DaemonSet?
Typically, scalability in Kubernetes works by scaling a deployment up and down under specific conditions. The deployment attempts to meet a desired state by looking for appropriate nodes, and deploying pods on them. Or, if pods are no longer needed, terminating them.
DaemonSets approach scalability from another perspective. When you have a background service such as monitoring, and you deploy it using a DaemonSet, it will automatically scale up and down together with the eligible nodes running in your cluster.
In other words, a DaemonSet is a simple scalability strategy for background services. When more eligible nodes are added to the cluster, the background service scales up. When nodes are removed, it will automatically scale down.
How to Update DaemonSets
A DaemonSet can be updated by changing one of the following:
- Pod specification
- Resource requests
- Resource limits
- Labels
- Annotations
In DaemonSet configuration, you can select one of two update strategies:
- RollingUpdate (default)—upon configuration change, automatically deletes and recreates the DaemonSet pods. This means changes will automatically trigger redeployment.
- OnDelete—when configuration is changed, Kubernetes does not automatically delete DaemonSet pods and recreate them. You have to delete pods manually, and the controller will then create a new pod that reflects the changes.
To see how updates are progressing, run this command: kubectl startup status my-daemonset
Automating Kubernetes Infrastructure with Spot
Spot Ocean from Spot frees DevOps teams from the tedious management of their cluster’s worker nodes while helping reduce cost by up to 90%. Spot Ocean’s automated optimization delivers the following benefits:
- Container-driven autoscaling for the fastest matching of pods with appropriate nodes
- Easy management of workloads with different resource requirements in a single cluster
- Intelligent bin-packing for highly utilized nodes and greater cost-efficiency
- Cost allocation by namespaces, resources, annotation and labels
- Reliable usage of the optimal blend of spot, reserved and on-demand compute pricing models
- Automated infrastructure headroom ensuring high availability
- Right-sizing based on actual pod resource consumption
Learn more about Spot Ocean today!