 Microsoft Azure
 Cloud Financial Management (FinOps)
 How to Operationalize FinOps
What Is Cluster Autoscaler?
Kubernetes, the popular container orchestration platform, offers several mechanisms for auto-scaling to accommodate changes in application loads. One of them is Cluster Autoscaler—an open-source tool that automatically adjusts the size of a Kubernetes cluster.
Cluster Autoscaler adds or removes machines (called nodes) from the cluster when one of these two conditions are true:
- There are pods that failed to run in the cluster due to insufficient resources.
- There are nodes in the cluster that have been underutilized for an extended period of time and their pods can be placed on other existing nodes.
The concept of Cluster Autoscaler is based on the principle of demand and supply. When the demand, in this case, workloads running on the cluster, exceeds the supply (the computational resources), the cluster automatically scales up. Conversely, when the supply exceeds the demand, the cluster scales down. Cluster Autoscaler integrates with cloud providers, such as Amazon Web Services or Google Cloud, and automatically provisions or shuts down physical machines using the cloud provider’s APIs.
We’ll discuss the benefits of Cluster Autoscaler and also cover some of its important limitations, show how to use it with Amazon Elastic Kubernetes Service (EKS), and show an easier, more powerful alternative to Cluster Autoscaler: Ocean from Spot.
This is part of a series of articles about Kubernetes Autoscaling
In this article:
- Cluster Autoscaler Benefits
- Limitations of Cluster Autoscaler
- Quick Tutorial: Using Cluster Autoscaler on AWS EKS
- Taking Cluster Autoscaler to the Next Level with Ocean
- Comparing Ocean and Cluster Autoscaler
- Try Ocean: Easier, More Powerful Kubernetes Scalability
Cluster Autoscaler Benefits
Automatic Horizontal Scaling
One of the main benefits of Cluster Autoscaler is automatic scaling. Manual scaling to adjust Kubernetes clusters to workloads can be time-consuming and inefficient. Automatic scaling not only saves time for Kubernetes operators by taking care of resource management; it also ensures workloads are always running optimally. The autoscaler constantly monitors the status of the cluster and makes adjustments as needed.
Cost-Effectiveness
By ensuring that the cluster is using just the right amount of resources, it helps businesses save on costs. There is no wastage of resources due to overprovisioning of cluster nodes. The cost savings can be substantial, especially for larger clusters. By optimizing the resource usage, Cluster Autoscaler can significantly reduce the operational costs of running a Kubernetes cluster.
Improved Performance
Cluster Autoscaler also leads to improved performance. By ensuring that cluster resources are optimally utilized, it ensures that workloads run smoothly and efficiently. This results in fewer performance issues due to resource wastage.
However, keep in mind that Cluster Autoscaler only takes care of provisioning the required number of nodes. There might still be inefficiencies within the cluster, such as nodes scheduled to pods that do not provide the required computing resources. This can be addressed by other Kubernetes scaling mechanisms, such as Horizontal Pod Autoscaler (HPA) and Vertical Pod Autoscaler (VPA).
Limitations of Cluster Autoscaler
While cluster autoscaler is beneficial, you should be aware of some important limitations:
- Lack of on-premises support: Cluster Autoscaler is primarily designed for cloud-based Kubernetes clusters and usually cannot be used with on-premises clusters.
- Worker nodes with dependencies: If a node has pods with local storage or pods that cannot be relocated, the autoscaler may not be able to remove the node even if it’s underutilized.
- Request-based scaling: Cluster Autoscaler scales based on pod requests (the resources required by the pod according to its manifest) and not actual usage. This means that if a pod requests more resources than it actually uses, the autoscaler may scale up unnecessarily. Similarly, if a pod uses more resources than it requests, the autoscaler may not scale up as needed.
- Limited support for auto scaling groups (ASG): Cluster Autoscaler can only scale one ASG per pod request, with limited support for mixed instance types, and limited support for running ASGs across multiple availability groups.
Limited support for spot instances: When using spot instances, Cluster Autoscaler cannot fall back to an on-demand instance if a spot instance shuts down.
Quick Tutorial: Using Cluster Autosclaer on AWS EKS
Here are the main steps involved in setting up Cluster Autoscaler on a managed Kubernetes cluster using Amazon’s Elastic Kubernetes Service (EKS).
Before you begin, ensure you have the AWS CLI installed and configured with the necessary permissions. You’ll also need eksctl, a command-line tool for creating and managing EKS clusters.
Step 1. Create a Cluster Configuration File
Create a file named cluster-config.yaml.
Add the following content, adjusting the parameters as needed:
apiVersion: eksctl.io/v1alpha5
kind: ClusterConfig
metadata:
name: my-cluster
region: us-west-2
nodeGroups:
- name: ng-1
instanceType: m5.large
desiredCapacity: 2
Run the following command:
eksctl create cluster -f cluster-config.yaml
Wait for the cluster creation process to complete.
Step 2. Create Identity and Access Management (IAM) OIDC Provider
An OIDC (OpenID Connect) provider is required for the EKS cluster to assign IAM roles to Kubernetes service accounts.
Create OIDC Provider:
Use eksctl to create the OIDC provider for your cluster:
eksctl utils associate-iam-oidc-provider --region=us-west-2 --cluster=my-cluster --approve
Step 3. Create IAM Policy for Cluster Autoscaler
First, create a policy document. Create a file named ca-policy.json and add the following policy (this is a basic example, adjust as necessary):
{
"Version": "2012-10-17",
"Statement": [
{
"Effect": "Allow",
"Action": [
"autoscaling:DescribeAutoScalingGroups",</code
"autoscaling:DescribeAutoScalingInstances",
"autoscaling:DescribeLaunchConfigurations",
"autoscaling:DescribeTags",
"autoscaling:SetDesiredCapacity",
"autoscaling:TerminateInstanceInAutoScalingGroup"
],
"Resource": "*"
}
]
}
Using this policy file, create a policy in Amazon IAM:
aws iam create-policy --policy-name ClusterAutoscalerPolicy --policy-document file://ca-policy.json
The output will give you the ARN code of the policy. Take note of this ARN for the next step.
Step 4. Create IAM Role for Cluster Autoscaler
Run the following command, replacing <your-policy-arn> with the ARN of the policy created in the previous step:
eksctl create iamserviceaccount \
--name cluster-autoscaler \
--namespace kube-system \
--cluster my-cluster \
--attach-policy-arn <your-policy-arn> \
--approve \
--override-existing-serviceaccounts
This command creates a service account in the kube-system namespace within your Kubernetes cluster, and attaches the IAM policy to it.
Step 5. Deploy Kubernetes Cluster Autoscaler
Use the following command to deploy the Cluster Autoscaler. Replace <autoscaler-version> with the appropriate version for your EKS cluster (e.g., v1.20.0 for EKS 1.20):
kubectl apply -f https://raw.githubusercontent.com/kubernetes/autoscaler/<autoscaler-version>/cluster-autoscaler/cloudprovider/aws/examples/cluster-autoscaler-autodiscover.yaml
Ensure that the cluster-autoscaler.kubernetes.io/safe-to-evict annotation is set to false on nodes that should not be terminated.
Now, edit the Cluster Autoscaler deployment to add your cluster name:
kubectl -n kube-system edit deployment.apps/cluster-autoscaler
In the command arguments, replace <YOUR CLUSTER NAME> with the name of your EKS cluster.
Learn more in our detailed guide to kubernetes deployment.
Related content: Read our guide to kubernetes deployment tools.
Step 6: Configure Cluster Autoscaler Settings
Now that you have a cluster up and running with Cluster Autoscaler, you can tune auto-scaling settings according to your requirements:
- Minimum and maximum nodes: Define the lowest and highest number of nodes your cluster can scale to. This range is crucial to handle workload fluctuations efficiently. You can set these limits in your cluster configuration file under
minSizeandmaxSizefor each node group. - Scale-down delay: This setting determines how long the autoscaler should wait before scaling down unnecessary nodes. This delay avoids frequent scale-downs that might disrupt ongoing processes. You can configure it using the
--scale-down-delay-after-addand--scale-down-delay-after-deleteflags. - Scale-down utilization threshold: This parameter sets the utilization level below which a node is considered for removal. Adjust it based on your application’s resource needs using the
--scale-down-utilization-thresholdflag. - Balancing similar node groups: If your cluster has node groups with similar instance types, turn on the balance-similar-node-groups feature. This can be done by adding the
--balance-similar-node-groupsflag. It helps distribute workloads more evenly across these node groups. - Customizing scaling policies: Tailor your scaling policies to specific application requirements. This might involve adjusting scaling thresholds based on memory or CPU usage, which can be done through flags like
--scale-down-utilization-thresholdor custom metrics.
Taking Cluster Autoscaler to the next level with Ocean
Cluster Autoscaler is a basic solution for scaling Kubernetes clusters, but has several important limitations. To help simplify and further automate Kubernetes infrastructure scaling, Spot offers Ocean, a serverless infrastructure engine for running containers, which supports all major cloud providers.
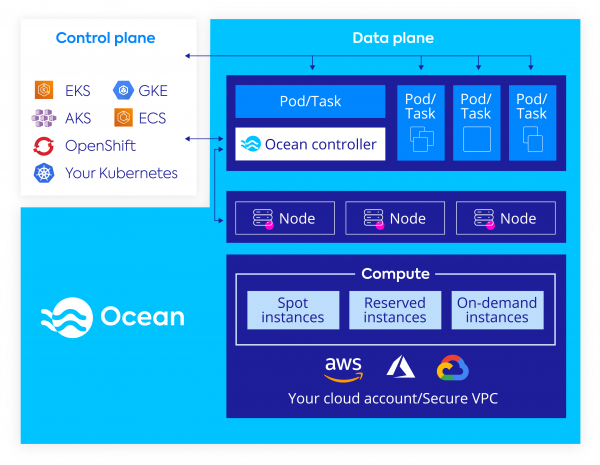
Leveraging pod-driven auto scaling, Ocean dynamically allocates compute infrastructure based on container requirements (documented in their YML config files), such as memory, CPU, disks and networking limitations. It allows pods and workloads to take advantage of the underlying capabilities of cloud compute infrastructure such as pricing model, lifecycle, performance, and availability without any direct integration.
Ocean does this by automating and optimizing infrastructure at three layers:
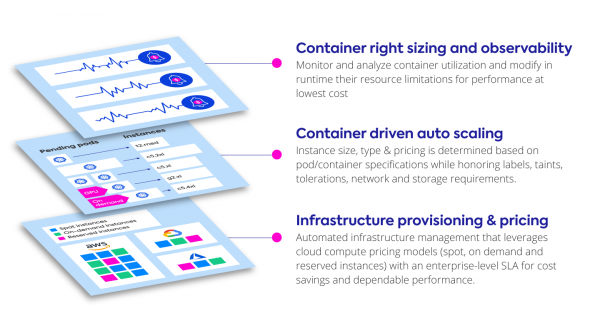
Ocean provides the following features that are not available out of the box in cloud-based Kubernetes services like EKS, GKE, or AKS:
- Users don’t have to configure or maintain individual scaling groups—Ocean provides nodes or various types and sizes out of the box
- Ocean dynamically scales infrastructure and allocates the best fit of instances based on scale, shape of pods and any labels, taints or tolerations
- Events are monitored at the Kubernetes API server and auto-scaling is automatically adjusted, achieving better performance and reliability, and faster scalability
- Ocean maintains a scoring model for compute capacity markets (spot instance, on-demand, and reserved instances), enabling discounts of up to 90% while significantly reducing interruptions
- Ocean reduces waste by more efficiently packing containers, significantly improving bin packing by 30-40%
Comparing Ocean and Cluster Autoscaler
In order to help make an informed decision between Ocean and Cluster Autoscaler, we have cataloged some architectural differences between the two, focusing on the common use case of Cluster Autoscaler with AWS auto-scaling groups (ASGs).
Feature |
Cluster Autoscaler with AWS Auto Scaling Groups |
Ocean by Spot |
|---|---|---|
| Mixed Instance Types | Limited support as only one ASG will be scaled per pod request and mixed instance types within each ASG must have the same capacity (CPU and memory). More information | Supported. Ocean supports mixed instance types across all families by default. Instead of managing multiple node-pools, you will be running a single “Ocean”. |
| Availability Zone awareness | A single AutoScaling group cannot span multiple availability zones without consideration for rebalancing. Alternatively, one can manage one AutoScaling Group per Availability Zone. More information | Supported. The k8s cluster can be managed with a single entity that manages all the underlying instances, across multiple configurations, irrespective of the AZ. |
| Persistent Volume Claims (PVC) awareness | NodeGroups must be configured with an AutoScaling group that is tied to a single Availability Zone. More information | Supported. Ocean reads requirements of pending pods in real time. If the resource should have a volume available, Ocean will launch the instance in the required AZ. No additional management is needed. |
| Fallback to on-demand |
CA or ASG/Spot Fleet don’t have an option to fallback to an on-demand instance. | Supported. Ocean falls back to on-demand instances when there is a shortage in spot capacity pools. |
| Scale down + re-shuffling pods |
Based on the conditions that (1) running CPU and memory across the pods in a node is less than 50% allocated or (2) all running pods on a node can be moved to another node. Ephemeral storage is accounted for in scale down decisions. CA does not scale down pods using Horizontal Pod Autoscaling. |
Ocean scale down takes all CA considerations as well as instance size for bin packing efficiency into account, resulting in ~30% reduction in cluster footprint when compared to CA. Ocean bases scale down decisions based on pod disruption budget, with no issues scaling down pods with HPA. |
| Spot interruption handler | In order to handle spot interruptions, one needs to install aws/spot-interruption-handler daemon-set. | Available by default in Spot SaaS platform. With Spot, one does not need to install extra tools in the cluster. Interruptions are predicted and managed automatically. |
| Fast, high-performance auto scaling | Supports DIY over-provisioning to deliver workload-based headroom. | Supported. Ocean automatically calculates a cluster headroom parameter, which allows clusters to always have space for incoming pods, without waiting for new nodes. |
| Infrastructure management |
Must manage Auto Scaling Groups independently and associate them with the cluster using labels. | Ocean automatically scales infrastructure dynamically as needed. |
| GPU support |
Requires the set up and labeling of additional GPU based node-pools to support different types and sizes. | Supported out of the box. |
| Node template generation |
Upstream autoscaler always uses an existing node as a template for a node group. Only the first node for each node group is selected, which might be up-to-date or not. More information. | Using Ocean ‘Launch Specification’, Ocean has a source of truth for the node template which is predictable. Launch specifications provide a large set of (optional) properties to configure and can be updated at will. |
| podAntiAffinity | If podAntiAffinity is configured, Cluster Autoscaler will scale up only one node at a time. | Ocean will continue to scale up in parallel for every constraint including podAntiAffinity and deliver immediate infrastructure scaling. |
Try Ocean: Easier, More Powerful Kubernetes Scalability
These instructions focus on Amazon EKS. To try Ocean on different cloud providers, use the following tools:
- Google Cloud – Ocean on GKE
- Microsoft Azure – Ocean on AKS
Prerequisites
1. Configure your AWS credentials
To use awscli environment variables, run the following commands:
$ export AWS_ACCESS_KEY_ID=<aws_access_key>
$ export AWS_SECRET_ACCESS_KEY=<aws_secret_access_key>
2. Set up Spot.io account
Sign up for free and use credentials to AWS according to Spot IAM policy.
To use environment variables, run the following commands:
$ export SPOTINST_TOKEN=<spotinst_token>
$ export SPOTINST_ACCOUNT=<spotinst_account>
3. eksctl installed with Ocean integration
$ curl -sfL https://spotinst-public.s3.amazonaws.com/integrations/kubernetes/eksctl/eksctl.sh | sh
$ sudo mv ./bin/eksctl /usr/local/bin && rm -rf ./bin
Steps
1. Create a yaml file to describe the desired EKS cluster and Ocean configurations. For example, “myEKSwithOcean.yaml”:
apiVersion: eksctl.io/v1alpha5
kind: ClusterConfig
metadata:
  name: cluster-4
  region: eu-north-1

vpc:
  id: "vpc-0dd338ecf29863c55"  # (optional, must match VPC ID used for each subnet below)
  cidr: "192.168.0.0/16"   	# (optional, must match CIDR used by the given VPC)
  subnets:
  # must provide 'private' and/or 'public' subnets by availability zone as shown
  private:
  	 eu-north-1a:
    	  id: "subnet-0b2512f8c6ae9bf30"
         cidr: "192.168.128.0/19" # (optional, must match CIDR used by the given subnet)

  	 eu-north-1b:
    	 id: "subnet-08cb9a2ed60394ce3"
         cidr: "192.168.64.0/19"  # (optional, must match CIDR used by the given subnet)

  	eu-north-1c:
    	 id: "subnet-00f71956cdec8f1dc"
         cidr: "192.168.0.0/19"   # (optional, must match CIDR used by the given subnet)

nodeGroups:
  - name: ng-1
    spotOcean:
  	strategy:
    	# Percentage of Spot instances that would spin up from the desired
    	# capacity.
        spotPercentage: 100

    	# Allow Ocean to utilize any available reserved instances first before
    	# purchasing Spot instances.
        utilizeReservedInstances: true

    	# Launch On-Demand instances in case of no Spot instances available.
        fallbackToOnDemand: true

    autoScaler:
    	# Enable the Ocean autoscaler.
    	enabled: true
    	# Cooldown period between scaling actions.
    	cooldown: 300

    	# Spare resource capacity management enabling fast assignment of Pods
    	# without waiting for new resources to launch.
        headrooms:
        	# Number of CPUs to allocate. CPUs are denoted in millicores, where
        	# 1000 millicores = 1 vCPU.
      	- cpuPerUnit: 2

        	# Number of GPUs to allocate.
            gpuPerUnit: 0

        	# Amount of memory (MB) to allocate.
            memoryPerUnit: 64

        	# Number of units to retain as headroom, where each unit has the
        	# defined CPU and memory.
            numOfUnits: 1

  	compute:
        instanceTypes:
      	# Instance types allowed in the Ocean cluster. Cannot be configured
      	# if the blacklist is configured.
      	whitelist: # OR blacklist
        	- t2.large
2. Create the cluster and Ocean
$ eksctl create cluster --name prod --nodegroup-name standard-workers --spot-ocean
Alternatively, use yaml config: predefined default values
$ eksctl create cluster -f MyEKSwithOcean.yaml
Provisioning the cluster takes about 10-15 minutes, and once it’s complete, you can migrate existing worker nodes and create new Ocean-managed node groups.
Learn more about Ocean
With Ocean, container infrastructure management is simplified, and you can be up and running with your Kubernetes cluster in just a few minutes. Explore the Ocean documentation library to learn more about what you can do with Ocean, or get started today with a free trial.