 Microsoft Azure
 Cloud Financial Management (FinOps)
 How to Operationalize FinOps
What Is a Kubernetes Deployment?
Kubernetes deployment has two common meanings:
- A resource object in Kubernetes that provides declarative updates to applications. It allows you to define the desired state of an application and handles the orchestration of changes to achieve that state.
- The process of deploying applications in a Kubernetes cluster. There are several common deployment strategies including rolling deployment, blue/green deployment, and canary deployment.
This article covers both meanings. We’ll explain how a Kubernetes deployment object differs from other Kubernetes objects, why it is important and how to use it. And we’ll cover 8 strategies you can use to deploy your applications in Kubernetes (via the deployment object or other mechanisms).
This is part of a series of articles about Kubernetes Autoscaling
Learn more in our detailed guide to kubernetes deployment tools.
In this article, you will learn:
- Kubernetes Deployments vs. Pods
- Kubernetes Deployments vs. StatefulSets vs. ReplicaSets
- What Are the Benefits of the Kubernetes Deployment Object?
- Tutorial: Creating a Kubernetes Deployment
- What is a Kubernetes Deployment Strategy?
- Automating Kubernetes Infrastructure with Spot
Kubernetes Deployments vs. Pods
Pods are the smallest deployable units in Kubernetes, representing a single instance of a running process in the cluster. A pod encapsulates one or more containers, storage resources, and a unique network IP. While pods are important as building blocks, they are typically not managed directly in production environments due to their ephemeral nature.
Deployments provide a higher-level abstraction for managing pods. They use ReplicaSets to ensure that the desired number of pod replicas are running at all times. While pods can be individually managed, deployments have mechanisms for scaling, updating, and self-healing of applications. Deployments simplify the lifecycle management of applications, making it easier to perform updates and maintain the desired state of the system.
Kubernetes Deployments vs. StatefulSets vs. ReplicaSets
Deployments are designed for stateless applications where any pod can replace another without issues. They handle scaling and rolling updates. Deployments are used directly by Kubernetes users to manage and scale applications on the cluster.
StatefulSets are an alternative to the deployment object, and are also managed directly by Kubernetes users. They are used for stateful applications that require stable, persistent storage and unique network identities. They ensure that pods are created, scaled, and deleted in a predictable order, maintaining the same network identity and persistent storage across rescheduling.
ReplicaSets are an internal mechanism that is typically not managed directly by Kubernetes users. It is used by deployments to manage the number of pod replicas active at a given time. ReplicaSets do not offer capabilities like rolling updates and rollbacks—they are limited to creating or shutting down pods to meet a required scale.
Learn more in our detailed guide to kubernetes statefulset and guide to kubernetes replicaset.
What Are the Benefits of the Kubernetes Deployment Object?
Using the deployment object offers several benefits:
- Declarative updates: You define the desired state of your application, and Kubernetes will handle the rest. This makes it easy to manage updates and maintain consistency.
- Rolling updates: Deployments support rolling updates, allowing you to update applications without downtime. If something goes wrong, you can roll back to a previous state. However, rolling deployments are not suitable for all cases and there are other, more advanced deployment strategies, which you can learn about below.
- Self-healing: Deployments ensure that the desired number of pods are always running. If a pod fails, the deployment controller will automatically replace it.
- Scalability: You can scale the application up or down by changing the number of replicas. Kubernetes will handle the distribution of pods across the cluster.
- Load balancing: Kubernetes automatically distributes traffic across all running pods, ensuring efficient resource utilization and improved application performance.
Tutorial: Creating a Kubernetes Deployment
Creating a Kubernetes deployment involves defining a deployment object in a YAML file. This object specifies the desired state for your application, including the number of replicas and the template for the pods that will be created. Below is a step-by-step guide to creating a simple deployment using an example that deploys three Nginx pods.
Step 1: Define the Deployment YAML File
First, create a file named nginx-deployment.yaml with the following content:
apiVersion: apps/v1kind: Deploymentmetadata: name: nginx-deployment labels: app: nginxspec: replicas: 3 selector: matchLabels: app: nginx template: metadata: labels: app: nginx spec: containers: - name: nginx image: nginx:1.14.2 ports: - containerPort: 80In this example:
- The
apiVersionandkindfields specify that this is a deployment. - The
metadatafield includes the name of the deployment and labels for identifying it. - The
specfield defines the desired state, including the number of replicas (3 in this case) and the pod template. - The
selectorfield matches pods with the labelapp: nginx. - The
templatefield specifies the pod configuration, including labels and the container specification.
Step 2: Apply the Deployment
Use the kubectl command-line tool to apply the deployment configuration:
kubectl apply -f nginx-deployment.yamlThis command creates the deployment, ReplicaSet, and pods as defined in the YAML file.
Step 3: Verify the Deployment
Check the status of the deployment using:
kubectl get deployments
You should see output similar to the following:
NAME READY UP-TO-DATE AVAILABLE AGEnginx-deployment 3/3 3 3 18sThis output shows that all three replicas are up-to-date and available.
Step 4: Check the ReplicaSet
To see the ReplicaSet created by the deployment, run:
kubectl get rs
The output will be similar to:
NAME                          DESIRED   CURRENT   READY   AGE

nginx-deployment-75675f5897   3         3         3       18s
This output indicates that the ReplicaSet is managing three replicas, all of which are ready.
Step 5: Inspect the Pods
List the pods created by the deployment with:
kubectl get pods --show-labels
The output will show something like:
NAME READY STATUS RESTARTS AGE LABELSnginx-deployment-75675f5897-7ci7o 1/1 Running 0 18s app=nginx,pod-template-hash=75675f5897nginx-deployment-75675f5897-kzszj 1/1 Running 0 18s app=nginx,pod-template-hash=75675f5897nginx-deployment-75675f5897-qqcnn 1/1 Running 0 18s app=nginx,pod-template-hash=75675f5897Each pod is running and labeled appropriately. The pod-template-hash label ensures that pods belong to the correct ReplicaSet.
What is a Kubernetes Deployment Strategy?
A deployment strategy defines how to create, upgrade, or downgrade different versions of applications. In a traditional software environment, deployments or upgrades to applications result in downtime and disruption of service. Kubernetes can help avoid this, providing several Deployment strategies that let you avoid or minimize downtime.
A Kubernetes deployment strategy is a declarative statement that defines the application lifecycle and how updates to an application should be applied. It is usually configured in a YAML file as part of the Kubernetes Deployment object. You can also create a deployment using the imperative approach, with explicit commands.
Technically speaking, if you take the declarative approach, the Kubernetes Deployment object lets you automatically create pods and ReplicaSets. You can define a desired state, and a Deployment Controller continuously monitors the current state of the relevant resources, and deploys pods to match the desired state. This mechanism plays a central role in Kubernetes autoscaling.
In this article, you will learn about the following Kubernetes deployment strategies:
- Rolling deployment—the default strategy that allows you to update a set of pods without downtime. It replaces pods running the old version of the application with the new version, one by one.
- Recreate deployment—an all-or-nothing method that lets you update an application instantly, with some downtime. It terminates all pods and replaces them with the new version.
- Ramped slow rollout—rolls out replicas of the new version, while in parallel, shutting down old replicas.
- Best-effort controlled rollout—specifies a “max unavailable” parameter which indicates what percentage of existing pods can be unavailable during the upgrade, enabling the rollout to happen much more quickly.
- Blue/green deployment—a deployment strategy in which you create two separate, but identical environments, and over to the new environment.
- Canary deployment—uses a progressive delivery approach, with one version of the application serving most users, and another, newer version serving a small pool of test users. The test deployment is rolled out to more users if it is successful.
- Shadow deployment—the new version of the application (the “shadow” version) receives real-world traffic alongside the current version, but without affecting end-users.
- A/B testing—rolls out two or more versions of an application feature to a subset of users simultaneously to see which one performs better in terms of user engagement, error rates, or other KPIs.
Note: While rolling deployments and recreate deployments are supported in Kubernetes out of the box, the other types are not, and might require customization or specialized tools to implement in your Kubernetes cluster.
1. Rolling Deployment
A rolling deployment is the default deployment strategy in Kubernetes. It replaces the existing version of pods with a new version, updating pods slowly one by one, without cluster downtime.
The rolling update uses a readiness probe to check if a new pod is ready, before starting to scale down pods with the old version. If there is a problem, you can stop an update and roll it back, without stopping the entire cluster.
To perform a rolling update, simply update the image of your pods using kubectl set image. This will automatically trigger a rolling update.
To refine your deployment strategy, change the parameters in the spec:strategy section of your manifest file. There are two optional parameters—maxSurge and maxUnavailable:
- MaxSurge specifies the maximum number of pods the Deployment is allowed to create at one time. You can specify this as a whole number (e.g. 5), or as a percentage of the total required number of pods (e.g. 10%, always rounded up to the next whole number). If you do not set MaxSurge, the implicit, default value is 25%.
- MaxUnavailable specifies the maximum number of pods that are allowed to be unavailable during the rollout. Like MaxSurge, you can define it as an absolute number or a percentage.
At least one of these parameters must be larger than zero. By changing the values of these parameters, you can define other deployment strategies, as shown below.
2. Recreate Deployment
This is a basic deployment pattern which simply shuts down all the old pods and replaces them with new ones. You define it by setting the spec:strategy:type section of your manifest to Recreate, like this:
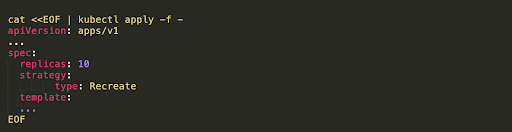
The Recreate strategy can result in downtime, because old pods are deleted before ensuring that new pods are rolled out with the new version of the application.
3. Ramped Slow Rollout
A ramped rollout updates pods gradually, by creating new replicas while removing old ones. You can choose the number of replicas to roll out each time. You also need to make sure that no pods become unavailable.
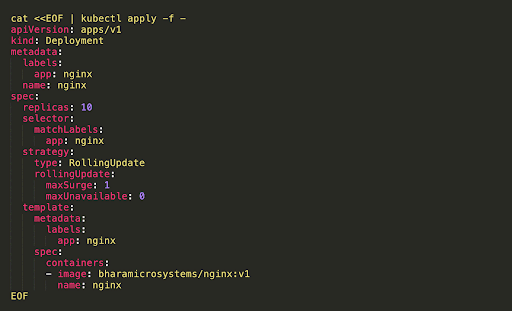
The difference between this strategy and a regular rolling deployment is you can control the pace at which new replicas are rolled out. For example, you can define that only 1 or 2 nodes should be updated at any one time, to reduce the risk of an update.
To define this behavior, set maxSurge to 1 and maxUnvailable to 0. This means the Deployment will roll one pod at a time, while ensuring no pods are unavailable. So, for example, if there are ten pods, the Deployment will ensure at least ten pods are available at one time.
The following Deployment YAML file performs a ramped rollout. This configuration, and the one shown in the next section, was shared by Gaurav Agarwal.
4. Best-Effort Controlled Rollout
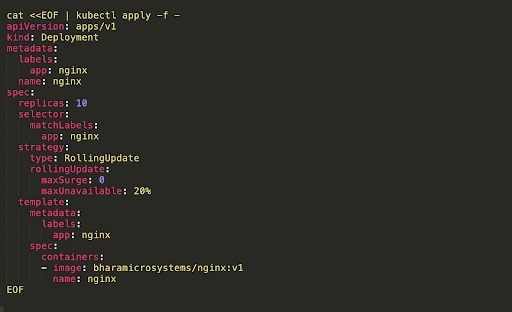
The downside of a ramped rollout is that it takes time to roll out the application, especially at large scale. An alternative is a “best-effort controlled rollout”. This enables a faster rollout, but with a tradeoff of higher risk, by tolerating a certain percentage of downtime among your nodes.
This involves:
- Setting maxUnavailable to a certain percentage, meaning your update can tolerate a certain amount of pods with downtime.
- Setting maxSurge to 0, to ensure that there are always the same number of pods in the Deployment. This provides the best possible resource utilization during the update.
This has the effect of rapidly replacing pods, as quickly as possible, while ensuring a limited number of pods down at any given time.
5. Blue-Green Deployment
In a Blue-Green deployment within Kubernetes, you maintain two versions of a deployment: ‘Blue’ for the current version and ‘Green’ for the new one.
You can use Kubernetes services to manage the traffic between the two:
- Initially, a service routes all traffic to the ‘Blue’ version.
- Deploy the ‘Green’ version alongside the ‘Blue’ version in your cluster.
- Once the ‘Green’ version is ready and tested, update the service to route traffic to the ‘Green’ version.
- If any issues arise, you can switch the service back to point to the ‘Blue’ version.
- By using labels and selectors in Kubernetes, you can easily control which version of the deployment the service points to.
6. Canary Deployment
Canary deployments are typically used to test some new features on the backend of an application. Two or more services or versions of an application are deployed in parallel, one running an existing version, and one with new features. Users are gradually shifted to the new version, allowing the new version to be validated by exposing it to real users. If no errors are reported, one of the new versions can be gradually deployed to all users.
See this detailed tutorial on the Kubernetes blog showing how to deploy an existing version and a new canary version, route between them using Gloo subset routing, and then shift all traffic to the new version.
7. Shadow Deployment
A Shadow deployment is an approach where the new version of the application (the “shadow” version) receives real-world traffic alongside the current version, but without affecting end-users. This deployment strategy allows teams to test, in real-time, how the system behaves under real loads and data.
In Kubernetes, implementing a shadow deployment requires advanced traffic routing, often done using service meshes like Istio or Linkerd:
- Deploy the shadow version alongside your current version.
- Configure the service mesh to duplicate incoming traffic, sending one copy to your current version and another to the shadow version.
- Monitor the shadow version’s performance and errors, ensuring it behaves as expected.
- Since the results from the shadow version aren’t returned to users, they remain unaffected.
8. A/B Testing
A/B Testing, in the context of deployment strategies, is about rolling out two or more versions of an application feature to a subset of users simultaneously to see which one performs better in terms of user engagement, error rates, or other KPIs.
A/B testing in Kubernetes often requires a combination of deployments and services, with potential help from ingress controllers or service meshes for finer-grained traffic routing:
- Deploy both versions (A and B) of your feature in parallel.
- Use a Kubernetes service or ingress controller to split traffic between the two versions, e.g., 50% to version A and 50% to version B.
- Monitor performance metrics and user feedback on both versions.
- Once sufficient data is gathered, decide on the better-performing version and adjust traffic accordingly, eventually phasing out the less optimal version.
Automating Kubernetes Infrastructure with Spot
Spot Ocean from Spot frees DevOps teams from the tedious management of their cluster’s worker nodes while helping reduce cost by up to 90%. Spot Ocean’s automated optimization delivers the following benefits:
- Container-driven autoscaling for the fastest matching of pods with appropriate nodes
- Easy management of workloads with different resource requirements in a single cluster
- Intelligent bin-packing for highly utilized nodes and greater cost-efficiency
- Cost allocation by namespaces, resources, annotation and labels
- Reliable usage of the optimal blend of spot, reserved and on-demand compute pricing models
- Automated infrastructure headroom ensuring high availability
- Right-sizing based on actual pod resource consumption
Learn more about Spot Ocean today!