 Microsoft Azure
 Cloud Financial Management (FinOps)
 How to Operationalize FinOps
What is Kubernetes?
Kubernetes lets you create, deploy, manage, and scale application containers across one or more host clusters.
A Kubernetes cluster is composed of two separate planes:
- Kubernetes control plane—manages Kubernetes clusters and the workloads running on them. Include components like the API Server, Scheduler, and Controller Manager.
- Kubernetes data plane—machines that can run containerized workloads. Each node is managed by the kubelet, an agent that receives commands from the control plane.
In addition, Kubernetes environments have the following key components:
- Pods—pods are the smallest unit provided by Kubernetes to manage containerized workloads. A pod typically includes several containers, which together form a functional unit or microservice.
- Persistent storage—local storage on Kubernetes nodes is ephemeral, and is deleted when a pod shuts down. This can make it difficult to run stateful applications. Kubernetes provides the Persistent Volumes (PV) mechanism, allowing containerized applications to store data beyond the lifetime of a pod or node.
This is part of an extensive series of guides about microservices.
In this guide, you will learn:
- Kubernetes Architecture Overview
- Core Components: Kubernetes Control Plane
- Kubernetes Worker Nodes
- Kubernetes Persistent Storage
- Kubernetes Helm
- Best Practices for Architecting Kubernetes Clusters
- Automating Kubernetes Infrastructure with Spot
Kubernetes Architecture Overview
A Kubernetes cluster has two main components—the control plane and data plane, machines used as compute resources.
- The control plane hosts the components used to manage the Kubernetes cluster.
- Worker nodes can be virtual machines (VMs) or physical machines. A node hosts pods, which run one or more containers.
Kubernetes nodes can run on regular compute instances or low cost spot instances – learn more in our guide to Kubernetes spot instances
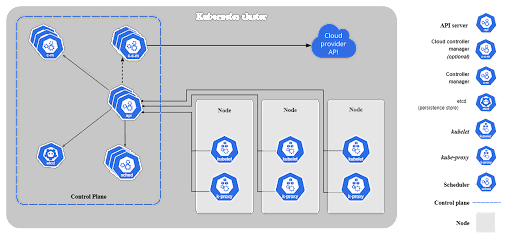
Image Source: Kubernetes
Core Components: Kubernetes Control Plane
The control plane includes components like the API Server, Scheduler, and Controller Manager. The control plane maintains communication with worker nodes. When you deploy applications on Kubernetes, you tell the control plane to start the application’s containers. The control plane then schedules the containers to run on the cluster’s nodes.
Technically speaking, the Kubernetes control plane is a collection of processes that manages the state of a Kubernetes cluster. It receives information about cluster activity and requests, and uses this information to move cluster resources to the desired state. The control plane interacts with individual cluster nodes using the kubelet, an agent deployed on each node.
To have a highly available control plane, you should have at least three control plane nodes with the components replicated across all three nodes.
Here are the main components of the control plane:
1. API Server
Provides an API that serves as the front end of a Kubernetes control plane. It is responsible for handling external and internal requests—determining whether a request is valid and then processing it. The API can be accessed via the kubectl command-line interface or other tools like kubeadm, and via REST calls.
2. Scheduler
This component is responsible for scheduling pods on specific nodes according to automated workflows and user defined conditions, which can include resource requests, concerns like affinity and taints or tolerations, priority, persistent volumes (PV), and more.
Learn more in our detailed guide to kubernetes affinity.
3. Kubernetes Controller Manager
The Kubernetes controller manager is a control loop that monitors and regulates the state of a Kubernetes cluster. It receives information about the current state of the cluster and objects within it, and sends instructions to move the cluster towards the cluster operator’s desired state.
The controller manager is responsible for several controllers that handle various automated activities at the cluster or pod level, including replication controller, namespace controller, service accounts controller, deployment, statefulset, and daemonset.
Related content: Read our guide to kubernetes monitoring.
4. etcd
A key-value database that contains data about your cluster state and configuration. Etcd is fault tolerant and distributed.
5. Cloud Controller Manager
This component can embed cloud-specific control logic – for example, it can access the cloud provider’s load balancer service. It enables you to connect a Kubernetes cluster with the API of a cloud provider. Additionally, it helps decouple the Kubernetes cluster from components that interact with a cloud platform, so that elements inside the cluster do not need to be aware of the implementation specifics of each cloud provider.
This cloud-controller-manager runs only controllers specific to the cloud provider. It is not required for on-premises Kubernetes environments. It uses multiple, yet logically-independent, control loops that are combined into one binary, which can run as a single process. It can be used to add scale a cluster by adding more nodes on cloud VMs, and leverage cloud provider high availability and load balancing capabilities to improve resilience and performance.
Kubernetes Core Components: Worker Nodes
6. Nodes
Nodes are physical or virtual machines that can run pods as part of a Kubernetes cluster. A cluster can scale up to 5000 nodes. To scale a cluster’s capacity, you can add more nodes.
7. Pods
A pod serves as a single application instance, and is considered the smallest unit in the object model of Kubernetes. Each pod consists of one or more tightly coupled containers, and configurations that govern how containers should run. To run stateful applications, you can connect pods to persistent storage, using Kubernetes Persistent Volumes—learn more in the following section.
Learn more in our detailed guide to the Kubernetes pod
8. Container Runtime Engine
Each node comes with a container runtime engine, which is responsible for running containers. Docker is a popular container runtime engine, but Kubernetes supports other runtimes that are compliant with Open Container Initiative, including CRI-O and rkt.
9. kubelet
Each node contains a kubelet, which is a small application that can communicate with the Kubernetes control plane. The kubelet is responsible for ensuring that containers specified in pod configuration are running on a specific node, and manages their lifecycle.. It executes the actions commanded by your control plane.
10. kube-proxy
All compute nodes contain kube-proxy, a network proxy that facilitates Kubernetes networking services. It handles all network communications outside and inside the cluster, forwarding traffic or replying on the packet filtering layer of the operating system.
11. Container Networking
Container networking enables containers to communicate with hosts or other containers. It is often achieved by using the container networking interface (CNI), which is a joint initiative by Kubernetes, Apache Mesos, Cloud Foundry, Red Hat OpenShift, and others.
CNI offers a standardized, minimal specification for network connectivity in containers. You can use the CNI plugin by passing the kubelet –network-plugin=cni command-line option. The kubelet can then read files from –cni-conf-dir and use the CNI configuration when setting up networking for each pod.
Kubernetes Persistent Storage
Containers are designed as immutable entities. Once a container is shut, all the data created during the container’s lifetime is lost. While this stateless characteristic is ideal for some applications, many use cases require preserving and sharing information.
You can set up Kubernetes persistent storage to allow applications to consume and request storage resources. You can do this by using volumes, which serve as basic components of a Kubernetes storage architecture.
PersistentVolumes (PVs) are storage resources designed to enable durable storage for containerized applications in Kubernetes. Each PV is a persistent storage component within the Kubernetes architecture.
PV resources belong to the cluster but exist independently of pods. To ensure statefulness, each disk and data represented by PVs continue existing even as changes occur to the cluster, regardless of deletion and recreation of pods.
There are two ways to create PVs—manually and dynamically. Dynamic creation of PVs involves the use of PersistentVolumeClaims (PVCs) that define the details of a resource request, letting Kubernetes manage the lifecycle of PVs.
Learn more in our detailed guide to Kubernetes Persistent Volumes
Kubernetes Helm
With Kubernetes, Helm serves as a package manager, working similarly to npm in Node.js and yum in Linux. Helm deploys charts as complete and packaged Kubernetes applications, which include pre-configured versioned application resources. It is possible to deploy different chart versions by using different configuration sets.
Helm plays a key role within the Kubernetes architecture. It can, for example, significantly improve productivity and deployment, and reduce the complexity of Kubernetes applications. You can leverage Helm charts to easily manage cloud-native applications and microservices.
Learn more in our detailed guide to Kubernetes helm
Related content: Read our guide to kubernetes helm charts.
Best Practices for Architecting Kubernetes Clusters
According to Gartner, the following best practices can help you architect effective Kubernetes clusters:
- Update versions—always update to the latest version of Kubernetes.
- Educate teams—invest in advance in training developer and operations teams.
- Govern integration—standardize governance enterprise-wide, to ensure all vendors and tools are aligned and are properly integrated with Kubernetes.
- Scan images—integrate image scanners into your CI/CD pipeline, including during build and run cycles. Always suspect open source code from Github repositories.
- Control access—implement role-based access control (RBAC) across all clusters, enforcing the least privilege principle and zero-trust models.
- Restrict users—to secure containers, use only non-root users and make your file system read-only.
- Minimal base images—basic Docker Hub images may contain malware or unnecessary code. When possible, start with clean, lean code and then build packages up. In general, small images can build faster and take up less disk space.
- Simplify containers—prefer setting up one process for each container. This makes it easier for the orchestrator to determine and report on the health of the process.
- Be verbose—descriptive labels can help other developers and relevant parties understand Kubernetes cluster structure and workflows.
- Avoid over-granularity—not every function within a logical code component should be a separate microservice.
- Automate—you can entirely avoid manual Kubernetes deployments by automating your CI/CD pipeline.
- Manage pods—prefer using readinessProbe and livenessProbe to manage the lifecycle of pods. Otherwise, pods may be terminated during initialization or receive user requests too early.
Automating Kubernetes Infrastructure with Spot
Spot Ocean from Spot frees DevOps teams from the tedious management of their cluster’s worker nodes while helping reduce cost by up to 90%. Spot Ocean’s automated optimization delivers the following benefits:
- Container-driven autoscaling for the fastest matching of pods with appropriate nodes
- Easy management of workloads with different resource requirements in a single cluster
- Intelligent bin-packing for highly utilized nodes and greater cost-efficiency
- Cost allocation by namespaces, resources, annotation and labels
- Reliable usage of the optimal blend of spot, reserved and on-demand compute pricing models
- Automated infrastructure headroom ensuring high availability
- Right-sizing based on actual pod resource consumption
Related content: Read our guide to kubernetes labels.
Related content: Read our guide to kubernetes resource management.
Learn more about Spot Ocean today!
See Additional Guides on Key Microservices Topics
Together with our content partners, we have authored in-depth guides on several other topics that can also be useful as you explore the world of microservices.
Application Mapping
Authored by CodeSee
- Bring visibility to your codebase
- What Is Software Mapping, 4 Types of Dependencies and How to Manage Them
- Why Code Dependencies Matter—and How to Identify and Resolve Them
AWS ECS
Authored by Spot
- Complete Guide to AWS ECS: Architecture, Pricing, and Best Practices
- AWS ECS Pricing: 4 Pricing Models and 7 Cost Saving Tips
- Run an ECS Cluster on Spot Instance in 3 Steps
Istio
Authored by Tigera