 Microsoft Azure
 Cloud Financial Management (FinOps)
 How to Operationalize FinOps
What is Azure Autoscaling?
Azure autoscaling is a cloud computing feature that allows you to automatically scale your applications or resources in the Azure cloud based on demand. Autoscaling can be based on specific criteria such as traffic or utilization levels. It can scale up or down automatically when these situations occur.
You can use autoscaling to provision enough resources to support the demand on your application, without over provisioning and incurring unnecessary costs. Azure Autoscaling can also be used to assist with cost management, by shutting down infrastructure that is currently not needed.
The service that handles autoscaling in Azure is Azure Monitor. You can get to autoscale settings by selecting Scale out in your Service Plan or by going to Azure Monitor, selecting Autoscale, and then selecting your Service Plan.
Azure Autoscaling is available for:
Azure App Service for Web Applications
Azure App Service has built-in autoscaling. Autoscaling automatically grows and shrinks an App Service environment to fit your budget and or load profile. You can autoscale individual worker pools based on metrics or schedule. Autoscaling settings apply to all of the apps within an App Service.
Virtual machine scale sets (VMSS)
Azure Autoscaling lets you set up automated processes that scale your virtual machines (VMs). You do this by creating an Azure VM scale set, which defines how VMs are increased and decreased. After you create rules that define acceptable performance, the process performs actions that adjust the capacity according to your scale set. You can also schedule events that automatically scale VMs during fixed time intervals.
Additional services:
- Azure Cloud Services—a Platform as a Service (PaaS) offering. Azure Cloud Services has built-in autoscaling at the role level.
- Data Explorer clusters
This is part of our series of articles on Azure pricing.
In this article:
- How Do I Turn On Autoscaling in Azure?
- Azure Autoscale Concepts
- Autoscaling in Azure App Service
- Autoscaling with Azure Virtual Machine Scale Sets (VMSS)
- Azure Autoscaling Best Practices
- Azure Autoscaling with Spot by NetApp
How Do I Turn On Autoscaling in Azure?
The service that handles autoscaling in Azure is Azure Monitor. To turn on autoscaling in Azure:
- In Azure Monitor, click the Autoscale pane and select a resource.
- Click Enable Autoscale.
- Type a name for the new scale setting, and add a rule. Scale rule options display in the right-hand pane. The default rule is to add 1 instance if CPU utilization exceeds 70%. You can modify the rules if necessary.
- Click Add to add the rule. Azure recommends adding at least one rule per scale set.
- You can now add more rules—for example, you can define a scale in event, by setting the Operator to Less than, setting Threshold to 30, and Operation to Decrease count by 1. This will remove an instance if CPU utilization goes under 30%.
- Click Save.
Alternatively, you can get to autoscale settings by selecting Scale out in your Service Plan.
Azure Autoscale Concepts
Here are the main concepts behind Azure Autoscaling:
- Resource metrics—Azure VM scale sets use telemetry data from Azure diagnostics agents. You can get telemetry for web applications and cloud services directly from the Azure infrastructure. You can get data about resources, including CPU and memory usage, thread counts, disk usage, and queue length.
- Custom metrics—you can configure your applications to send custom metrics to Application Insights, a feature of Azure Monitor which provides Application Performance Management (APM). You can then scale VMs according to this information.
- Rules—Azure lets you create metric-based rules and time-cased rules. Additionally, you can create as many autoscale rules as you need, and set them up to overlap during certain scenarios.
- Actions and automation—you can use rules to trigger one or multiple types of actions, including scaling VMs, sending emails to relevant stakeholders, and triggering automated actions via webhooks.
- Horizontal vs vertical scaling—autoscale uses horizontal scaling only. This means you can set up rules that increase or decrease the amount of VMs. This process provides the flexibility needed to run hundreds and thousands of VMs. Vertical scaling, on the other hand, lets you maintain the same amount of VMs, while increasing or decreasing the CPU and memory resources. You usually need to stop VMs when using vertical scaling.
Learn more in our guide on Azure automation tools
Autoscaling in Azure App Service
Azure App Service is a popular platform for hosting web applications, and its integration with Azure Autoscaling is one of its central features.
Once you’ve enabled autoscaling for your App Service applications, Azure will automatically adjust the number of instances running your apps based on the criteria you’ve set. This can be CPU usage, memory usage, HTTP queue length, or even a custom metric.
You have full control over the scaling process. You can set minimum and maximum instance limits to ensure your apps never go beyond your budget or fall short of essential resources. You can also configure the cooldown period—the time Azure waits after a scale operation before it can scale again—to prevent excessive scaling.
Autoscaling in Azure App Service can also scale down when demand decreases. This ensures you’re not wasting resources or money on unnecessary capacity.
Autoscaling with Azure Virtual Machine Scale Sets (VMSS)
Azure Autoscaling initiates events based on predefined settings. You can set up rules that define how VMs should be scaled during unexpected or regular, predictable events.
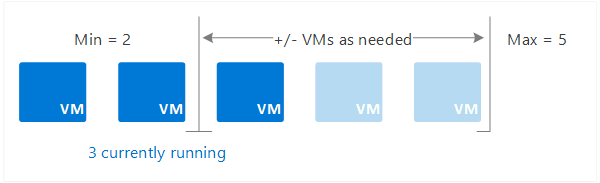
You can define a scale set, which is a group of VMs with a minimum and a maximum number of instances. The minimum number of instances will always run, irrespective of loads. The maximum number is a limit, which will put a cap on the total cost per hour. The scale set automatically adjusts between these two extreme values according to the rules you set.
Source: Azure
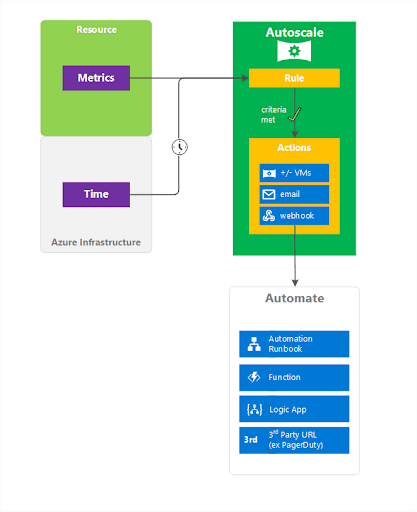
When rule conditions are met, you can perform one or more auto-scaling actions, including:
- Adding VMs (scale out)
- Removing VMs (scale in)
- Sending notifications
- Using webhooks to run other automated events, including automated runbooks, Azure Functions, and third party systems
Source: Azure
Azure Autoscaling Best Practices
The following best practices will help you use Azure Autoscaling more effectively:
- If you can predict application loads, use scheduled autoscaling to add and remove instances according to known workload fluctuations.
- If you cannot predict loads, use autoscaling based on resource metrics
-
- Initially provision some extra capacity, especially when starting to use autoscaling for an application. This will allow you to monitor resource metrics and tune autoscaling behavior, without disrupting the application.
- Monitor and fine tune autoscaling rules. Keep in mind that autoscaling is an iterative process—it will take some trial and error to identify the resource metric and threshold that will achieve the best scaling behavior.
- You can have multiple rule profiles. Azure Autoscaling processes one rule profile at a time, and only after processing all custom rules, uses the default profile. This means the most important rules should be in custom profiles, if used. Within a profile, scale out is executed if any rule is met, and scale in (removing instances) is only performed if all rules are met.
The SDK is more flexible than Azure Portal, allowing more detailed scheduling options, and also lets you use custom metrics and counters as a trigger for autoscaling.
Related: learn more in our detailed guide on Azure Automanage
Azure Autoscaling with Spot by NetApp
Spot by NetApp’s Elastigroup is a SaaS offering that helps Azure customers simplify their infrastructure management overhead while reducing costs. Elastigroup’s advanced autoscaling ensures your Azure clusters are highly available, always healthy and extremely affordable.
Here are some of the key benefits of Elastigroup:
-
- Heterogenous and predictive VM scaling enables you to create a blended cluster of different VM types and sizes as well as updating relevant Load Balancers and Application Gateways as needed. Elastigroup will intelligently scale your cluster to match any scaling rules as well as predictively anticipate workload changes coming from increased or decreased traffics or application requests.
- Seamless scaling across Azure spot and pay-as-you-go VMs allows you to enjoy dramatic cost savings (up to 90%) for even mission-critical and production workloads, with guaranteed availability.
- Hassle-free Blue/Green deployments provide built-in CI/CD functionality. Anytime you wish to upgrade your application version or any attribute in the group that you want to gracefully update on all the VMs, simply provide a new image, define your desired batch sizes and Elastigroup will seamlessly replace your VMs with updated versions, with each batch waiting for healthy green instances before moving on to the next batch, thereby ensuring high availability for your workloads, completely hassle free.
- Built-in health checks for VM state and Application Gateway.
- VM scheduling allows you to start and stop VMs as well as schedule scaling operations and deployments to reflect your actual work requirements, establish tighter control on when VMs are being used and increase cost efficiency.
Discover how Spot by NetApp can help you take control of your Azure cloud today!