 Microsoft Azure
 Cloud Financial Management (FinOps)
 How to Operationalize FinOps
What Is AWS Cost Anomaly Detection?
AWS Cost Anomaly Detection is a feature of the AWS Cost Management suite. It leverages machine learning to enable continuous monitoring of your AWS costs and usage, allowing you to identify unexpected and abnormal spending. AWS Cost Anomaly Detection offers businesses various benefits, including visibility and intelligent analysis to help you optimize your AWS costs.
Cost Anomaly Detection provides aggregated reports via email alerts of Amazon SNS topics. You can configure SNS to create a chatbot configuration mapping each topic to a chatroom in Amazon Chime or a Slack channel. The machine learning capabilities allow you to assess your spending patterns and help reduce false positives. You can configure monthly or weekly evaluations or evaluate organic growth.
AWS Cost Anomaly Detection’s analysis capabilities let you determine the root causes of anomalies, including the specific usage driving up your costs. You can set up cost evaluations based on your organization’s needs. For example, you specify if the analysis covers entire cost categories, member accounts, or cost allocation tags or if it assesses each service separately.
Related content: Read our guide to AWS Cost Explorer
In this article:
- Getting Started with AWS Cost Anomaly Detection
- Benefits and Limitations of AWS Cost Anomaly Detection
- Tutorial: Slack Integrations for Cost Anomaly Detection Using AWS Chatbot
Getting Started with AWS Cost Anomaly Detection
AWS Cost Anomaly Detection is a Cost Explorer feature, so you need to enable Cost Explorer to access it. Once you’ve finished setting up Cost Explorer, you can start using Cost Anomaly detection by opening the AWS Management Console and navigating to the Cost Management console. Next, you select the Cost Anomaly Detection option on the navigation pane.
You can configure Cost Anomaly Detection to detect anomalies at various levels of granularity and different spending patterns based on the type of monitor.
For example, you might have different usage and spending patterns for each AWS service, such as Amazon EC2, AWS Lambda, and Amazon S3. You can segment cost evaluations by service to identify distinct usage trends and minimize false-positive alerts. You can build a cost monitor to evaluate a specific member account, cost category, or cost allocation tag.
There are several monitor types to choose from, each suited to different AWS account structures. The current selection includes:
- AWS services—this is the recommended monitor for use cases that don’t require segmenting your spending patterns by specific environments or organizations. A single monitor evaluates your account’s entire AWS service usage and identifies any anomaly across the AWS account. The monitor evaluates any new services you add automatically, eliminating the need for manual configuration.
- Cost categories—this is the recommended option for use cases that manage AWS costs based on cost categories. You can only use one key/value pair for this monitor.
- Linked accounts—this option is suited to use cases requiring segmenting the cost evaluation based on the environments, products, services, or teams. It assesses your overall spending for a member account or group of accounts. For one monitor, you can define up to 10 linked accounts, either as groups or individual accounts.
- Cost allocation tags—this is a similar option to the linked account monitor type. It is useful for segmenting the spending evaluation based on team, service, environment, or product, which you define using cost allocation tags. You can only use one key for this monitor type, though it supports up to 10 values per monitor.
It is not advisable to create a monitor spanning different monitor types, as this could result in duplication due to overlapping spending evaluations.
Related content: Read our guide to AWS cost optimization
Benefits and Limitations of AWS Cost Anomaly Detection
AWS Cost Anomaly Detection helps finance and engineering teams to monitor, detect, and investigate the factors determining AWS spending. A major benefit of this capability is recognizing and preventing undesired outcomes and helping enforce budgets. For example, an undesired outcome might be a deployment that takes longer than expected, driving up IT costs.
Cost Anomaly Detection helps AWS users minimize unexpected costs by identifying their root causes early on. It alerts you immediately of detected anomalies, allowing you to take the necessary actions to stay on budget.
Additional benefits include:
- Determining usage baselines—you can identify normal patterns to determine what counts as an anomaly.
- Machine learning—Cost Anomaly Detection automatically filters data to reduce your management burden.
- Various metrics—it regularly examines infrastructure and application metrics to assess activity.
- Root cause identification—it finds what causes each unexpected change.
- Streamlined alerting—you automatically receive alerts with reduced false positives.
However, AWS Cost Anomaly Detection also has some limitations, such as:
- Manual configuration and management—you still need to configure the service manually to ensure it works correctly. For example, you need to define the segments for the metrics you want to evaluate.
- No unit cost mapping—it identifies overutilized resources but not unit costs (i.e., costs per customer, team, or project).
- Limited data collection—it only analyzes limited amounts of data, potentially affecting accuracy.
- Mediocre performance—Cost Anomaly Detection works well, but it is not AWS’ strongest real-time anomaly detection tool.
Related content: Read our guide to AWS Cost and Usage Report
Tutorial: Slack Integrations for Cost Anomaly Detection Using AWS Chatbot
Use the following steps to set up a Slack integration for AWS Cost Anomaly Detection via a chatbot:
1. Set Up Cost Anomaly Detection Alerts
If you do not have an AWS account, you must create one first. Once you have an account, you can use your account credentials to sign in to the AWS Cost Management console.
Next, select Cost Anomaly Detection on the navigation pane. Create a monitor using the Creating cost monitors and alerts subscriptions option.
Once you’ve created the monitor, select “individual alerts” in the “alerting frequency” field, and specify an Amazon SNS topic as the alert recipient.
Finally, select Create monitor.
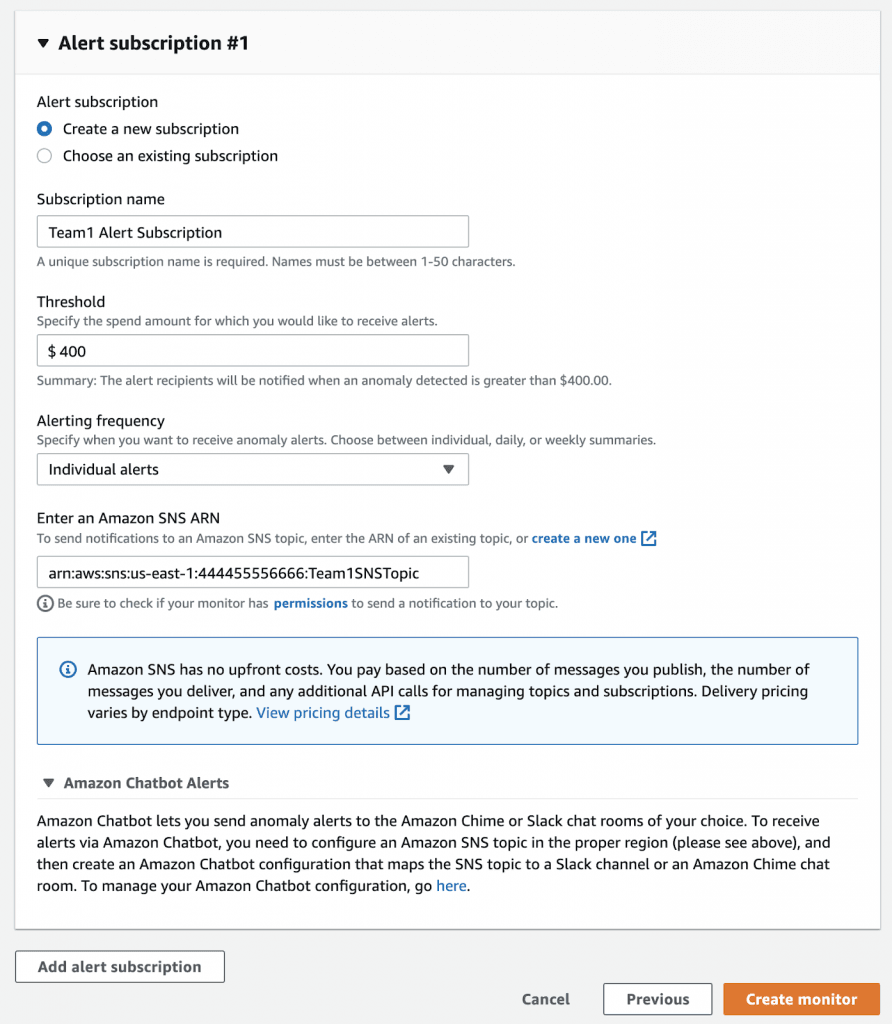
Image Source: AWS
2. Set Up Slack in AWS Chatbot
Once you’ve added an Amazon SNS topic to an “individual alert” anomaly subscription, you can configure Slack using Chatbox. First, go to the AWS Chatbot console and choose Slack as your chat client.
Next, give AWS Chatbot permission to access your AWS Slack workspace.
After specifying the workspace configurations in the Chatbot console, select Configure a new channel. Enter the configuration name and (optionally) specify if you require further logging to enable the configuration.
Select the Slack channel you want to use as a workspace to publish alerts. Copy the link by right-clicking the channel and paste it into the channel ID textbox.
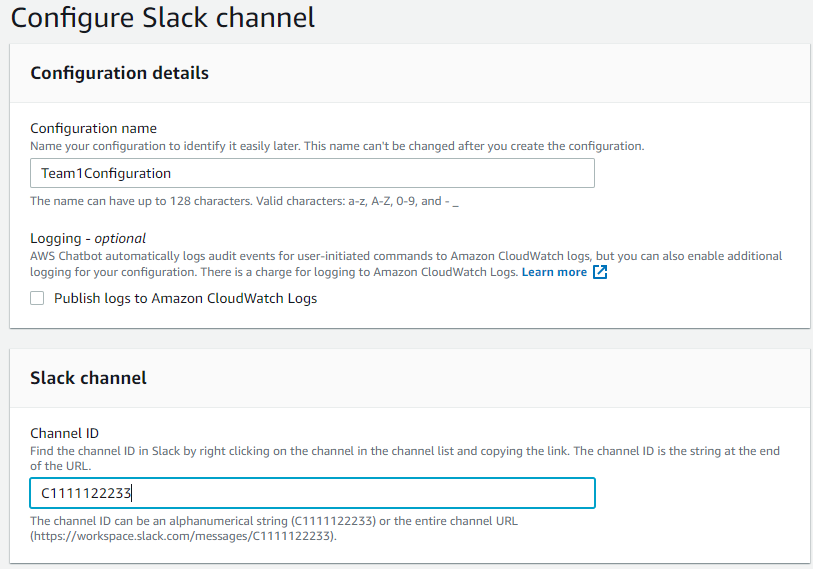
Image Source: AWS
AWS Chatbot must have an IAM role to execute actions like running CLI commands or responding to interactive messages. You can use role settings to determine each channel member’s permissions. You can choose a user role or a channel IAM role, either reusing an existing role or creating a new one based on an IAM template.
For example, you can create an IAM role and grant permissions using the notification permissions template. You may choose permissions that allow Chatbot to receive and send notifications. It is advisable to use descriptive names to help identify the purpose of new IAM roles.
Next, select a suitable policy that provides guardrails for the SNS channel. Your company’s administrator should be able to provide additional information on your organization’s policies.
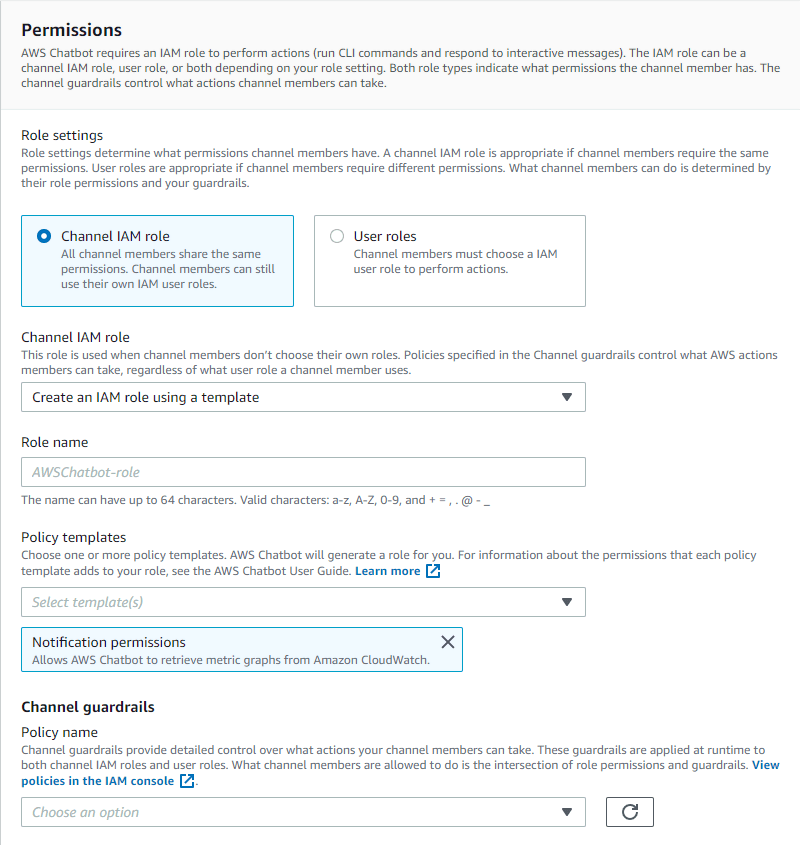
Image Source: AWS
With the channel guardrails in place, you can choose the SNS topic you created under the alert subscription in the Cost Anomaly Detection console. You can choose several SNS topics from multiple regions and grant them all permissions to notify your specified Slack channel.
Finally, select “configure.”
3. View Your Cost Anomaly Detection Notifications
When you’ve finished configuring Cost Anomaly Detection and Slack, you should be able to see your subscription alerts in the Slack channel you configured. The following example shows you what a Cost Anomaly Detection alert should look like on Slack. The header includes a link navigating to the anomaly’s page to provide further details.
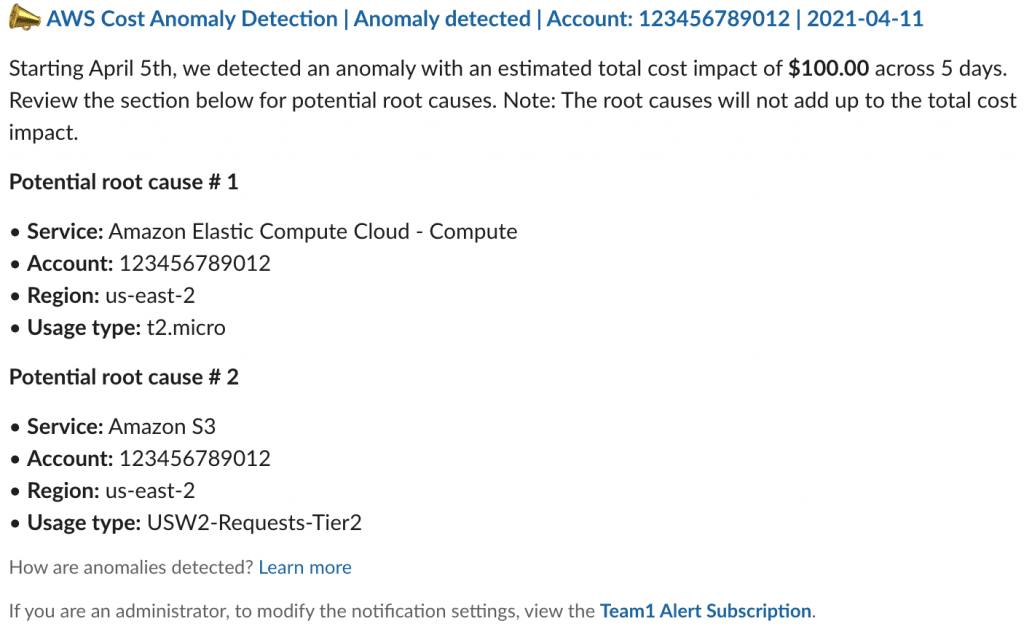
Image Source: AWS
AWS Cost Optimization with Spot
AWS Cost Explorer is a useful tool for reducing cloud costs, but it is limited to the current pricing models you are utilizing. Spot lets you cut costs dramatically by switching to lower-cost pricing models like spot instances and reserved instances.
Spot allows you to reliably use spot instances for production and mission-critical workloads as well as enjoy the long-term pricing of RIs without the risks of long-term commitment.
Key features of Spot’s cloud financial management suite include:
- Predictive rebalancing—identifies spot instance interruptions up to an hour in advance, allowing for graceful draining and workload placement on new instances, whether spot, reserved or on-demand.
- Advanced auto scaling—simplifies the process of defining scaling policies, identifying peak times, automatically scaling to ensure the right capacity in advance.
- Optimized cost and performance—keeps your cluster running at the best possible performance while using the optimal mix of on-demand, spot and reserved capacity.
- Enterprise-grade SLAs—constantly monitors and predicts spot instance behavior, capacity trends, pricing, and interruption rates. Acts in advance to add capacity whenever there is a risk of interruption.
- Serverless containers—allows you to run your Kubernetes and container workloads on fully utilized and highly available compute infrastructure while leveraging spot instances, Savings Plans and RIs for extreme cost savings.
- Intelligent and flexible utilization of AWS Savings Plans and RIs—ensures that whenever there are unused reserved capacity resources, these will be used before spinning up new spot instances, driving maximum cost-efficiency. Additionally, RIs and Savings Plans are fully managed from planning and procurement to offloading unused capacity when no longer needed, so your long-term cloud commitments always generate maximum savings.
- Visibility and recommendations—lets you visualize all your cloud spend with the ability to drill-down based on the broadest range of criteria from tags, accounts, services to namespaces, annotations, labels, and more for containerized workloads as well as receive cost reduction recommendations that can be implemented in a few clicks.
Learn more about Spot’s cloud financial management solutions