 Microsoft Azure
 Cloud Financial Management (FinOps)
 How to Operationalize FinOps
What Is Azure Pipelines?
Azure Pipelines is a cloud-based Continuous Integration/Continuous Deployment (CI/CD) platform that automates the building, testing, and deployment of applications. It is a component of Microsoft’s Azure DevOps services. The pipeline begins when you commit code changes to a version control system like Git. After triggering, it goes through various stages, such as building the code, running automated tests, and deploying the application to target environments, which could be in the cloud or on-premises.
You define your pipeline in a YAML file, which outlines the steps to be taken during the build, test, and deploy phases. The YAML file can be stored alongside your code, making it easier to maintain and version your control. Azure Pipelines reads this file to execute tasks in the order and environment you specify.
The platform supports multiple languages including .NET, Java, Python, and Node.js. It can also integrate with various tools and services, both from Microsoft and third parties, for tasks like containerization, package management, and code quality checks.
By breaking down the CI/CD process into components like agents, jobs, stages, and steps, Azure Pipelines allows for modularity and reusability, making it easier to manage and troubleshoot.
This is part of a series of articles about CI/CD
Related content: Read our guide to Azure CI/CD
In this article:
- Azure Pipeline Components
- Benefits of Azure Pipelines for DevOps Teams
- Tutorial: Creating Azure Pipeline in Python
Azure Pipeline Components
Let’s explore the key components of Azure Pipelines in more detail.
Agents
Agents are the backbone of Azure Pipelines. An agent is a computing environment where tasks are executed. It’s responsible for checking out your code, running tasks, and reporting the results. Azure Pipelines provides two types of agents:
- Microsoft-hosted agents are ready-made environments maintained by Microsoft. They are pre-configured with popular software and tools, saving you the trouble of setting up and managing your own machines.
- Self-hosted agents are environments that you manage yourself. They give you more control over the configuration and can run on your hardware or in the cloud.
Jobs
In Azure Pipelines, a job represents a single phase of your pipeline, such as building code or running tests. A job runs on an agent and consists of a series of steps. You can run multiple jobs in parallel to speed up your pipeline or run them sequentially depending on the dependencies between them.
Each job has its context and workspace, which means variables and files created in one job are isolated from others. This helps maintain the integrity of your pipeline and makes troubleshooting easier.
Stages
Stages group related jobs together, providing a logical structure to your pipeline. For instance, you might have a ‘Build’ stage that compiles your code, followed by a ‘Test’ stage that runs unit tests, and finally a ‘Deploy’ stage that pushes your application to production.
Stages have several benefits. They allow you to visualize your pipeline’s progress, control the flow with conditions, and use approvals for critical stages. They also enable you to reuse pipeline code across projects, making your CI/CD process more efficient.
Steps
Steps are the smallest units of work in Azure Pipelines. They represent individual tasks such as running a script, publishing artifacts, or deploying to a target environment. Each step runs in the context of a job and executes on an agent.
You can define steps using built-in tasks provided by Azure Pipelines, or you can write your scripts using PowerShell, Bash, Python, or other scripting languages. You can also use third-party tasks from the Azure DevOps Marketplace, further extending the capabilities of your pipeline.
Learn more in our detailed guide to devops automation.
Benefits of Azure Pipelines for DevOps Teams
Integrated Ecosystem
Azure Pipelines is part of the larger Azure ecosystem, which includes a wide range of services and tools for building, testing, deploying, and managing applications. This integrated ecosystem allows for seamless collaboration between developers and IT operations, resulting in faster delivery of high-quality software.
Scalability and Speed
Azure Pipelines is highly scalable, allowing you to run multiple jobs in parallel. This can reduce the time it takes to build, test, and deploy complex applications. Furthermore, Azure Pipelines is designed to automatically scale up the underlying infrastructure to meet your needs.
Hosted and Self-Hosted Agents
Azure Pipelines support both hosted and self-hosted agents, providing you with the flexibility to choose the best option for your needs. Hosted agents are managed by Azure, freeing you from the need to maintain your own infrastructure. Self-hosted agents give you more control over the environment in which your jobs run.
YAML-Defined Pipelines
With Azure Pipelines, you can define your pipelines as code using YAML. This allows you to version your pipelines along with your application code, enhancing transparency and reproducibility. Moreover, YAML-defined pipelines enable developers to manage their pipelines directly from their preferred IDE, improving productivity and efficiency.
Environment and Security Controls
Azure Pipelines provide comprehensive environment and security controls, ensuring that your CI/CD processes are secure and compliant. These controls include features like secure secrets management, role-based access control, and audit trails, among others.
Tutorial: Creating Azure Pipeline in Python
Here are the basic steps involved in creating your first pipeline in the Azure Pipelines service.
Step 1: Create a Python Pipeline
Start by setting up your Azure DevOps organization. If you don’t have an account yet, you can create one for free. Once you have your account, you can create a new project and select Pipelines from the left-hand menu.

You will need to initialize a repo before you can add a YAML file. Use the default repo created for this deployment or provide information about your repository

A default YAML file will exist in your project’s root directory. This file, typically named azure-pipelines.yml, will contain the pipeline definition. You will need to modify it. Here’s a simple example of what your YAML file might look like:
trigger:
- master

pool:
  vmImage: 'ubuntu-latest'

steps:
- task: UsePythonVersion@0
  inputs:
    versionSpec: '3.x'
    addToPath: true

- script: |
    python -m pip install --upgrade pip
    pip install -r requirements.txt
  displayName: 'Install dependencies'

- script: |
    python -m pytest
  displayName: 'Run tests'
This pipeline is configured to run whenever there’s a push to the master branch. It uses the latest Ubuntu VM image and Python 3.x. It then installs the necessary dependencies and runs the tests.

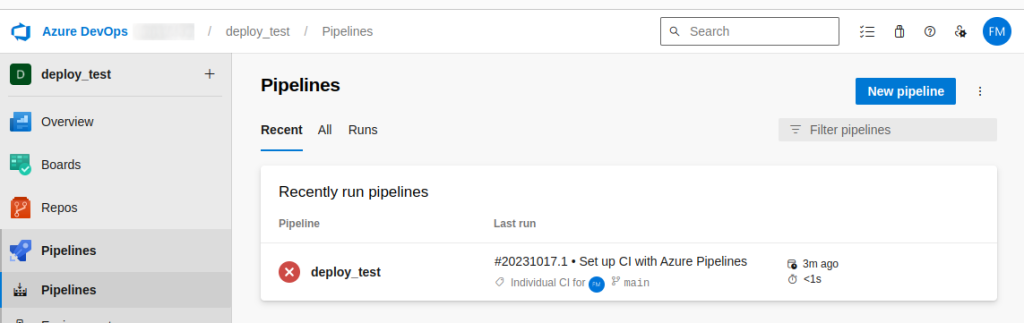
Step 2: View and Manage Your Pipeline
Once your pipeline is set up, you can view and manage it from the Azure DevOps portal. You’ll see a list of all your pipelines, along with their status, the last time they were run, and the results of the most recent run.
To view the details of a pipeline, click on its name. This will take you to a page with more detailed information, including a visualization of the pipeline and a log of recent runs. If a run fails, you can click on it to see more detailed error information.
You can edit a pipeline by clicking on the Edit button from the pipeline’s page. This allows you to modify the YAML file directly in the Azure DevOps portal. You can also set up triggers to run your pipeline automatically when specific events occur, such as a push to a certain branch or the creation of a pull request.
Step 3: Add a Status Badge to Your Repository
Adding a status badge to your repository is a great way to show off your pipeline’s status. The badge will display the status of the latest run and will update automatically whenever the status changes.
To add a badge, go to your pipeline’s page and click on the Status Badge button. This will open a dialog where you can configure your badge. You can choose which branch the badge should reflect, and whether it should show the status of the latest build, the latest release, or both.
Once you’ve configured your badge, you’ll be given a snippet of Markdown that you can add to your README file. Here’s an example:
[](https://dev.azure.com/your-org/your-project/_build/latest?definitionId=1&branchName=master)
This Markdown snippet creates a link to your pipeline’s latest build, with the link text being an image that displays the build status.

Build Your Azure DevOps Pipeline with Spot
With hundreds of services over multiple clusters, providing control of the software deployment process and ensuring services behave as expected is not a trivial task. That’s exactly where Ocean CD comes in.
Get everything you need to control and standardize your deployment process with Spot’s Ocean CD. This CI/CD containers solution reinvents progressive deployment strategies to deliver code to production as fast and as frequently as your business demands.