 Microsoft Azure
 Cloud Financial Management (FinOps)
 How to Operationalize FinOps
What is the Azure Cost Calculator?
The Azure Pricing Calculator can help you understand the costs of moving workloads to the Azure cloud. It estimates Azure pricing once all your data and applications are in Azure. It displays the price for different configurations and sizes of Azure Virtual Machines (AVM), accounting for the memory, CPU, location, storage, and hours of usage.
The calculator can provide an estimation of a complete solution using a combination of Azure services. Organizations can then make an informed decision when considering a shift to the Azure cloud, or expanding their presence in Azure.
Azure also provides a Total Cost of Ownership Calculator, which can help you define workloads, set assumptions, and generate an economic analysis of the total cost of your expected Azure deployment, across different possible scenarios.
Related content: Read our guide to Azure cost management
In this article:
- Estimate Workload Cost Using the Pricing Calculator
- Compare Costs by Using the Total Cost of Ownership Calculator
- Optimizing Azure Costs with Spot.io
Estimate Workload Cost Using the Pricing Calculator
The following tutorial can help you learn how to create an Azure Pricing Calculator estimate. This example uses configurations for a VM as well as related resources. When creating your own estimate, provide Azure Pricing Calculator with the details of real resource requirements.
1. Go to the Azure Pricing Calculator page.
2. Find the Products tab, and click on the Virtual Machines option. Next, scroll down to see the VM options, and add the configuration details of your VM.
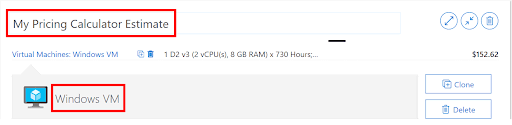
3. Change the text—Your Estimate and Virtual Machines—with descriptive names. The image below replaces the generic Your Estimate text with My Pricing Calculator Estimate, and the generic Virtual Machines text with Windows VM.
4. Replace the default VM configuration with your own specifications.
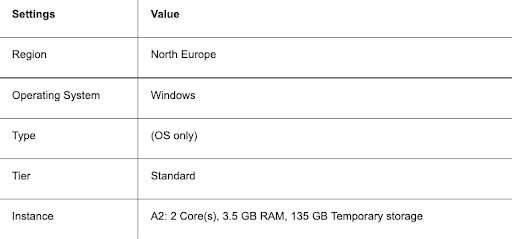
Note: the above pricing is an example and may be subject to change. You can, however, choose a similar instance. To learn about the various VM options, go to the More info menu on the right, and choose Product details.
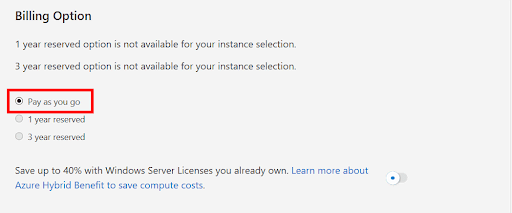
5. In the Billing Option menu, choose Pay as you go. This option uses market on-demand pricing.
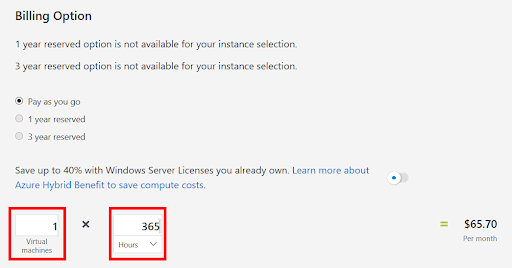
6. Azure defines a month as 730 hours. You can configure a VM for a monthly availability—set to 100% of the time. To do this, specify 730 as the ‘hours-per-month’ value.
This example needs one VM with 50% availability. To set this up, specify 1 VM and change the value of ‘hours-per-month’ to 365.
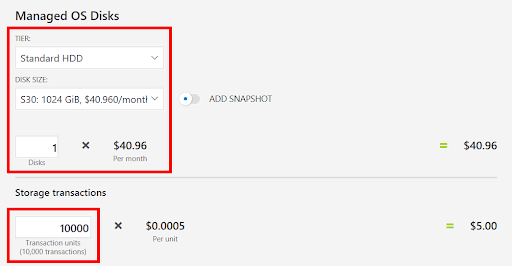
7. Go to the Managed OS Disks pane and change the default configuration of your VM’s storage.
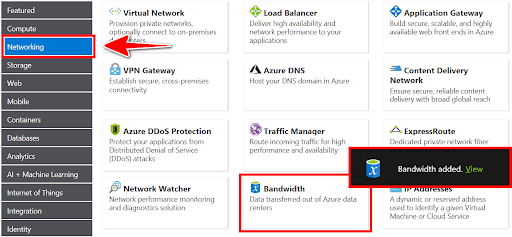
8. You can add networking bandwidth to an Azure cloud estimate. To do this, go to the Azure Pricing Calculator page. In the product menu on the left, find the Networking option. Next, click on the Bandwidth tile. Finally, choose the View option in the Bandwidth added message dialog.
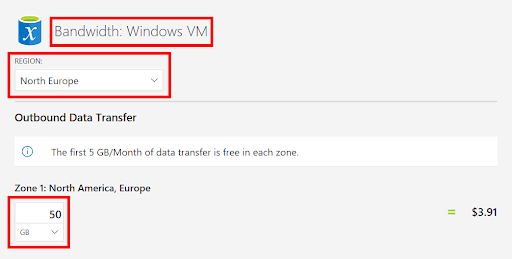
9. Set a descriptive name for the VM bandwidth configuration. In this example, we use the name Bandwidth: Windows VM. You can use the details from the image below to modify the default bandwidth configuration.
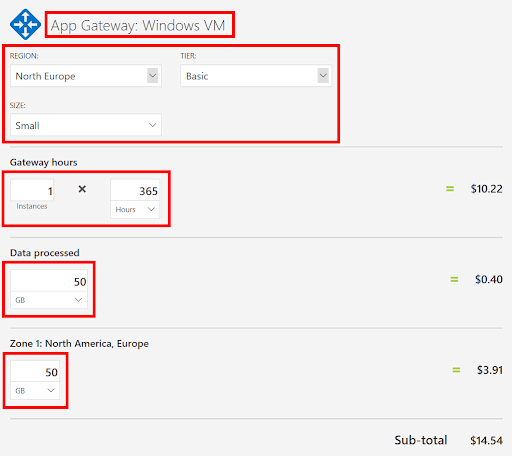
10. To add an Application Gateway, go back to the top of the page. Find the Networking menu and choose the Application Gateway option. Once the Application Gateway message dialog opens, you can click View.
11. Add a descriptive name to the configuration of your Application Gateway. This example defines ‘App Gateway: Windows VM’ as the name. You can add the details below when changing the default configuration of your own Application Gateway.
Review the Pricing Estimate
Here is a quick walkthrough that explains how you can review the results provided by the Azure Pricing Calculator:
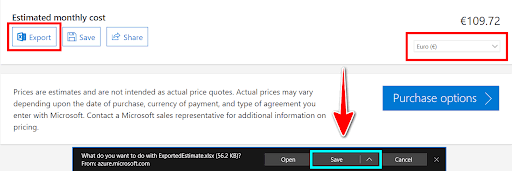
- Go to the main page of the Azure Pricing Calculator, and scroll down to see the total Estimated monthly cost.
- You can change the currency. This example modified the default to Euro. You can view the estimate offline as well as online. To download a copy for offline use, select Export. Note that the exported file is in Microsoft Excel (.xlsx) format.
Compare Costs by Using the Total Cost of Ownership Calculator
Total cost of ownership (TCO) estimations can help organizations understand whether it is cost-effective to own an asset. TCO is particularly important when trying to estimate the costs of operating technology in-house, and often serves as the deciding factor. It can help discover the hidden costs of on-premises operations, such as software licenses and the hardware needed for scaling to meet sudden peaks in demand.
Related content: Read our guide to Azure cost optimization
The TCO Calculator is designed to help organizations estimate the cost savings of operating on Azure over a certain period of time. Organizations can add the details of their on-premises workloads to the TCO calculator, and then review the suggested industry average cost for related operational costs. This average is adjustable, and costs include network maintenance, IT labor, and electricity.
Once all the information is inputted and all details are set, the TCO calculator provides a side-by-side report. Organizations can then compare these costs with the costs of running the same workloads on Azure. The below image shows an example of the comparison.

Here are three simple steps that demonstrate how to use the TCO Calculator:
Step 1: Define Your Workloads
Enter the details of your on-premises infrastructure into the TCO Calculator, using the following categories:
- Servers—virtualization methods, operating systems, memory (RAM), and CPU cores.
- Databases—server hardware and database types. This category also lets you define the Azure service of your choice, which includes the expected maximum concurrent user sign-ins.
- Storage—capacity and storage type, including any store used for backup or archiving purposes.
- Networking—the amount of network bandwidth currently consumed in the on-premises environment.
Step 2: Adjust Assumptions
Specify whether the current on-premises licenses are enrolled for Software Assurance. This lets you reuse your existing licenses on Azure, eliminating the costs associated with purchasing additional licensing. You can specify if you need to replicate your storage to another Azure region, to establish greater redundancy.
Once you specify this information, you can see key operating cost assumptions across several areas. For example, these costs may include the electricity price per kilowatt hour (KWh) and the hourly pay rate for IT administration. You may also see network maintenance costs as a percentage of network hardware and software costs.
Related content: Keep Azure costs in check with Azure Budgets
Step 3: View the Report
Next, the TCO calculator lets you choose a time frame—between one and five years. The calculator then generates a report based on the information you have entered. Here is an example:
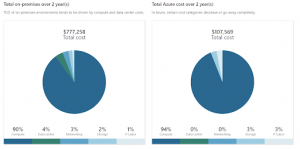
Image Source: Azure
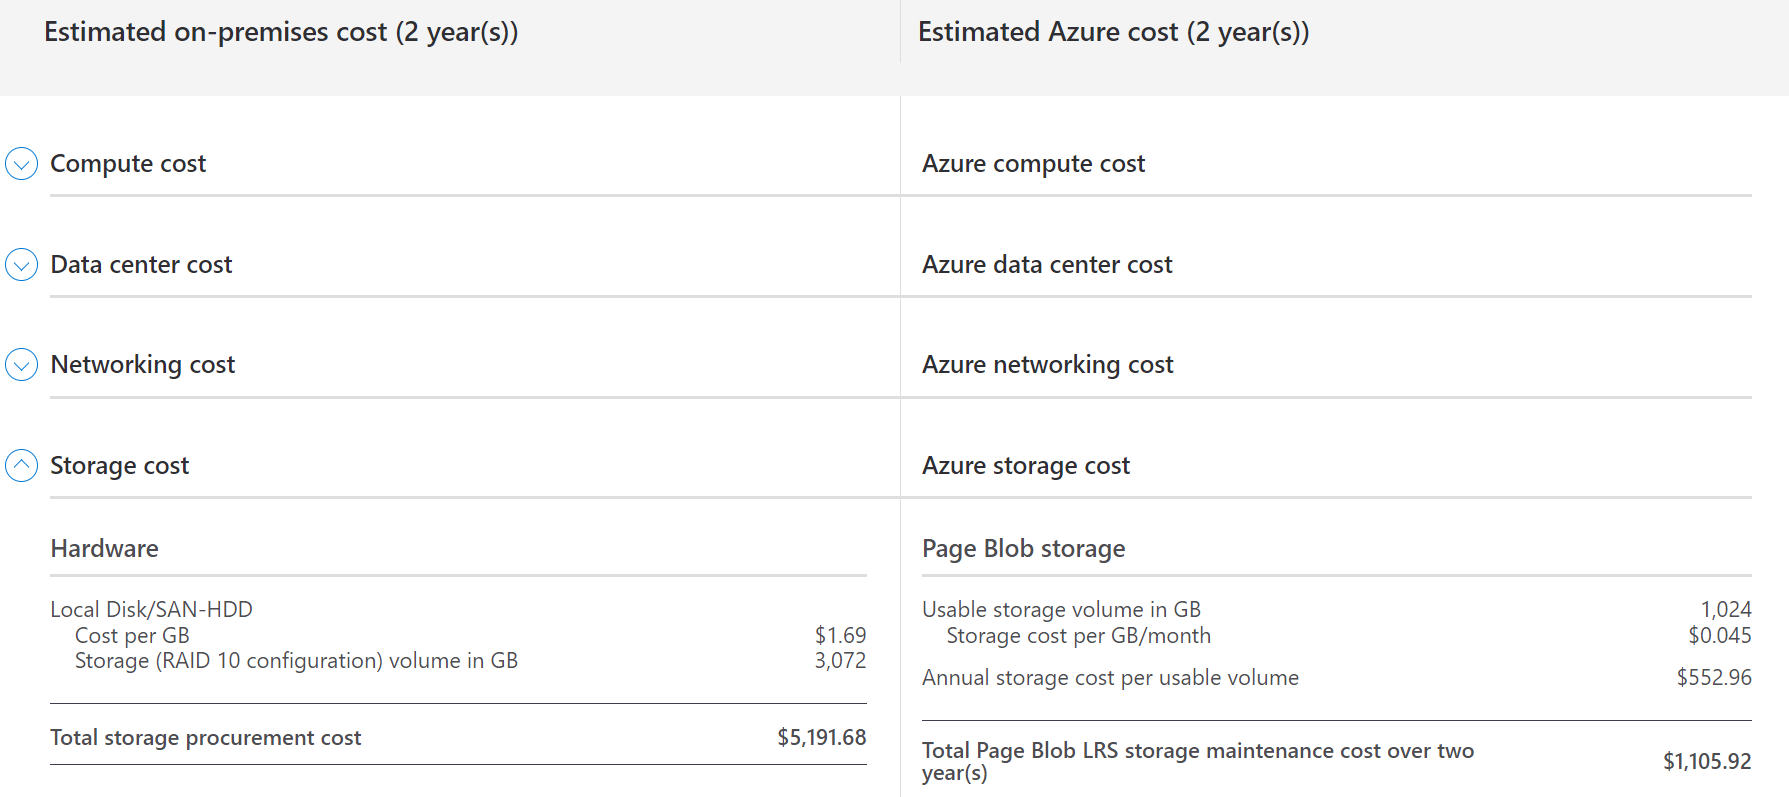
In addition to the above visualization, you can also view a side-by-side comparison of the cost breakdown of operating your workloads on the Azure cloud versus on-premises. It shows the cost breakdown for each category, including IT labor, storage, compute, networking, and data center. Here is an example:

Image Source: Azure
The TCO calculator lets you download, share, and save your reports.
Azure Cost Optimization with Spot.io
Spot offers Azure users solutions to optimize their cloud spend and leverage cost-saving strategies in the cloud. If you are looking to broaden your usage of Azure spot VMs for even mission-critical workloads, Spot’s Elastigroup and Ocean products enable you to do so for non-containerized and AKS workloads respectively.
By leveraging proprietary, predictive algorithms that consider both current spot market activity and historical trends, Spot will spin up new replacement spot instances in advance while gracefully draining at-risk ones. If spot instances are not available, the workload will be moved to pay-as-you-go instances. In those situations, Spot will move workloads back to spot instances as soon as they become available.
Spot’s Eco allows Azure customers to enjoy the long-term benefits of using Azure RIs without worrying about financial lock-in and wasted reservations. You can maximize cloud savings on Azure with Eco’s intelligent planning, procurement, utilization and lifecycle management for Azure RIs. Learn more about Eco for Azure.