 Microsoft Azure
 Cloud Financial Management (FinOps)
 How to Operationalize FinOps
What Is AWS EC2?
Amazon Web Services (AWS) Elastic Compute Cloud (EC2) is a web service that provides compute capacity on-demand in the cloud. Designed to make web-scale cloud computing easier for developers, EC2 offers a simple web interface, command line interface (CLI), and application programming interface (API), which allow businesses and developers to obtain and configure capacity with minimal friction.
EC2 reduces the time required to obtain and boot new server instances to minutes, allowing quick scaling capacity, both up and down, as computing requirements change. By offering a wide selection of instance types, which are optimized for different workloads, EC2 allows users to build failure-resilient applications and isolate them from common failure scenarios.
What Is the AWS CLI?
The AWS Command Line Interface (CLI) is an open-source tool that enables users to interact with AWS services using commands in the command-line shell. With minimal configuration, the AWS CLI allows users to start running commands that implement functionality equivalent to that provided by the browser-based AWS Management Console. It provides direct access to the public APIs of AWS services.
With the AWS CLI, users can easily manage their AWS services from a terminal session on their own client, allowing them to script automation tasks. The CLI provides commands for a range of tasks, including launching and managing EC2 instances, managing storage in S3, and configuring AWS services.
In this article:
- Installing the AWS CLI
- Using the CLI to Manage EC2 Key Pairs
- Launch Amazon EC2 Instances with the CLI
- Using the CLI to Manage EC2 Security Groups
Installing the AWS CLI
To install and configure the AWS CLI, start by downloading the installer specific to your operating system (Windows, macOS, Linux). You can get the installers here. Run the installation command, which varies based on the system.
For example, on macOS and Linux, you might use a command like sudo ./aws/install after unzipping the downloaded file. On Windows, you could run the MSI installer directly or use msiexec.exe for command-line installation. After installation, confirm it by checking the AWS CLI version using aws --version.
Using the CLI to Manage EC2 Key Pairs
Creating, managing, and utilizing key pairs is crucial for secure communication with AWS EC2 instances. Key pairs in AWS consist of a public key that AWS stores and a private key that the user keeps secure. This private key is used to securely connect to instances.
Creating a Key Pair
You can generate a new key pair and direct the private key component into a file using the following command:
aws ec2 create-key-pair --key-name ExampleKeyPair --query 'KeyMaterial' --output text > ExampleKeyPair.pem
For users on a Windows system using PowerShell, the output must be adjusted to ensure compatibility with SSH clients by setting the encoding explicitly:
aws ec2 create-key-pair --key-name ExampleKeyPair --query 'KeyMaterial' --output text | out-file -encoding ascii -filepath ExampleKeyPair.pem
It’s important to set the file permissions correctly to secure the private key file, especially on Linux or macOS:
chmod 400 ExampleKeyPair.pem
The output should look like this:

Displaying the Key Pair
Each key pair has a unique fingerprint which serves as a secure identifier. To display the fingerprint and confirm the key pair, you can use:
aws ec2 describe-key-pairs --key-name ExampleKeyPair
The output should look like this:
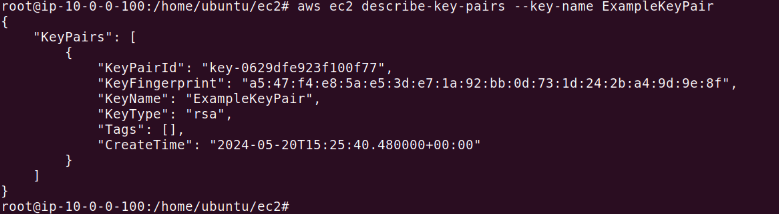
This command returns the key fingerprint, which is used to verify that the private key you possess matches the public key stored in AWS.
Deleting a Key Pair
If a key pair is no longer needed or has been compromised, it is advisable to delete it to maintain security. The following command deletes a specific key pair:
aws ec2 delete-key-pair --key-name ExampleKeyPair
The output should look like this:

This series of commands and operations ensure that users can manage their EC2 key pairs efficiently, providing both security and convenience in handling AWS EC2 instances.
Launch Amazon EC2 Instances with the CLI
Before launching an instance, ensure that the AWS CLI is installed and configured. Also, appropriate IAM permissions must be set to allow Amazon EC2 access. You need to have a key pair and security group ready, and select an AMI, noting down the AMI ID.
Launch an Instance
To start an instance, the aws ec2 run-instances command is used along with several options that specify the instance’s configuration.
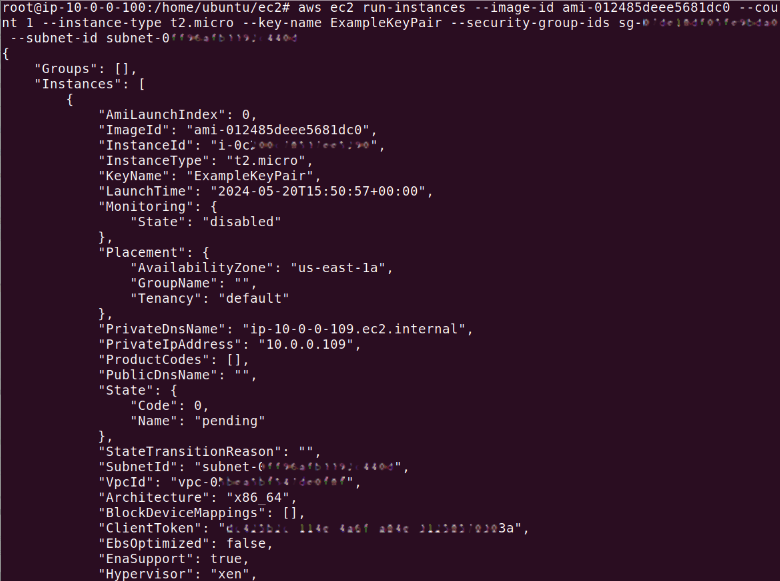
$ aws ec2 run-instances --image-id ami-xxxxxxxx --count 1 --instance-type t2.micro --key-name ExampleKeyPair --security-group-ids sg-905004d6 --subnet-id subnet-6e7f829e
The output should look like this:
Here is a detailed breakdown of the command:
--image-id ami-xxxxxxxx: Specifies the ID of the AMI that the instance is based on.--count 1: Indicates the number of instances to launch.--instance-type t2.micro: Defines the type of instance, affecting processing power and memory.--key-name ExampleKeyPair: Associates a key pair with the instance for SSH access.--security-group-ids sg-905004d6: Assigns the instance to a specific security group.--subnet-id subnet-6e7f829e: Specifies the subnet within a Virtual Private Cloud (VPC) where the instance will be located.
Initially, the instance status will be pending. It transitions to running once the setup is complete, which usually takes a few minutes.
Related content: Read our guide to EC2 instance types
Using the CLI to Manage EC2 Security Groups
Security groups in Amazon EC2 act as a virtual firewall for your instances to control incoming and outgoing traffic. When setting up security groups, you can specify rules that allow traffic to or from associated instances, providing a layer of security that controls access to instances based on IP protocol, port, and source/destination IP addresses.
Creating a Security Group
To create a security group, you use the AWS CLI with specific parameters to define the security group for your Virtual Private Cloud (VPC). Here’s how you can create a security group:
aws ec2 create-security-group –group-name example-sg –description “Example security group” –vpc-id vpc-1a2b3c4d
This command will output the GroupId of the newly created security group, which is necessary for modifying or querying the group later. For example:
{
"GroupId": "sg-905004d6"
}
The output should look like this:

Adding Rules to a Security Group
After creating a security group, the next step involves adding rules to it. These rules determine the traffic allowed into and out of the instances associated with the security group. For example, to add a rule allowing RDP access (which is common for Windows instances), you can use the following command:
aws ec2 authorize-security-group-ingress --group-id sg-905004d6 --protocol tcp --port 3389 --cidr x.x.x.x/x
For a Linux instance where SSH access is needed, the command would look like this:
aws ec2 authorize-security-group-ingress --group-id sg-905004d6 --protocol tcp --port 22 --cidr x.x.x.x/x
The output should look like this:
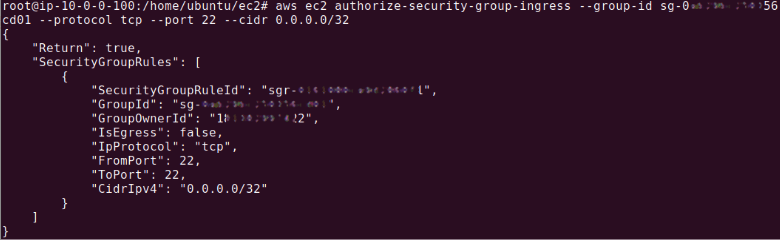
Warning: A CIDR address of 0.0.0.0/32 allows access from all IPs. Please use with caution.
These commands specify the protocol, port, and CIDR block that defines who can access the instances.
Viewing Security Group Details
To view the details of your security group, including the rules you’ve added, you can execute:
aws ec2 describe-security-groups --group-ids sg-905004d6
The output should look something like:
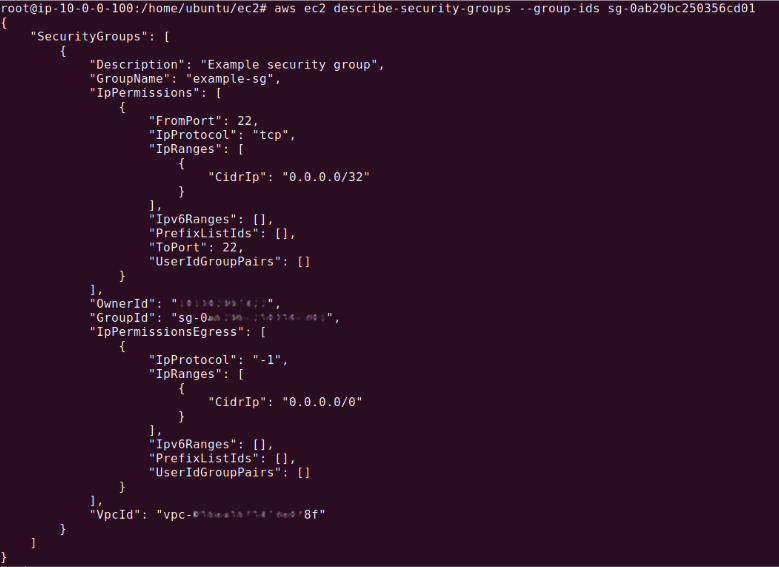
This will display all the current settings and rules associated with the security group.
Deleting a Security Group
If a security group is no longer required, you can delete it using the AWS CLI as long as it’s not associated with any active instances. The command to delete a security group is:
aws ec2 delete-security-group --group-id sg-905004d6
It’s important to ensure that the security group is not attached to any resources to avoid errors.
Related content: Read our in-depth guide to AWS EC2 logs
Automating AWS Cost Savings with Spot
While AWS offers Savings Plans, RIs and spot instances for reducing EC2 cost, these all have inherent challenges:
- Spot instances can be 90% less expensive than on-demand instances, however, as spare capacity, AWS can reclaim those instances with just a two minute warning, making them less than ideal for production and mission-critical workloads.
- AWS Savings Plans and RIs can deliver up to 72% cost savings, but they do create financial lock-in for 1 or 3 years and if not fully utilized can end up wasting money instead of saving it.
Spot addresses these challenges, allowing you to reliably use spot instances for production and mission-critical workloads as well as enjoy the long-term pricing of RIs without the risks of long-term commitment.
Key features of Spot’s cloud financial management suite include:
- Predictive rebalancing—identifies spot instance interruptions up to an hour in advance, allowing for graceful draining and workload placement on new instances, whether spot, reserved or on-demand.
- Advanced auto scaling—simplifies the process of defining scaling policies, identifying peak times, automatically scaling to ensure the right capacity in advance.
- Optimized cost and performance—keeps your cluster running at the best possible performance while using the optimal mix of on-demand, spot and reserved instances.
- Enterprise-grade SLAs—constantly monitors and predicts spot instance behavior, capacity trends, pricing, and interruption rates. Acts in advance to add capacity whenever there is a risk of interruption.
- Serverless containers—allows you to run your Kubernetes and container workloads on fully utilized and highly available compute infrastructure while leveraging spot instances, Savings Plans and RIs for extreme cost savings.
- Intelligent and flexible utilization of AWS Savings Plans and RIs—ensures that whenever there are unused reserved capacity resources, these will be used before spinning up new spot instances, driving maximum cost-efficiency. Additionally, RIs and Savings Plans are fully managed from planning and procurement to offloading unused capacity when no longer needed, so your long-term cloud commitments always generate maximum savings.
- Visibility and recommendations—lets you visualize all your cloud spend with the ability to drill-down based on the broadest range of criteria from tags, accounts, services to namespaces, annotations, labels, and more for containerized workloads as well as receive cost reduction recommendations that can be implemented in a few clicks.