 Microsoft Azure
 Cloud Financial Management (FinOps)
 How to Operationalize FinOps
What Is AWS EC2?
Amazon Web Services (AWS) Elastic Compute Cloud (EC2) is a web service that provides resizable compute capacity in the cloud. It is designed to make computing easier for developers by offering virtual servers—known as instances—that can scale up or down based on requirements.
EC2 provides a variety of instance types optimized for different use cases, including memory, compute, storage, and GPU-based workloads, allowing users to choose the right hardware configuration for their applications.
EC2 offers flexibility, with the ability to launch instances in multiple geographical regions and availability zones to ensure high availability and reduce latency. It integrates with hundreds of AWS services, enabling users to build sophisticated, scalable applications. EC2 provides control over the networking environment including IP addressing, subnetting, and security settings.
This is part of a series of articles about EC2 instances
In this article:
4 Ways to Backup AWS EC2 Instances
Backing up AWS EC2 instances is crucial for data integrity and disaster recovery. Let’s look at some of the methods available for backing up EC2 instances.
Note: Further in this article, we provide a tutorial showing how to backup EC2 instances with the AWS Backup service (option 1), which can be considered the standard option for EC2 backup available today. Details for the other options are outside the scope of this article.
1. AWS Backup
AWS Backup provides a centralized solution for backing up EC2 instances along with other AWS resources. This service automates backup policies and provides a unified dashboard for managing backup activities across AWS services. Users can define policies dictating the frequency and retention of backups, ensuring compliance with data protection policies.
AWS Backup allows users to recover specific resources or entire applications consistently. The service supports cross-region and cross-account backup, enhancing disaster recovery strategies and data sovereignty compliance.
2. EBS Snapshots
EBS snapshots offer a straightforward way to back up the entire state of an EC2 instance’s storage volumes at a specific point in time. Snapshots are incremental, meaning only the blocks on the device that have changed since the last snapshot are saved. This approach minimizes storage usage and allows for efficient backup processes.
Snapshots can be automated using Amazon Data Lifecycle Manager, ensuring regular, systematic backups without manual intervention. Restoring from an EBS Snapshot is simple and enables quick recovery. Users can create a new volume from a snapshot and attach it to an instance, reducing downtime.
3. Creating a New AMI
Another method for EC2 backup involves creating a new Amazon Machine Image (AMI). AMIs encapsulate the information required to launch an instance, including the root volume and additional block storage volumes. By creating an AMI of an existing instance, users have a comprehensive point-in-time backup, capturing the entire state of the instance, including operating system configurations, installed software, and data.
The process of creating a new AMI is simple through the AWS Management Console, AWS CLI, or AWS SDKs. Users can launch new instances from the AMI, making it an efficient way to replicate environments for testing or scale out quickly during high demand periods. AMIs can be shared with other AWS accounts or made public, offering versatility in deployment scenarios.
4. Automating with S3 and the AWS CLI
Another option is using Amazon S3 in conjunction with the AWS Command Line Interface (CLI) for automation. This approach requires exporting EC2 instance data to S3, a durable, scalable object storage service. Through scripts or AWS Lambda functions, users can automate the process of creating image backups of EC2 instances and storing these backups in S3.
This method provides flexibility and control over backup processes, including the capability to trigger backups based on specific events or schedules. It allows for cost-effective long-term storage by leveraging S3 storage classes, such as S3 Intelligent-Tiering or S3 Glacier for infrequent access.
Related content: Read our guide to EC2 instance types
Quick Tutorial: Amazon EC2 Backup and Restore Using AWS Backup
Prerequisites
Before starting the backup and restore process, ensure you have:
- An AWS account: You can create a free account here.
- One or more Amazon EC2 instances: Make sure you are aware of pricing for Amazon EC2 and AWS Backup. Learn more in our guide to AWS pricing. However, you can complete this tutorial within the AWS free tier.
- The appropriate IAM roles for AWS Backup to function correctly: In the absence of a specific role, the default AWSBackupDefaultRole can be used.
Step 1: Configure an On-Demand Backup Job
Start by logging into the AWS Management Console and navigating to the AWS Backup console to begin your backup process. To configure AWS Backup services:
- In the AWS Backup console, under My account, select Settings.
- Choose Configure resources on the Service opt-in page.
- Enable EC2 services using the toggle switches and confirm your configuration.
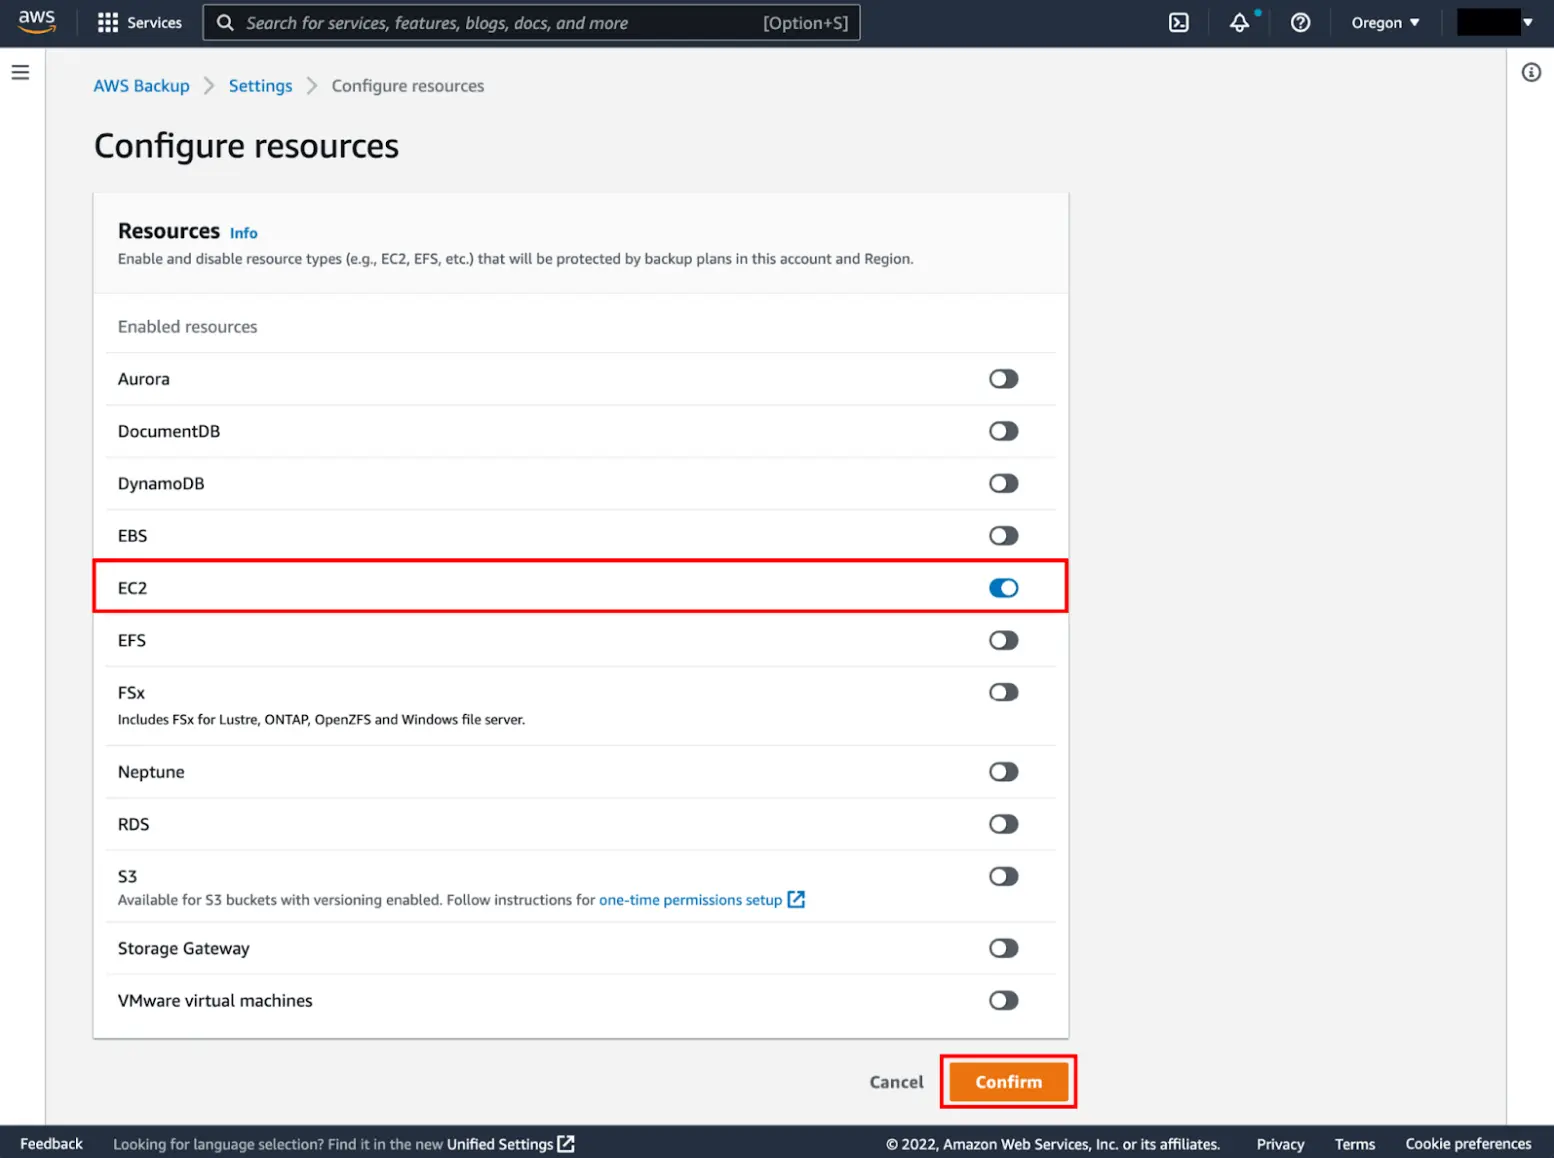
Source for this and the following images: AWS
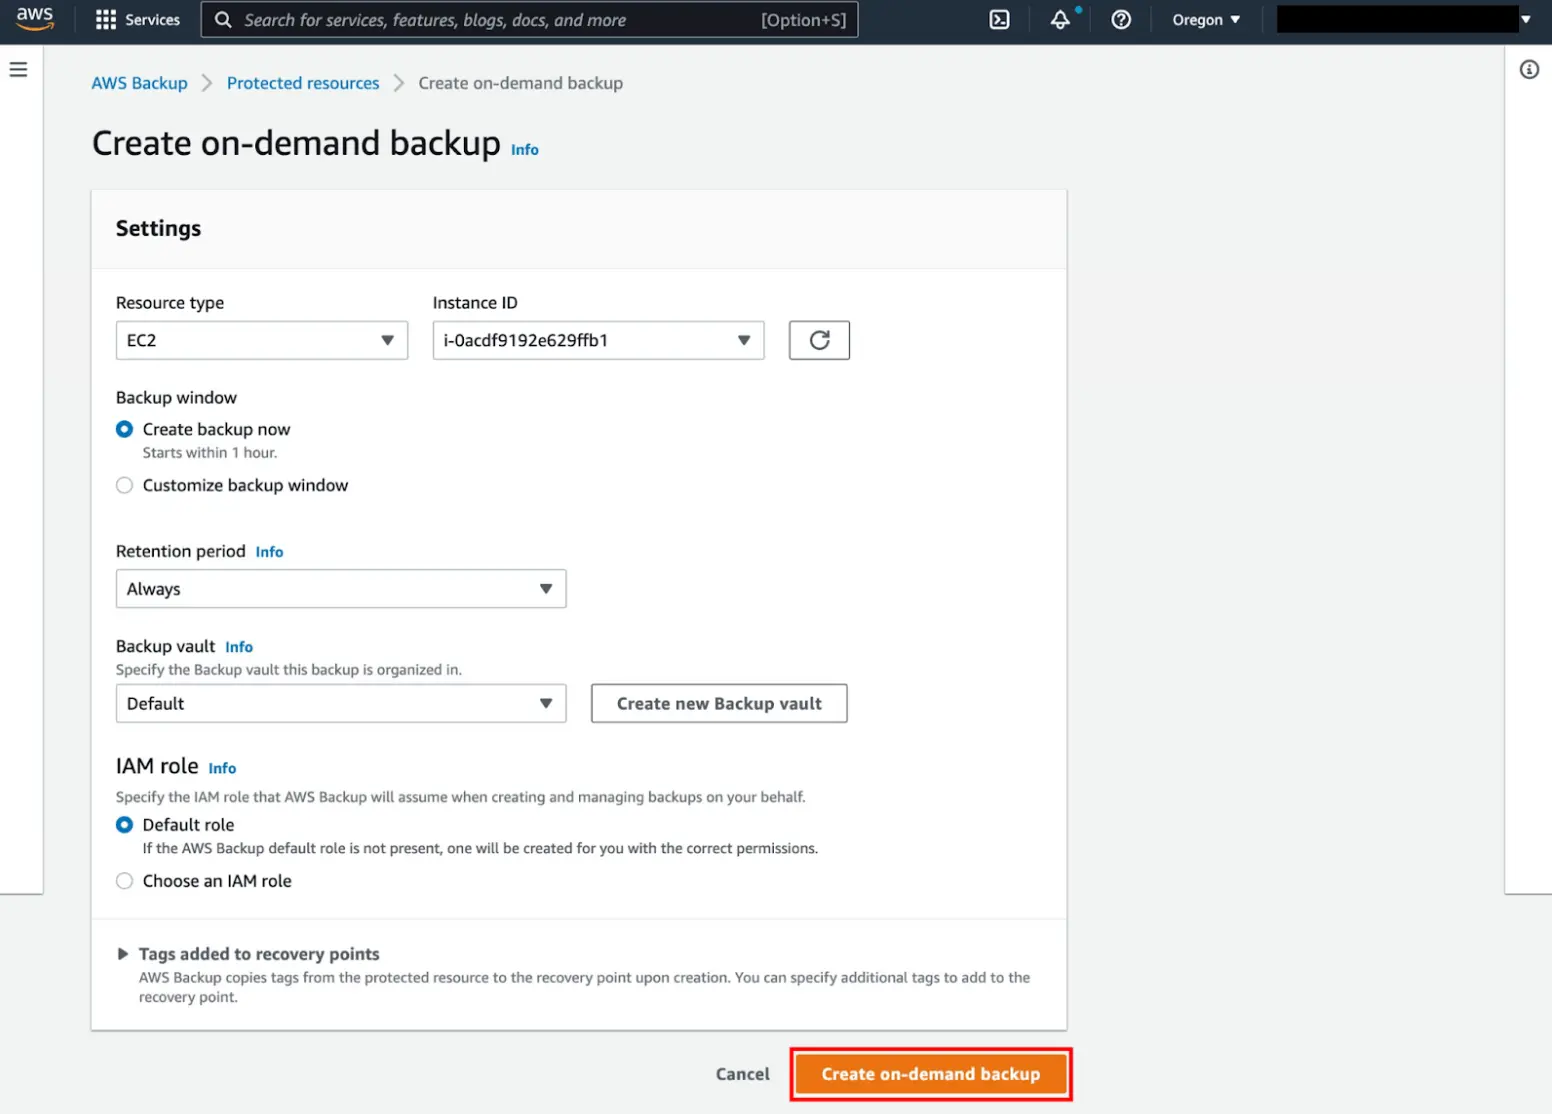
Create an on-demand backup job:
- Return to the AWS Backup console, select Protected resources, and click Create on-demand backup.
- For resource type, select EC2, then choose your Instance ID.
- Ensure Create backup now is selected, set a retention period, choose Create a backup vault, and select the default IAM role.
- Click Create on-demand backup to initiate the job and view it under the Jobs page. You can view the details of a job by clicking on the backup job ID.
Step 2: Automate Backup with a Backup Plan
To configure services and a backup plan:
- Repeat the service configuration steps in the AWS Backup console settings.
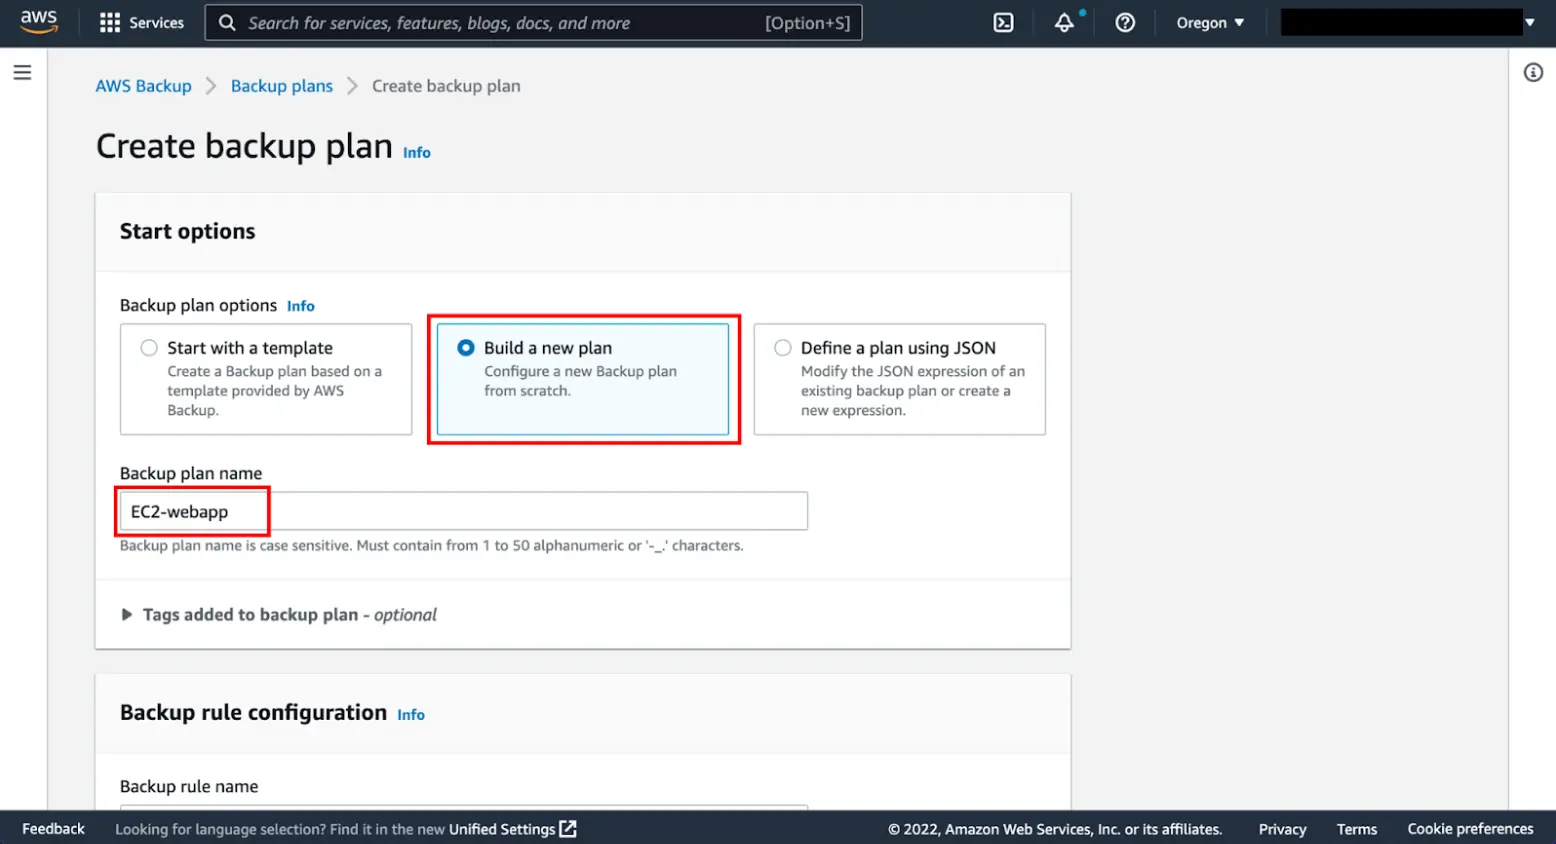
- Navigate to Backup plans under My account, and click Create backup plan.
- Select Build a new plan. Name your backup plan and define your backup rules, such as frequency, vault, and retention period.
Define the backup plan settings:
- Backup frequency: Choose how often backups occur (daily, weekly, monthly).
- Backup window: Set the start time and duration.
- Cold storage transition: Currently applicable only to Amazon EFS.
- Retention period: Define how long backups are kept.
- Cross-region copy: Optionally replicate backups to another region.
- Tags and advanced settings: Add tags for organization and enable application-consistent backups if needed.
Assign resources to the backup plan:
- After creating your backup plan, assign resources by tags or resource IDs.
- Define your resource selection, exclude specific resources if necessary, and click on Assign resources.
Step 3: Restore an Amazon EC2 Instance
To restore a backup:
- In the AWS Backup console, go to your selected backup vault and choose the most recent backup.
- Select Restore and configure the restoration settings, including network settings and IAM roles.
- Customize advanced settings like shutdown behavior, tenancy, and SSH keys.
- After setting up, choose Restore backup. Monitor the restore job under Restore jobs in the AWS Backup console.
- Upon completion, verify the restored EC2 instance in the Amazon EC2 console. You can do this by selecting Instances on the navigation page.
EC2 Price Optimization with Spot
AWS EC2 pricing models offer multiple instance types and various options for cloud spending optimization, but managing it all on your own is not so simple. To address the challenges of cloud infrastructure management, including EC2 cost optimization, Spot offers a full suite of cloud management tools. These tools can help with everything from spend reporting and cost allocation, to running production and mission-critical workloads on EC2 spot instances, to maximizing utilization and ROI on EC2 reserved instances.
Reliably run workloads on spot instances for up to 90% savings
While the spare capacity offered by cloud providers has the potential for massive savings on cloud compute, using spot instances comes with risk of termination, with little warning.
Elastigroup from Spot makes it easy to reliably leverage spot instances, enterprise-grade SLA, even mission critical and production workloads can benefit. Elastigroup provides every feature you’d expect from a standard cluster management platform, but raises the bar with predictive approaches to instance selection, auto-recovery and autoscaling, along with comprehensive dashboarding and advanced automation
Make the most out of your long-term cloud commitments
For cost-conscious companies, reserved instances and savings plans can help reduce costs up to 72%. These commitment pricing models are often a good match for long-term deployments, and stable, predictable workloads. However, if your application needs change, or you no longer need the resources you’ve committed to, you’re locked in.
Eco from Spot manages and automates commitment lifecycles to offload unused capacity and automatically adjust capacity portfolios to maximum ROI.