 Microsoft Azure
 Cloud Financial Management (FinOps)
 How to Operationalize FinOps
What Is Amazon Elastic Load Balancer (ELB)?
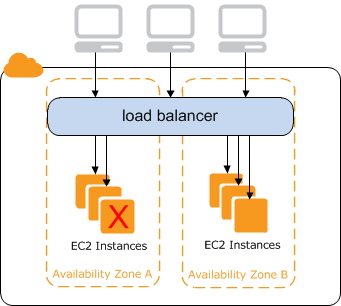
Amazon Elastic Load Balancer (ELB) is a cloud service that helps ensure high availability and elasticity in your application’s infrastructure. It automatically distributes incoming application traffic across multiple targets, such as Amazon EC2 instances, containers, IP addresses, and Lambda functions, in one or more Availability Zones. ELB adjusts to incoming application traffic, improving your application’s fault tolerance and enhancing its availability. It can also improve user experience by balancing load efficiently between application instances.
ELB simplifies management of incoming traffic by providing a single point of access for all traffic sources, and automatically adapting to changing traffic patterns and network conditions. ELB supports health checks, which monitor the health of the services behind it, rerouting traffic away from unhealthy instances to healthy ones, thereby increasing the overall fault tolerance of your application.
This is part of a series of articles about AWS autoscaling.
In this article:
Types of Load Balancers on AWS
As part of the ELB service, Amazon offers several types of load balancers that can be used for application, network, and other types of traffic.
Classic Load Balancers
Classic load balancers are the original form of AWS load balancers and provide basic load balancing across multiple Amazon EC2 instances. They support both the EC2-Classic network and VPCs. These load balancers enable automatic distribution of incoming application traffic across multiple targets, including EC2 instances, in both HTTP/HTTPS and TCP traffic.
Classic load balancers provide simple, straightforward routing capabilities and are a good choice for applications that do not require the more advanced features offered by the other types below. However, as AWS has introduced more specialized types of load balancers, classic load balancers are now generally considered a legacy option, not favored for new applications.
Source: AWS Documentation
Application Load Balancer
The application load balancer on AWS supports HTTP and HTTPS traffic, as well as gRPT and WebSocket connections. It offers advanced request routing targeted for modern application architectures, including microservices and containers. Application load balancers allow for routing decisions based on the content of the request, enabling more granular control over the distribution of web traffic.
This type of load balancer is well-suited for handling complex, content-based routing rules, allowing developers to route traffic to different services based on the request path or host headers. Application load balancers support features such as SSL termination and HTTP/2, enhancing the performance and security of applications. They also integrate seamlessly with AWS services like ECS (Elastic Container Service), EKS (Elastic Kubernetes Service), and Lambda for serverless architectures.
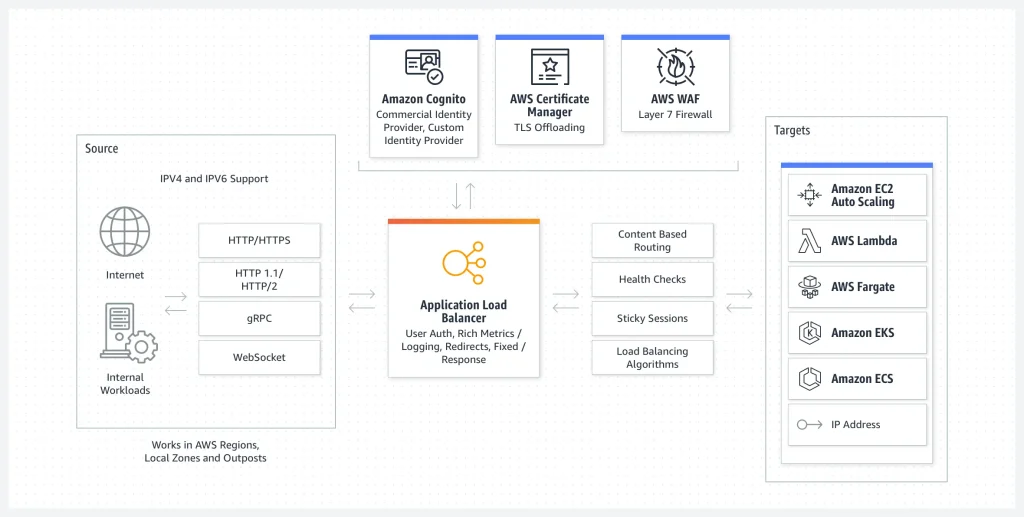
Source for this and the following images: AWS
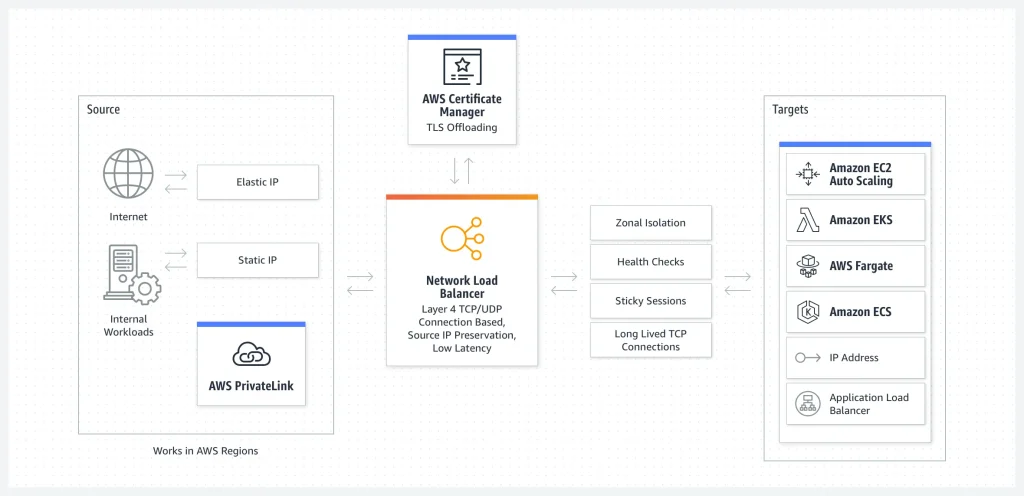
Network Load Balancer
The network load balancer is optimized for high throughput and low latency, handling millions of requests per second while maintaining low latency. Network load balancers operate at the transport layer (Layer 4), routing traffic to targets – Amazon EC2 instances, microservices, and containers – within Amazon Virtual Private Cloud (Amazon VPC) based on IP protocol data.
Unlike application load balancers, network load balancers are capable of handling volatile traffic patterns and sudden spikes without compromising on performance. They also offer long-lived TCP connections that are ideal for WebSocket applications. This makes them particularly suited for real-time and gaming applications, as well as other scenarios where maintaining TCP connections is crucial.
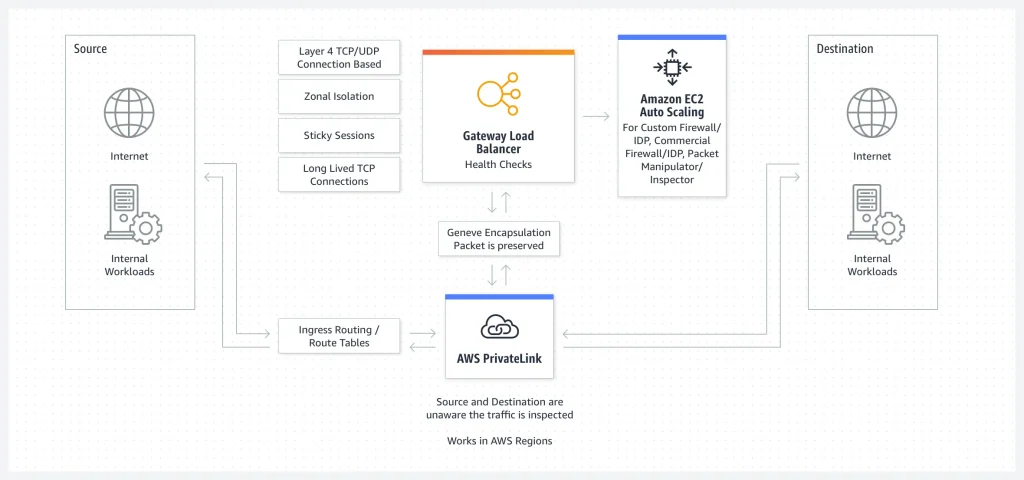
Gateway Load Balancers
Gateway load balancers are the newest type of load balancer, designed to make it easy to deploy, scale, and manage third-party virtual appliances such as firewalls, intrusion detection and prevention systems, and deep packet inspection systems in the cloud. It typically receives traffic from AWS PrivateLink, which provides organizations with a secure, private link to the AWS cloud.
Gateway load balancers operate at the network layer (Layer 3), offering seamless integration with these appliances by distributing traffic to them in a way that is transparent to the end client. Gateway load balancers can preserve the original source IP address, which is crucial for security appliances to make accurate traffic analysis and decisions.
They also simplify the architecture of deploying these network functions by providing a single entry and exit point for all traffic. This helps optimize the performance and reliability of the services they provide.
Related content: Read more in our guide to EC2 autoscaling.
Tutorial: Getting Started with Amazon ELB Application Load Balancers
Prerequisites
Choose two Availability Zones for your EC2 instances. Set up your Virtual Private Cloud (VPC) with a minimum of one public subnet in each selected Availability Zone. These public subnets will be utilized to set up the load balancer. You can launch your EC2 instances in these or other subnets within these Availability Zones.
Start at least one EC2 instance in each AZ. Install a web server, like Apache or Internet Information Services (IIS), on all these EC2 instances. Additionally, confirm that the security groups for these instances permit HTTP access via port 80.
Step 1: Set Up Target Group
The target group is used for handling request routing. The default rule of your listener will route requests to the targets registered in this group. The load balancer will conduct a health check of the targets in this group.
To set up your target group:
- Navigate to the Amazon EC2 console and select Load Balancing > Target Groups.
- Click Create target group.
- Keep instance as the Target type under Basic configuration.
- Type a name for the new target group.
- Choose the VPC in which you launched your instances.
- Keep the rest of the settings as default and click Next.
- Optional: To help verify the effectiveness of your load balancer and ensure traffic is directed correctly, on the Register targets page, go to Available instances and choose one or more instances. Retain the default port 80 and click Include as pending below.
- Click Create target group.
Step 2: Create an Application Load Balancer
To create an application load balancer:
- In the Amazon EC2 console, select a Region for your load balancer on the navigation bar. Ensure you pick the same region as your EC2 instances.
- In the navigation pane, select Load Balancing > Load Balancers.
- Click Create Load Balancer.
- Select Create under the option for Application Load Balancer.
Step 3: Configure the Load Balancer and Listener
After creating your application load balancer, you’ll need to enter some basic configuration details, and set up one or more listeners. A listener is a process that keeps an eye out for connection requests and is set up with a protocol and port for client connections to the load balancer.
To configure the settings for your load balancer and listener:
- Enter a name for your load balancer.
- For Network mapping, choose the VPC that houses your EC2 instances. Select at least two Availability Zones and one subnet per zone.
- Under Security groups, select the standard security group for the VPC chosen in the previous step or choose another one. You must choose a security group with rules allowing the load balancer to interact with registered targets on both the listener and health check ports.
- For Listeners and routing, keep the default protocol and port, then choose your target group from the list. This configuration sets up a listener that waits for HTTP traffic on port 80 and diverts it to the selected target group (for the purposes of this tutorial we will not use HTTPS).
- For Default action, choose the target group that you set up and registered in step 1.
- Leave the rest of the settings as default.
- Click Create load balancer.
Step 4: Verify that the Load Balancer is Working
Having successfully created your load balancer, it’s important to ensure it’s properly distributing traffic among your EC2 instances:
- You should get confirmation that your load balancer was set up correctly. Once you’ve received this, click Close.
- In the menu, select Target Groups > Load Balancing.
- Select the target group you created in the previous steps.
- Click on Targets to make sure your instances are set up and ready. If an instance is in the initial state, this means it’s either still getting registered, or it hasn’t passed the required minimum health checks to be deemed functional. As soon as at least one instance is confirmed as healthy, you can start testing your load balancer.
- Select Load Balancers > Load Balancing in the navigation menu, and select the new load balancer you created.
- Under Description, find and copy the load balancer’s DNS name (for instance,
my-load-balancer-1234567890abcdef.elb.us-east-2.amazonaws.com). - Paste this DNS name into the URL box of a web browser that’s connected to the internet. If the setup is correct, the default page of your server should appear.
Optimize AWS Auto Scaling with Spot
Spot Elastigroup can scale mission-critical workloads on spot instances, with availability guaranteed. Elastigroup supports Amazon ELB/ALB, adding an application-aware auto scaling and prediction layer to mitigate spot interruptions while running on the most optimal compute price and size.
Learn how Spot Elastigroup can support your scale-out environments and start a free trial today.