 Microsoft Azure
 Cloud Financial Management (FinOps)
 How to Operationalize FinOps
What Is a GKE Cluster?
A Google Kubernetes Engine (GKE) cluster is a managed Kubernetes environment provided by Google Cloud Platform (GCP) that allows you to deploy, manage, and scale containerized applications using Kubernetes. A GKE cluster consists of a master node and multiple worker nodes that run on Google Cloud compute instances.
This is part of a series of articles about Google Kubernetes Engine
In this article, you will learn:
GKE Cluster Architecture
The architecture of a GKE cluster consists of the control plane, nodes, and connected Google Cloud services.
The control plane is the centralized management system that provides the API server, resource controllers, scheduler, and storage services. The API server acts as the front-end for the Kubernetes API, allowing users to interact with the cluster. The resource controllers manage the Kubernetes resources, such as pods and services, and ensure that the desired state of the cluster is maintained. The scheduler schedules pods on the nodes based on resource availability and constraints. The storage service provides persistent storage for the cluster.
The nodes are the worker machines that run the user’s containerized applications as pods. These nodes can be either virtual machines or physical machines, depending on the user’s configuration. Each node runs a container runtime and a kubelet agent, which communicates with the control plane to manage the node’s resources.
Connected Google Cloud services include VPC networking, persistent disk, load balancer, and Google Cloud Operations. VPC networking provides secure and private communication between nodes and services within the cluster. Persistent disk provides persistent storage for the cluster’s nodes and pods. Load balancer distributes traffic to the nodes and provides high availability for the applications. Google Cloud Operations provides integrated monitoring and logging for the cluster.
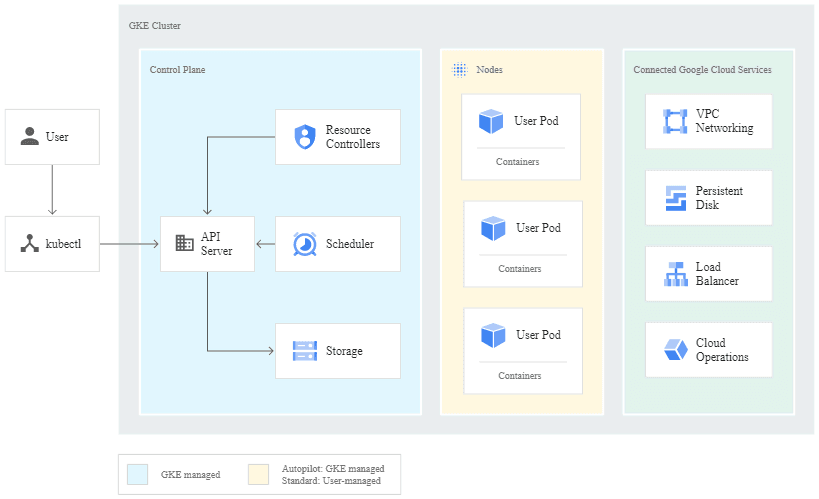
Image Source: Google Cloud
GKE Autopilot handles the infrastructure management, which means that Google Cloud takes care of the underlying infrastructure, such as the compute instances and load balancers, and allows developers to focus on deploying their applications and services. This feature also ensures the cluster is highly available, secure, and cost-effective.
How to Create a GKE Cluster
Before you can create a GKE cluster, you need to ensure that the Kubernetes Engine API is enabled. You can do this in the Google Cloud console, under Kubernetes Engine. You select or create your Google Cloud project and check that billing is enabled for that project.
Step 1: Select a Shell
You can use a local shell or Cloud Shell, which is a Google-hosted shell environment that makes it easier to manage resources. It has two built-in command-line tools: gcloud and kubectl. The first CLI is for Google Cloud, while the second is for Kubernetes. If you choose to use a local shell, you need to install these CLI tools in this environment.
Step 2: Create the Cluster
A GKE cluster must have at least one master and several workers (nodes), which are Compute Engine VM instances used to run Kubernetes processes. You can deploy your applications to the cluster, and they will run on the nodes.
You can create a single-node cluster using this command:gcloud container clusters create example-cluster --num-nodes=1
Step 3: Get the Auth Credentials for Your Cluster
Once you’ve created the cluster, you need authentication credentials to enable interactions with it. Use the following command to configure kubectl to use the specified cluster — in this case, example-cluster:gcloud container clusters get-credentials autopilot-cluster-1 --zone us-central1
How to Upgrade a GKE Cluster
You need to update both the master (or masters) and nodes when upgrading a GKE cluster. The master must be updated before you can update the nodes. You can use Kubernetes Engine to automatically upgrade the master machine whenever there is a point release, but it won’t typically perform an automatic version upgrade (e.g., from 1.7 to 1.8). If you want to upgrade the cluster to a new version, go to the Kubernetes Engine console and select Upgrade master.
However, this should open a warning that changing the master machine’s version may cause several minutes of downtime, when you won’t be able to edit the cluster from the control plane. During the master upgrade, services and deployments will continue to operate normally, but operations that require the Kubernetes API — including kubectl — will stop working. Likewise, it won’t be possible for applications to retrieve information via the API.
It is possible to upgrade the worker nodes without causing downtime on the control plane. There are two ways to approach this: rolling updates and migration using node pools.
Option 1: Rolling Updates
The most straightforward approach to updating Kubernetes nodes is with a rolling update. This is Kubernetes Engine’s default update mechanism. It works by draining and cordoning off nodes one at a time. Only once there are no more running pods on one node does the update roll on to the next node. Kubernetes creates a new, updated node after deleting each node. The rolling update continues until it has upgraded all the nodes to the new version.
Kubernetes Engine can manage this process automatically if you enable automatic node updates on the node pool. Otherwise, you will see alerts on the Kubernetes Engine dashboard alerts when upgrades are available.

Image Source: Google Cloud
To launch a rolling update, click on the link to follow the prompts. It is important to ensure that the pods are not standalone, because Kubernetes Engine will note reschedule these. You can use a deployment, StatefulSet, or ReplicaSet to manage these pods.
Drawbacks of rolling updates
Despite the ease of implementing rolling updates with Kubernetes Engine, it might not be the optimal choice because you lose the capacity of one node during the update. You can work around this by scaling up the node pool and reducing capacity again when the upgrade is complete.
Another drawback of a fully automated rolling update is that you relinquish some control over the upgrade process. It can take time to roll back to an older version when you encounter an issue because you have to pause and undo the rolling update.
Option 2: Migration with Node Pools
Alternatively, you can build a new node pool to update your GKE cluster without reducing capacity or causing downtime. This approach doesn’t stop the active nodes while updating them. Instead, you wait until all the nodes in a new node pool are running before you migrate the workloads to them.
For example, your Kubernetes cluster might have four active VMs. Use the kubectl get nodes command to view them:
NAME                                        STATUS  AGE
gke-cluster-1-original-pool-5b4f78de-0a6b    Ready   2h
gke-cluster-1-original-pool-5b4f78de-9zxm    Ready   2h
gke-cluster-1-original-pool-5b4f78de-y6gt    Ready   2h
gke-cluster-1-original-pool-5b4f78de-h2b1    Ready   2h
Step 1: Create a new node pool
You can use the following command to create a fresh node pool called new-pool:
gcloud container node-pools create new-pool --region us-central1-c --cluster example-cluster
Next, you can view the nodes again to see four more nodes with the new name:
NAME                                        STATUS  AGE
gke-cluster-1-new-pool-8ca14ab7–3nma        Ready   2m
gke-cluster-1-new-pool-8ca14ab7–6v5x        Ready   2m
gke-cluster-1-new-pool-8ca14ab7-4gg2        Ready   2m
gke-cluster-1-new-pool-8ca14ab7-v9c1        Ready   2m
gke-cluster-1-original-pool-5b4f78de-0a6b    Ready   2h
gke-cluster-1-original-pool-5b4f78de-9zxm    Ready   2h
gke-cluster-1-original-pool-5b4f78de-y6gt    Ready   2h
gke-cluster-1-original-pool-5b4f78de-h2b1    Ready   2h
Note that the pods remain on the original nodes, so you’ll have to transfer them.
Step 2: Move the pods to the new pool
You can move the nodes one at a time by cordoning and removing pods from the old nodes. Once a node is cordoned off, Kubernetes cannot schedule new pods onto it. Use this command:
kubectl cordon
When you’ve cordoned all the original nodes, you can remove the pods from them and Kubernetes will automatically reschedule them to your new nodes. are cordoned, pods can only be scheduled on the new nodes. Again, you must make sure that the pods are managed with a ReplicaSet, StatefulSet, or deployment, etc.
To delete the pods on a node, use the following command:
kubectl drain --force --ignore-daemonsets
You should check that the new pods are running on the new node once you’ve drained the old node. You can then proceed to drain the next node until you’ve covered all of them.
Step 3: Roll back the changes (optional)
If there are problems with the migration process, you can uncordon the nodes in the old pool to allow Kubernetes to schedule pods back to them. You can then move the pods back by cordoning them and draining the new nodes; the pods will be rescheduled on the old node pool. Once you’ve identified the cause of the issue, you can try again.
Step 4: Delete the old node pool
When you have rescheduled all your pods on the new node pool and there are no issues, you can safely delete the old one. Once they are safely rescheduled, it is time to delete the old pool. For example:
gcloud container node-pools delete original-pool --zone us-central --cluster example-cluster
All the nodes are now successfully updated!
Related content: Read our guide to gke pricing.
Run Your GKE Clusters with Spot
The ins and outs of Kubernetes may be complex, but operating GKE and other Kubernetes engines doesn’t have to be difficult. Having a clear understanding of your Kubernetes architecture and costs at all times leads to success for your organization and fewer headaches for your engineering staff, so you can focus on your workloads, not your infrastructure.
Ensure availability and optimize your Kubernetes costs with Spot Ocean. Get a demo or sign up for a free trial today.