 Microsoft Azure
 Cloud Financial Management (FinOps)
 How to Operationalize FinOps

Jupyter Notebook is a web-based interactive computational environment for creating notebook documents. It supports programming languages – such as Python, Scala, R – and is largely used for data engineering, data analysis, machine learning, and further interactive, exploratory computing. Think of notebooks like a developer console or terminal, but with an intuitive UI that allows for efficient iteration, debugging or exploration. They can be spun up locally using a terminal, or executed in a distributed manner using a cloud hosted environment. No matter the use case, it’s not uncommon for an engineer to open up a Jupyter notebook several times a day.
It should be no surprise that Jupyter Notebooks are one of the preferred tools of data engineers or data scientists writing Spark applications. However, configuring environments for Spark development in notebooks can be complicated. Installing external packages or libraries requires in-depth knowledge of Spark architecture, and it can be especially tricky to configure these environments to be shared by teams. In addition, running notebooks locally for spark development can be limited in functionality and performance, as you are running on a single machine instead of a distributed environment.
In this article, we will demonstrate how you can easily connect your Jupyter Notebooks to an Ocean for Apache Spark backend so you can take full advantage of your Spark notebooks. We will provide example configurations for running local Jupyter and JupyterLab notebooks, as well as hosted in a cloud environment using JupyterHub. You can also refer to our documentation.
Prerequisite: Installing Jupyter on your laptop
The simplest and original implementation of the notebook interface, Jupyter Notebooks are included in most modern installations of Python or Anaconda (the most common python distribution platform). You can also install jupyter using pip – `pip install jupyter notebook`, or with homebrew for OSX users – `brew install jupyter`.
To start the jupyter process, open a terminal and type `jupyter notebook`. This command will kick off the Jupyter process and open a browser window the the Jupyter file system interface. Jupyter wils display whatever files or folders are available in the directory where you executed the `jupyter notebook` command.

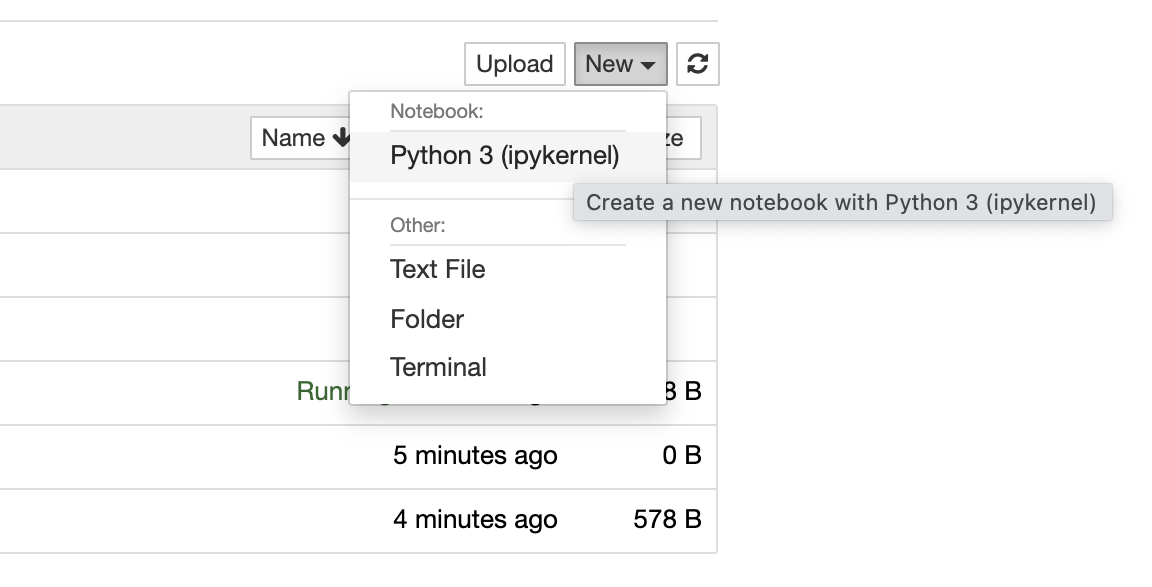
Jupyter notebooks will have the file extension `.ipynb`. Jupyter can open other file types, but you can only execute code in `.ipynb` files. To start a new Jupyter Notebook, click the new button in the upper right hand corner, and select the `Python` option. The new notebook will open in a separate browser window.
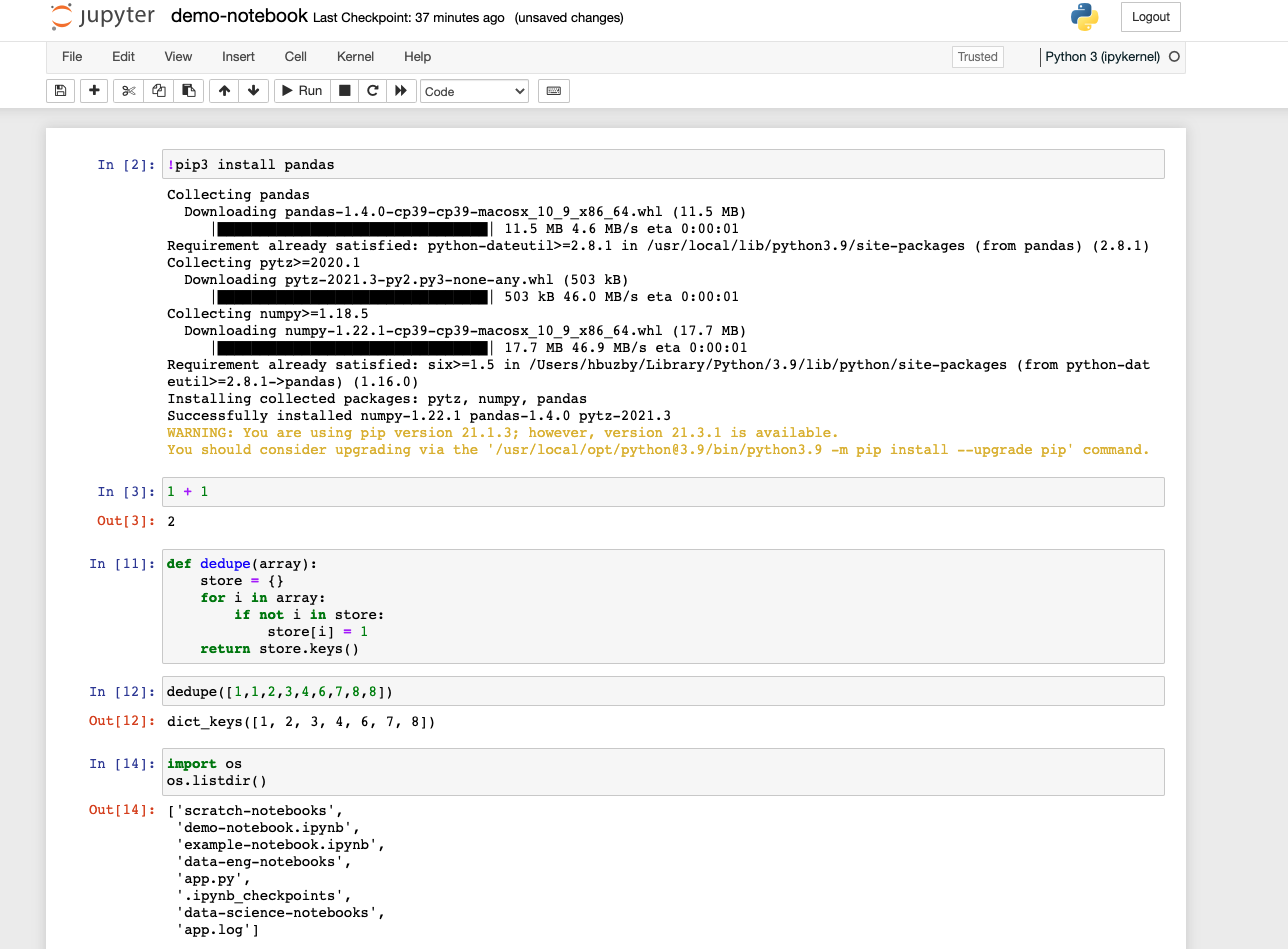
Once in the new notebook, you can immediately begin writing and executing Python code. Notebooks have a similar feel to the Python console opened in the terminal. Notebooks contain many code blocks called cells. You can execute these cells one by one, or run the entire notebook at once; cells are executed synchronously. You can execute arbitrary code blocks, define functions or classes, and interact with the local file system. You can also execute shell commands by prefixing your code with an exclamation point. This can be especially useful for installing pip packages into your environment. You can also configure Jupyter to use locally defined python environment like venv or virtualenv by creating a kernel configuration environment in Jupyter.
Connecting local Jupyter Notebooks to Ocean for Apache Spark
Now let’s connect our Jupyter Notebook to a Spark backend so we can begin distributing our workloads.
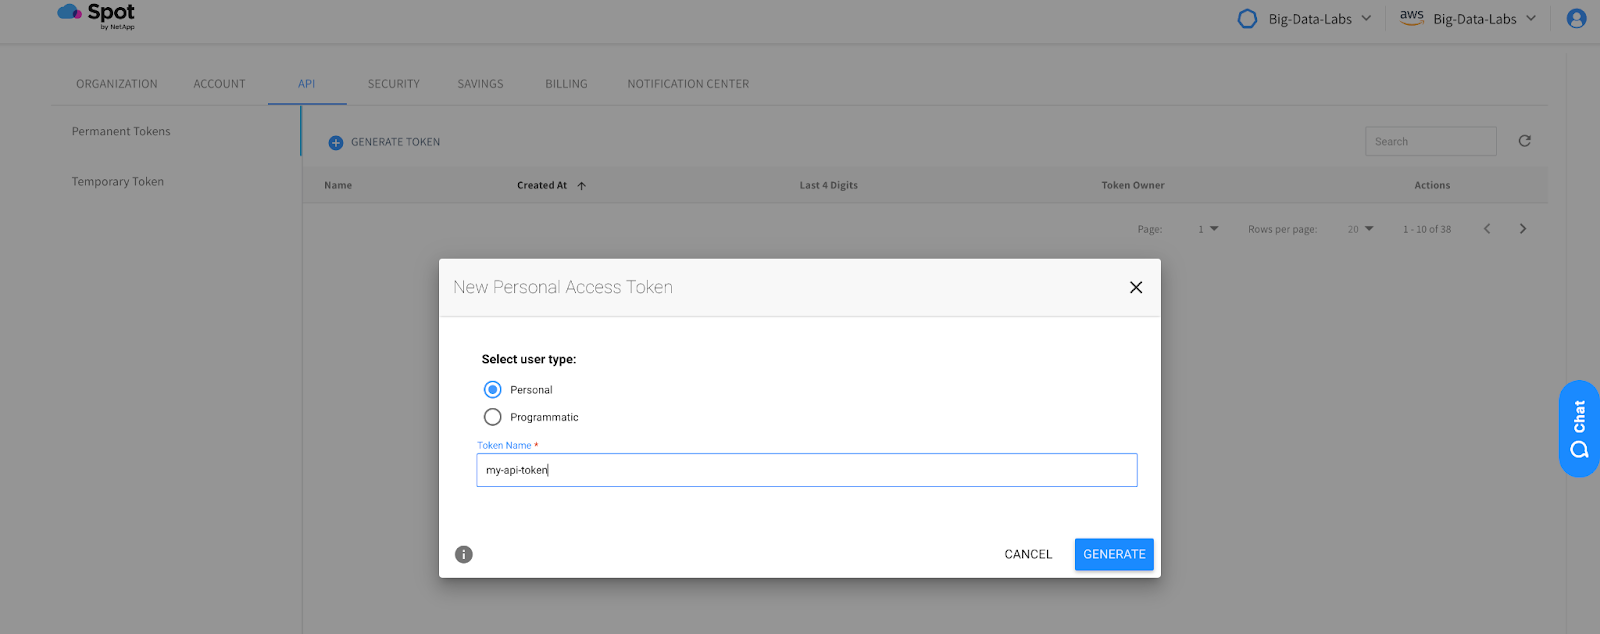
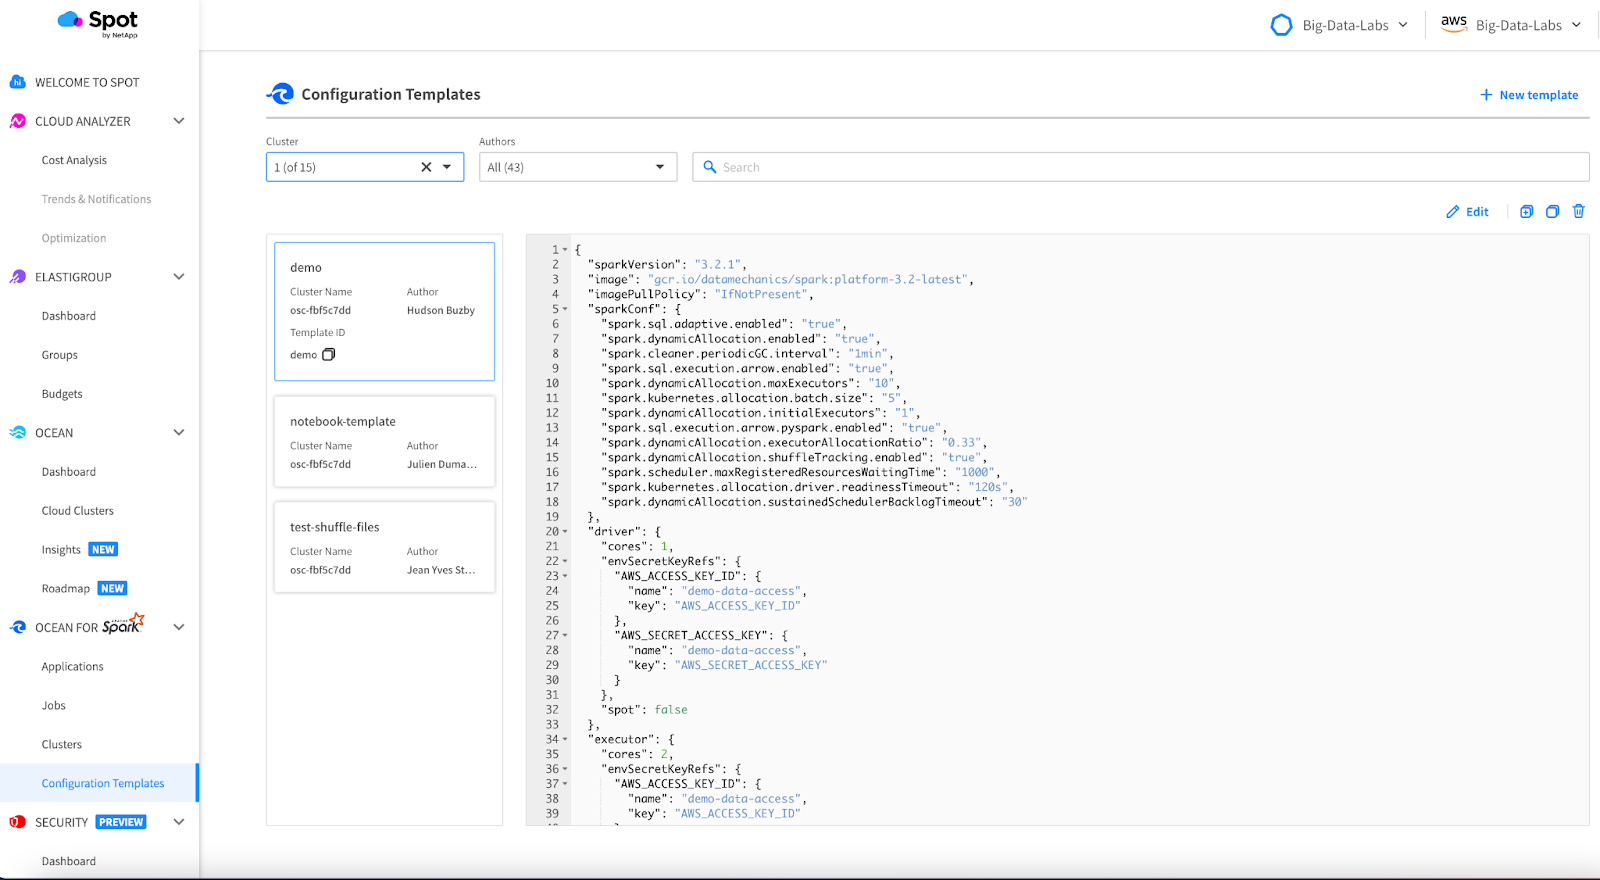
Go to your Ocean for Apache Spark platform, click on the profile icon in the upper right hand corner, click on the API tab, and select `generate token`. We will use this key to authenticate our notebook with the backend api.
 After you’ve created your key, you can start the Jupyter Notebook process in your terminal, but with a slightly different configuration.
`jupyter notebook \ –gateway-url=https://api.spotinst.io/ocean/spark/cluster/<cluster-id>/notebook \
–GatewayClient.auth_token=<your Ocean for Apache Spark API key> \
–GatewayClient.request_timeout=600`
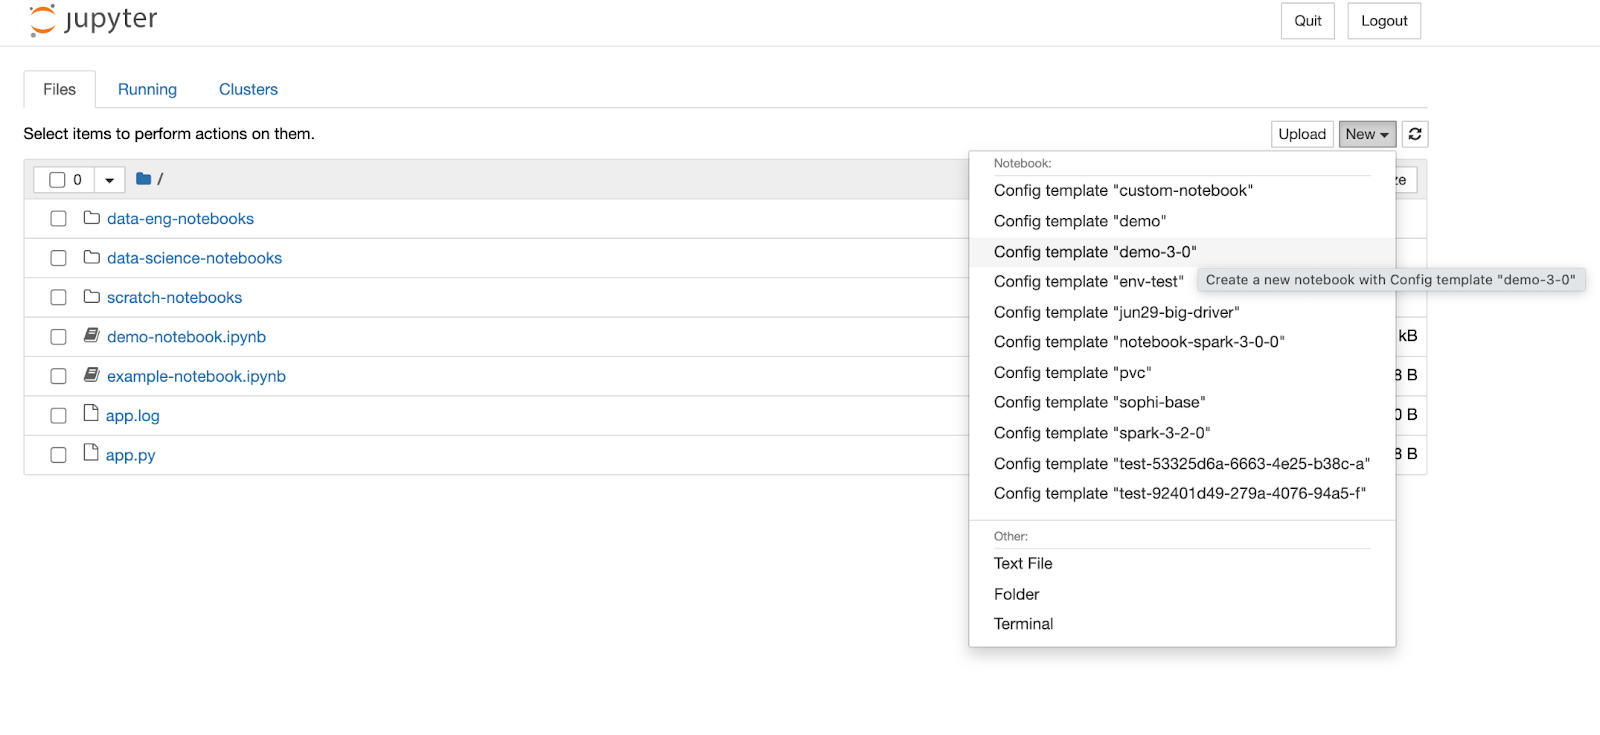
This will open the Jupyter UI in your browser just like before. However, when you go to create a new notebook, you will see a list of Kernels to choose from. These kernels refer to Ocean for Apache Spark configuration templates you have created in the UI, which effectively operate as Spark environments. Click on one of the terminals, and a new notebook will open that is using the Ocean Spark environment as its kernel.
Once you have selected a Notebook kernel/config template, a new Notebook window will open, and the Ocean for Apache Spark platform will begin spinning up a new containerized Spark application. Depending on the number of nodes currently running in your Kubernetes cluster, this could take a few seconds or a few minutes. Once the driver is ready, you should see a `kernel ready` icon appear in the upper right corner.
Now you can begin executing Spark code. The Ocean for Apache Spark platform manages the creation and stopping of the SparkSession, so you can begin referencing the `spark` object right away.
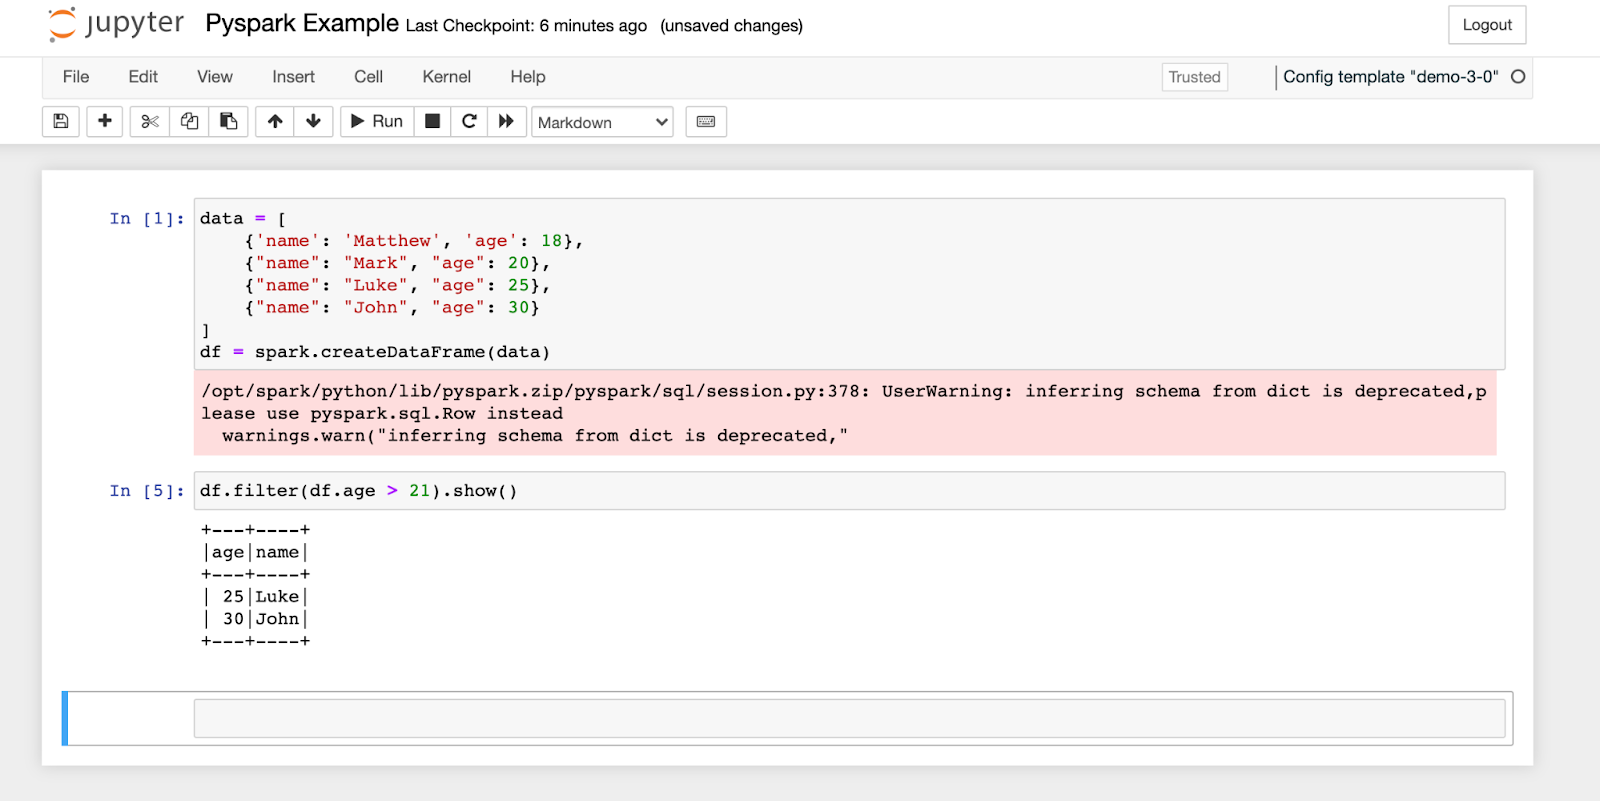
And that’s it! You can now run Spark code just like a PySpark shell. If you need to install Spark packages or pip libraries, you can add them directly to the Docker image that your configuration template is referencing. You can also adjust the size and resources of the Spark Application in the configuration template. You can read more about configuration environments here – https://docs.spot.io/ocean-spark/configure-spark-apps.
Connecting local JupyterLab notebooks to Ocean for Apache Spark
The next iteration of the Jupyter platform is JupyterLab. JupyterLab has a flexible interface that allows users to configure multiple notebooks in a single, dashboard-like view. JupyterLab not only has full support for Jupyter notebooks, it also enables the use of text editors, terminals, data file viewers, and other custom components side by side with notebooks in a tabular work area. If your development environment consistently requires the use of multiple notebooks at one time, JupyterLab can drastically improve your developer experience and efficiency.
The JupyterLab installation is similar to installing Jupyter Notebooks. You can use pip directly, `pip install jupyterlab` or install with Homebrew, `brew install jupyterlab`. Once installed, the command to start JupyterLab looks very similar to Jupyter Notebook:
`jupyter lab –gateway-url=https://api.spotinst.io/ocean/spark/cluster/<cluster-id>/notebook \
–GatewayClient.auth_token=<your Ocean for Apache Spark API key> `
Once JupyterLab is running, you will see the notebook launcher interface. Select a pre-existing notebook from the file system on the left side of the dashboard, or start a new notebook by selecting a configuration template from the list of available kernels. You’ll quickly notice the UI is a significant improvement from Jupyter Notebooks, and contains a number of configuration options to improve your developer experience.
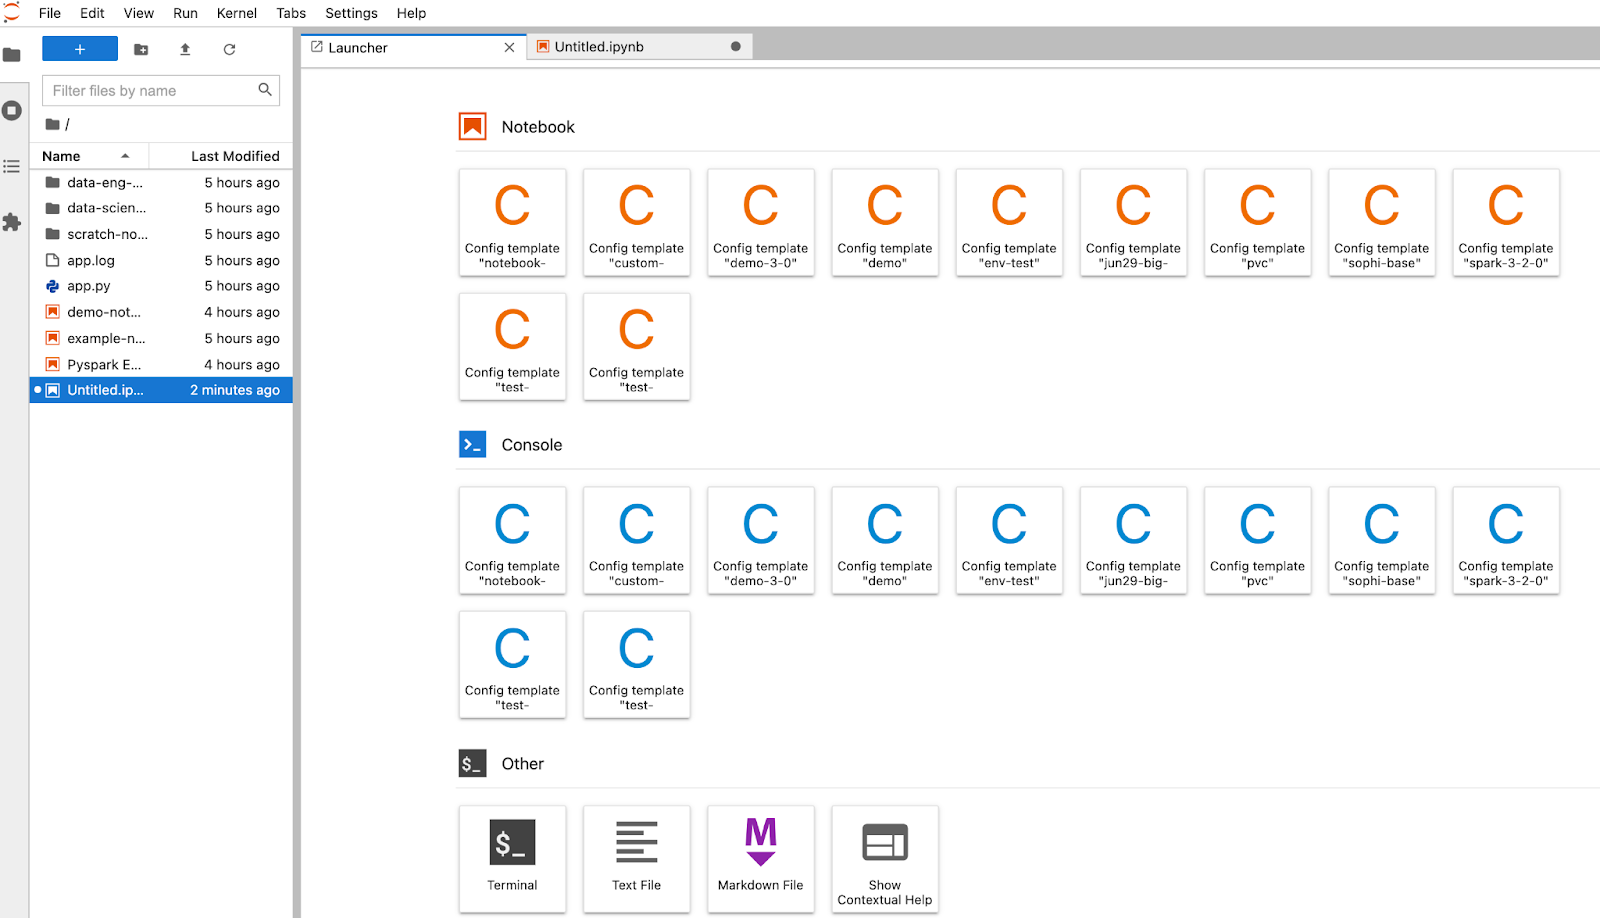
JupyterLab gives you the ability to open many notebooks in the same view. You can move the notebooks around the dashboard similar to browser tabs in a desktop. Each opened notebook will run within its own containerized Spark application (consisting of 1 Spark driver plus a variable number of executors) on Kubernetes. Each notebook can define its own configuration and Docker image. This can be especially useful when managing multiple versions of Spark, testing out new libraries or features, or monitoring the execution of long running applications or streaming jobs.

JupyterLab can also be run in a Docker container. This can be particularly useful if you want to separate your Juypter, Python, or Spark environments from your physical machine.There are also several JupyterLab extensions that allow you to integrate your JupyterLab environment with repositories like Github or BitBucket so you can add source control to your notebook environments.
Connecting hosted JupyterHub notebooks to Ocean for Apache Spark
For teams that rely heavily on Jupyter Notebooks and want to allow developers to collaborate and share progress across notebooks, JupyterHub provides a hosted notebook experience that can scale to support your team’s needs.
JupyterHub provides an API that allows for the management of users, role-based access control, incorporating services, managing active or long running notebooks, monitoring, event logging, and several other security or authentication features. You can configure JupyterHub to persist and access Notebooks stored in an object store like Amazon S3 or Google Cloud Storage.
JupyterHub can be deployed directly onto a cloud-hosted instance (ec2), or deployed as a Docker container, which should simplify your operations – for example making it easy to replicate your JupyterHub instance across your development environments like staging and production. You can find the JupyterHub docker repository here – https://hub.docker.com/r/jupyterhub/jupyterhub/
Like Jupyter Notebook and JupyterLab, JupyterHub can utilize the Ocean for Apache Spark backend as its execution kernel so you can run your Spark workloads at scale. Because JupyterHub is a hosted service, the configuration is a bit more complex. To make things easier, we have developed an example deployment built on top of Kubernetes with setup scripts and instructions. You can find that example here: https://github.com/spotinst/ocean-spark-examples/tree/main/jupyter-hub-example.
The example listed above has two options, JupyterHub deployment for a single user, or multiple profiles. If your team has multiple notebook users, choose the multiple profile configuration. For either deployment method, navigate to either the `config-profiles.yaml` or `config-singleuser.yml` file and replace any `auth_token` or `gateway_url` fields with your Ocean for Apache Spark API token and the URL of your Ocean for Apache Spark platform.
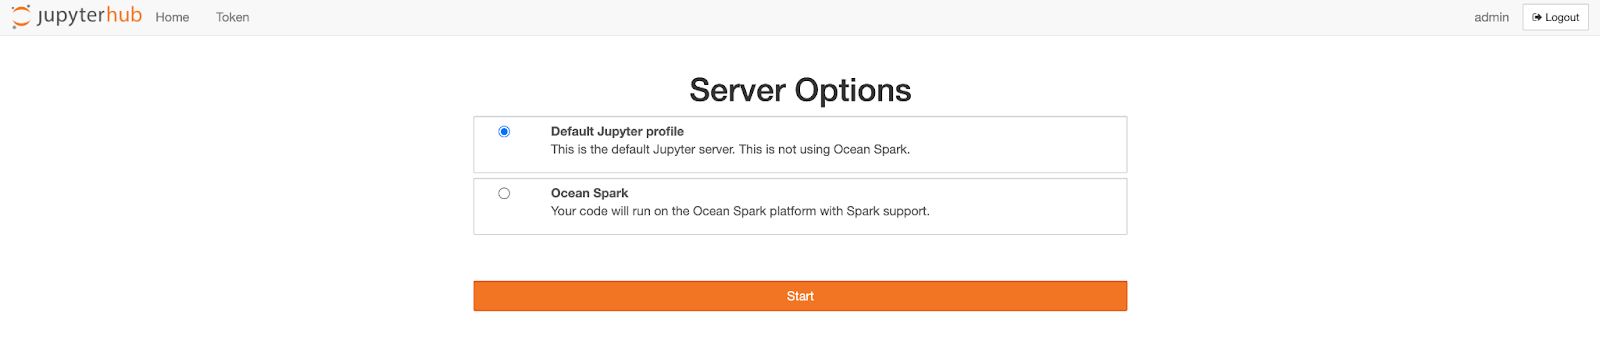
Run the make command that corresponds with your deployment method, and navigate to the browser where you will be able to register a profile or log in, access existing notebooks, or create new ones. Similar to Jupyter Notebook or JupyterLab, once you select a notebook, you will be prompted to select a kernel that reflects your Ocean Spark configuration templates. Once a notebook and kernel have been selected, a containerized Spark application will spin up and begin executing your Spark workloads.
Conclusion
We hope this tutorial has given you a taste on how to connect Jupyter notebooks to our serverless Spark-on-Kubernetes service. Notebooks are a great way to develop Spark applications and explore data interactively.
Ocean Spark enables dynamic allocation on notebooks by default, to make sure they do not consume resources when they go idle. Ocean Spark also gives you a simple way to edit your notebook configuration (update your docker image, install additional libraries, request specific resources for your Driver or Executor) through the configuration template mechanism. Schedule a time with our team to see this during a live demo!