 Microsoft Azure
 Cloud Financial Management (FinOps)
 How to Operationalize FinOps

Last week, AWS and NetApp announced the general availability for AWS FSx for NetApp ONTAP. In this blog post, we’ll go through the steps to create a FSx for ONTAP filesystem, and you’ll learn how to create volumes using Kubernetes resources with Astra Trident, and how to mount those volumes to pods.
As a prerequisite, make sure to register to the Spot platform, connect your AWS account and have a Kubernetes cluster connected to Ocean using the following guides.
Filesystem Creation
Please note: You can also create your FSx for ONTAP with NetApp Cloud Manager
Go to the AWS FSx dashboard and select Create file system.
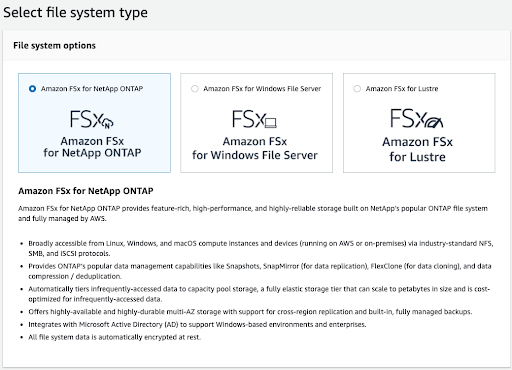
Select Amazon FSx for Netapp ONTAP as the File system type:
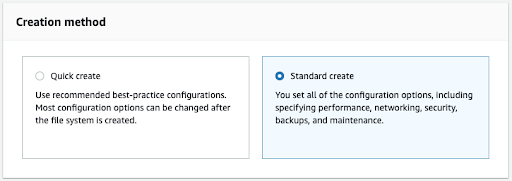
Select the Standard creation method:
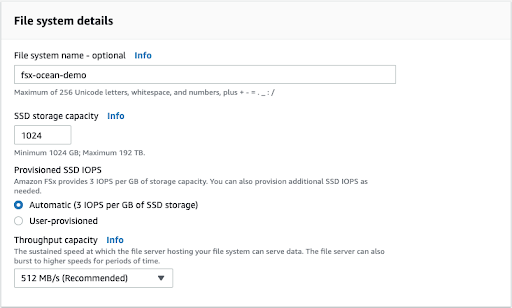
In the file system details screen specify a name for the File system and decide upon its capacity & performance.
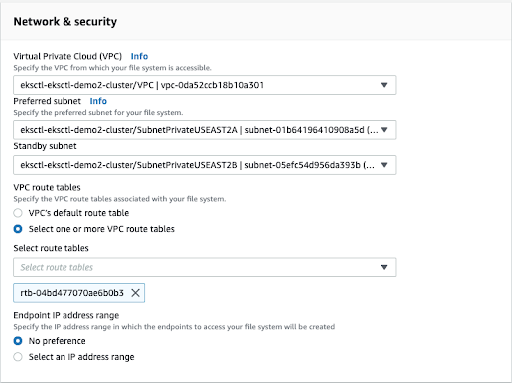
In the network and security section, choose the VPC on which your Kubernetes cluster connected to Ocean is running on. Specify the subnets on which you’d like the file system to be created on. In the VPC route tables section, select the route tables that the subnets specified above are associated with.
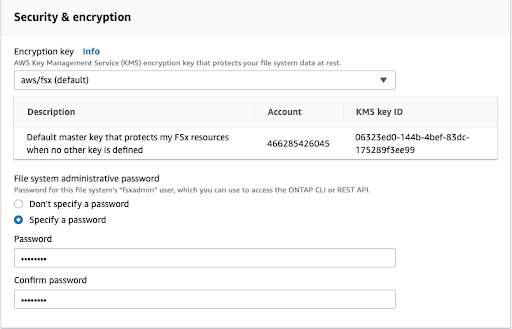
In the security and encryption section specify a password in the file system administrative password (the password is set for a user names “fsxadmin” on the file system)
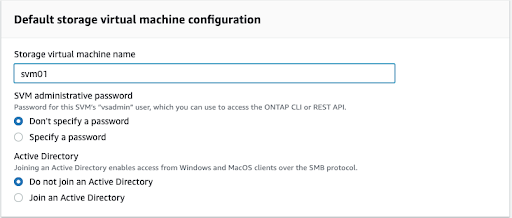
As part of the filesystem creation process, a Storage Virtual Machine (SVM) will also be created, SVMs allow you to segregate your filesystem to multiple logical filesystems.
Specify the SVM name:
These are the configurations needed for our setup, you are welcome to specify/modify additional configurations.
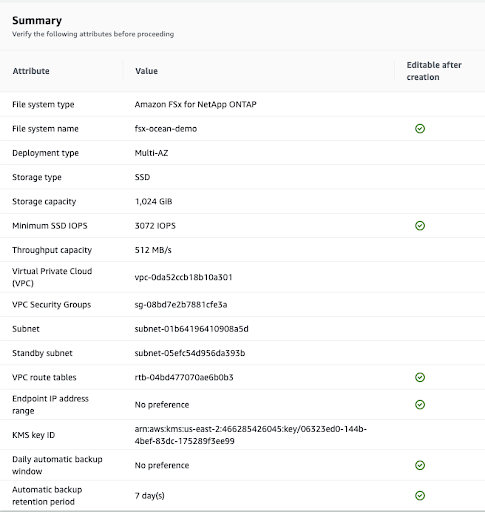
Click next and you’ll see a summary of the file system details:
Click “Create file system”. Note, the creation process will take approximately 20 minutes.
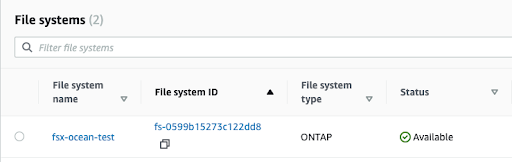
Once the file system reaches an available state, the FSx for ONTAP File system is ready for consumption.
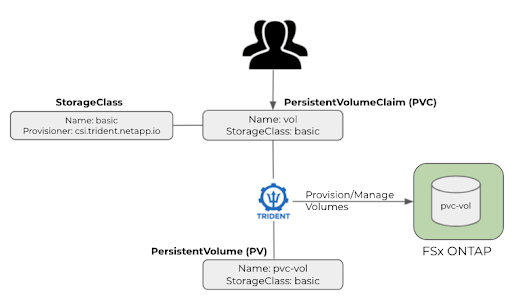
Volume Creation
We want to use Kubernetes resources to manage our file system (create/remove volumes from it). To do that, we’ll use Astra Trident as our CSI.
Configure the AWS FSx for NetApp ONTAP as a backend for Astra Trident and create the relevant StorageClass. Following that we’ll be able to consume PersistentVolumes & PersistentVolumeClaims from our FileSystem.
Astra Trident
Deploy Astra Trident using the following guide.
After deploying Astra Trident we will now have to create a backend configuration for it. Run the following to create the backend-ontap-nas.yaml file.
cat << EOF > backend-ontap-nas.yaml
apiVersion: trident.netapp.io/v1
kind: TridentBackendConfig
metadata:
name: backend-tbc-fsx-ontap-nas
spec:
version: 1
backendName: fsx-ontap
storageDriverName: ontap-nas
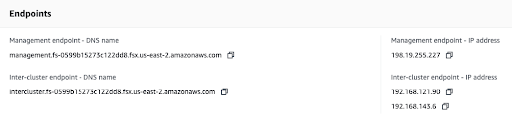
managementLIF: management.fs-0599b15273c122dd8.fsx.us-east-2.amazonaws.com
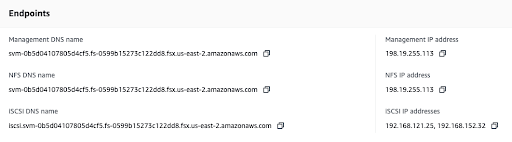
dataLIF: svm-0b5d04107805d4cf5.fs-0599b15273c122dd8.fsx.us-east-2.amazonaws.com
svm: svm01
credentials:
name: backend-tbc-fsx-ontap-nas-secret
---
apiVersion: v1
kind: Secret
metadata:
name: backend-tbc-fsx-ontap-nas-secret
type: Opaque
stringData:
username: fsxadmin
password: password
EOF
Modify the values as follows:
- backendName to your liking.
- managementLIF – Go to your file system view on the Amazon FSx dashboard, under the Network and Security tab find the Endpoints section and fetch the Management endpoint

- dataLIF – Go to the StorageVirutalMachine and search for the Endpoints section
- svm – the StorageVirtualMachine name
- password – the password you’ve specified earlier during the creation of the file system
Create the TridentBackendConfig resource using kubectl:
➜  trident-installer k -n trident create -f backend-ontap-nas.yaml
tridentbackendconfig.trident.netapp.io/backend-tbc-fsx-ontap-nas created
secret/backend-tbc-fsx-ontap-nas-secret created
Trident is now connected to the Filesystem through the backend configuration created
Creating a StorageClass
The next step is to create a Kubernetes StorageClass. Use the following command to create a storage-class-csi.yaml file:
cat << EOF > storage-class-csi.yaml
apiVersion: storage.k8s.io/v1
kind: StorageClass
metadata:
  name: basic-csi
provisioner: csi.trident.netapp.io
parameters:
  backendType: "ontap-nas"
  fsType: "__FILESYSTEM_TYPE__"
allowVolumeExpansion: True
EOF
Apply the StorageClass
kubectl apply -f storage-class-csi.yaml
You should now be able to see the configured StorageClass with the following command:
kubectl get storageclasses
NAME            PROVISIONER             RECLAIMPOLICY   VOLUMEBINDINGMODE
ALLOWVOLUMEEXPANSION   AGE
basic-csi       csi.trident.netapp.io   Delete          Immediate              false                  16h
Create/consume volumes from our Filesystem
We are now ready to consume storage from our Filesystem, let’s create a PVC:
kubectl apply -f sample-input/pvc-samples/pvc-basic-csi.yaml
You should be able to see the PVC by running the following command:
kubectl get pvc
NAME        STATUS   VOLUME                                     CAPACITY   ACCESS MODES   STORAGECLASS   AGE
basic   Bound    pvc-9d83906d-d3f0-4ac0-bf91-72a69720c1dc   1Gi        RWO            basic-csi      15h
Now that we have a volume ready, let’s have a pod that will consume it
Run the following command to create a task-pv-pod.yaml file and deploy it on the cluster:
cat << EOF > task-pv-pod.yaml
kind: Pod
apiVersion: v1
metadata:
  name: task-pv-pod
spec:
  volumes:
    - name: task-pv-storage
      persistentVolumeClaim:
       claimName: basic
  containers:
    - name: task-pv-container
      image: nginx
      ports:
        - containerPort: 80
          name: "http-server"
      volumeMounts:
        - mountPath: "/usr/share/nginx/html"
          name: task-pv-storage
EOF
kubectl create -f task-pv-pod.yaml
Let’s describe our pod. We can see that the volume was successfully attached:
kubectl describe pod task-pv-pod
Name:         task-pv-pod
Namespace:    default
Priority:     0
Node:         ip-192-168-180-255.us-east-2.compute.internal/192.168.180.255
Start Time:   Tue, 20 Jul 2021 10:54:33 +0300
Labels:       <none>
Annotations:  kubernetes.io/psp: eks.privileged
Status:       Running
IP:           192.168.164.62
IPs:
  IP:  192.168.164.62
Containers:
  task-pv-container:
    Container ID:   docker://b232c80e6cf06a1667661d8c930cf9296cec47dcd22f4896eaa02b2da6bf4080
    Image:          nginx
    Image ID:       docker-pullable://nginx@sha256:353c20f74d9b6aee359f30e8e4f69c3d7eaea2f610681c4a95849a2fd7c497f9
    Port:           80/TCP
    Host Port:      0/TCP
    State:          Running
      Started:      Tue, 20 Jul 2021 10:54:38 +0300
    Ready:          True
    Restart Count:  0
    Environment:    <none>
    Mounts:
      /usr/share/nginx/html from task-pv-storage (rw)
      /var/run/secrets/kubernetes.io/serviceaccount from default-token-jg9wc (ro)
Conditions:
  Type              Status
  Initialized       True
  Ready             True
  ContainersReady   True
  PodScheduled      True
Volumes:
  task-pv-storage:
    Type:       PersistentVolumeClaim (a reference to a PersistentVolumeClaim in the same namespace)
    ClaimName:  basic
    ReadOnly:   false
  default-token-jg9wc:
    Type:        Secret (a volume populated by a Secret)
    SecretName:  default-token-jg9wc
    Optional:    false
QoS Class:       BestEffort
Node-Selectors:  <none>
Tolerations:     node.kubernetes.io/not-ready:NoExecute op=Exists for 300s
                 node.kubernetes.io/unreachable:NoExecute op=Exists for 300s
Events:
  Type    Reason                  Age   From                     Message
  ----    ------                  ----  ----                     -------
  Normal  Scheduled               14s   default-scheduler        Successfully assigned default/task-pv-pod to ip-192-168-180-255.us-east-2.compute.internal
  Normal  SuccessfulAttachVolume  14s   attachdetach-controller  AttachVolume.Attach succeeded for volume "pvc-9d83906d-d3f0-4ac0-bf91-72a69720c1dc"
We can also run the following command against the pod to see that the volume is actually mounted and reachable:
kubectl exec -it task-pv-pod -- df -h /usr/share/nginx/html
Filesystem                                                     Size  Used Avail Use% Mounted on
1.1.178.130:/trident_pvc_9d83906d_d3f0_4ac0_bf91_72a69720c1dc  1.0G  256K  1.0G   1% /usr/share/nginx/html
Tip – You can also consume Block storage (iSCSI) from the FSx for ONTAP Filesystem.
Summary
FSx for ONTAP provides a fully managed shared file system and block storage volumes that is easily exposed to Kubernetes pods/jobs using Astra Trident, Ocean handles the infrastructure required by the provisioned pods making sure they all have the best and most efficient resources to run on. Combined, they create a truly serverless & storageless experience, allowing customers to focus their resources on their main businesses rather than handling infrastructure.